
FSP’s newly launched large-sized case, the CUT610, features a full acrylic side-through design, accommodating various motherboard sizes including E-ATX, ATX, M-ATX, and Mini-ITX. This case is equipped with 9 PCIe slots, supporting dual graphics cards up to 390mm in length. For cooling, it comes with three 140mm silent fans at the front and two 140mm silent fans at the rear. The top of the case can house either three 120mm fans or a 360mm water cooler, with a maximum tower cooler height support of 180mm.
Key Specifications of the FSP CUT610:
- Model: CUT610
- Color: Black
- Dimensions (LxWxH): 465x235x565mm
- Material: 0.7mm SPCC and Acrylic
- Supported Motherboard Types: E-ATX, ATX, M-ATX, Mini-ITX
- 3.5″ Drive Bays: 2
- 2.5″ Drive Bays: 2
- I/O Panel: 2 USB3.0 ports, 1 USB2.0 port, 1 Type-C port
- Expansion Slots: 9+2
- Power Supply Support: 160mm ATX
- Maximum CPU Cooler Height: 180mm
- Maximum Graphics Card Length: 390mm
- Fan Support: Front – 120mm x 4 or 140mm x 3 or 360mm water cooler, Top – 120mm x 3 or 360mm water cooler, Rear – 120/140mm x 2
- Water Cooling Support: 360mm / 240mm
- Standard Fan Configuration: Front 140mm x 3, Rear 140mm x 2
Comprehensive Review of FSP CUT610 Case: Versatile Cooling Options and Robust Design Features
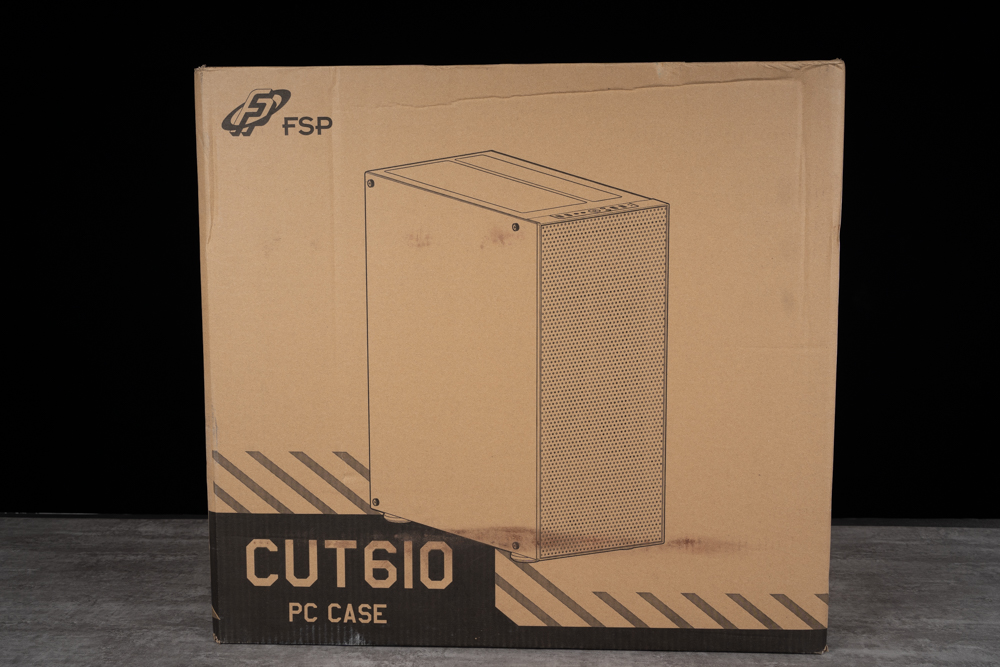
The front of a cardboard box for the FSP CUT610 PC case. The box features a graphic outline of the PC case with a mesh-like pattern on the front, indicative of a possible ventilation area. The FSP logo is visible in the upper left corner, and the product name “CUT610 PC CASE” is prominent at the bottom. The box’s overall aesthetic suggests a straightforward, utilitarian design, likely reflecting the case’s functional focus.

The back of the cardboard box for the FSP CUT610 PC case, displaying an exploded view of the case itself. This type of illustration is often used to give a detailed view of the product’s internal structure and component parts. It seems to highlight the modular design, showcasing the side panels, the framework including the drive bays, and the potential placement for cooling fans or radiators.
The exploded diagram is a technical drawing that indicates the case’s capacity for customization and maintenance, such as easy access for upgrades and installation of components. This type of packaging design is informative and can serve as a quick guide to the PC case’s features and assembly for potential buyers even before they open the box.
A straightforward, classic design with an all-black exterior that embodies a conventional and squared structure. The front panel is characterized by a fine mesh metal design that facilitates ventilation, enhancing airflow to cool internal components effectively. This panel is designed to be removed from the bottom in a traditional manner, which might appeal to users who appreciate a classic approach to case design. The inside includes a non-removable dust filter, which serves to keep the internal environment of the PC clean, thereby potentially prolonging the lifespan of the hardware components.
This minimalist and functional design could appeal to users looking for a sleek and professional-looking PC case. The emphasis on ease of access and maintenance, along with the built-in features aimed at preserving the system’s cleanliness, reflects a thoughtful consideration of both aesthetics and functionality.
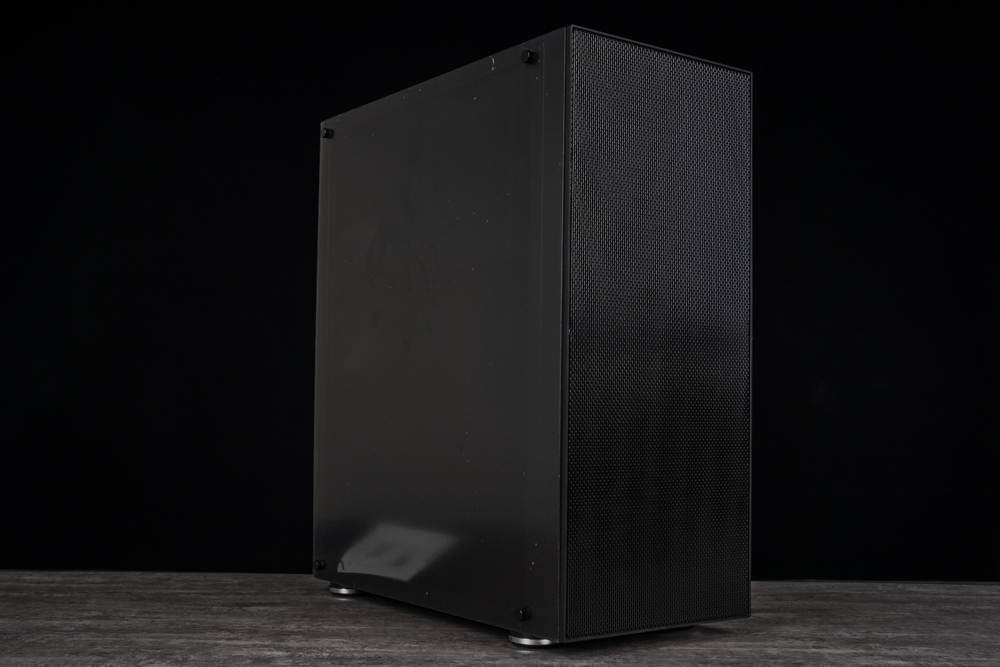
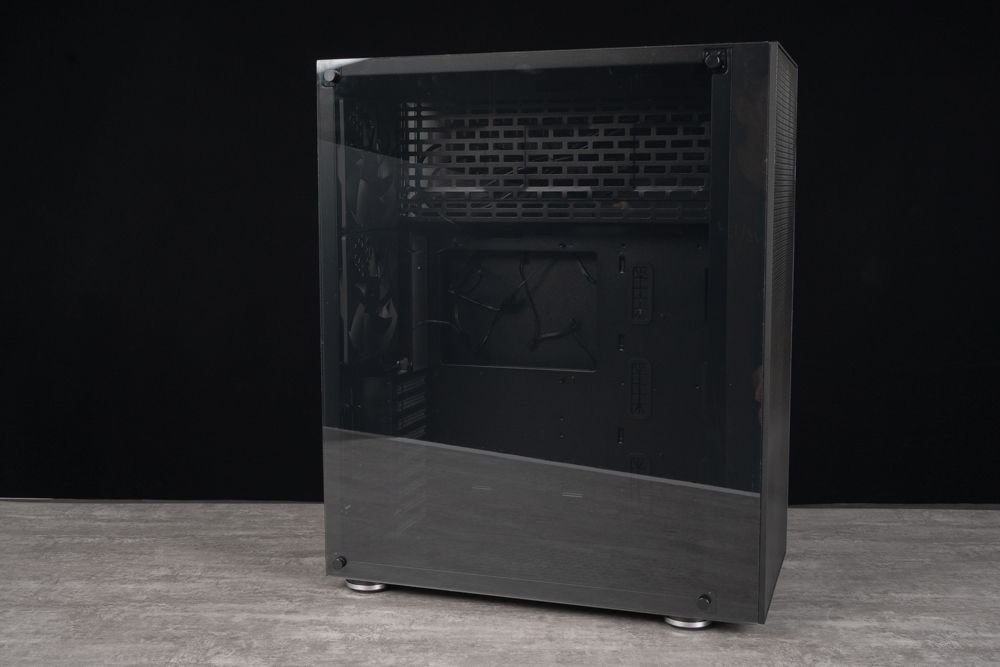
The case is depicted from a side angle, emphasizing its full black design. The front panel is clearly visible with its fine mesh metal pattern, which serves both an aesthetic and functional purpose, allowing for efficient airflow while also filtering out dust. The case’s design is sleek and minimalistic, with a uniform color scheme that would easily blend with various setups, making it versatile for different user preferences.
The case stands on small, round feet that provide a slight elevation, likely contributing to better airflow and stability. The side panel seems to be solid, without any visible windows or vents, which may be preferred by users who opt for a clean, uninterrupted look or who prioritize noise reduction over the ability to view internal components.
The overall appearance of the CUT610 speaks to a design philosophy that values simplicity, functionality, and a professional aesthetic, which could be particularly appealing to users who seek a modern and understated look for their PC build.
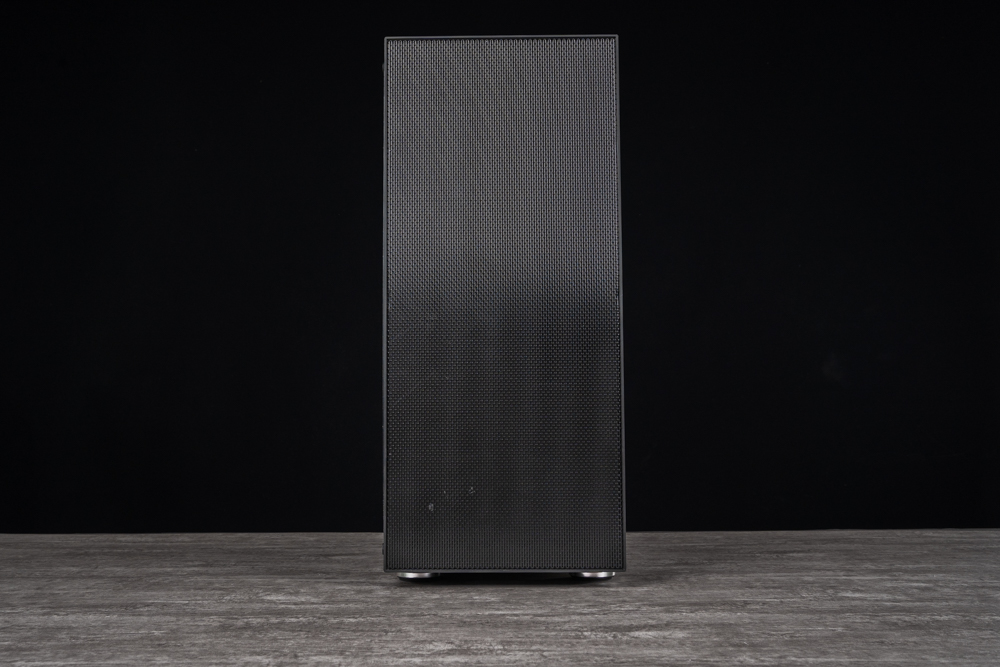
The FSP CUT610’s front panel, which features a detailed, fine mesh metal design. This panel is not only aesthetically pleasing with its sleek, understated look, but it’s also functionally significant. The mesh design allows for optimal airflow, facilitating better cooling for the internal components of the PC while acting as a dust filter to maintain a clean system environment.
The use of such a panel is a common feature in PC case design, aimed at balancing the needs for effective cooling and dust minimization without compromising on the external look of the case. The elevation at the bottom suggests that the case is designed to intake air from the front and possibly from underneath, promoting circulation and helping to prevent overheating.
The minimalist design approach, with no flashy elements or branding disrupting the mesh pattern, aligns with modern trends in PC case aesthetics, where the focus is on clean lines and functionality. This design choice is likely to appeal to both gamers and professional users who prefer a sophisticated look for their computer systems.
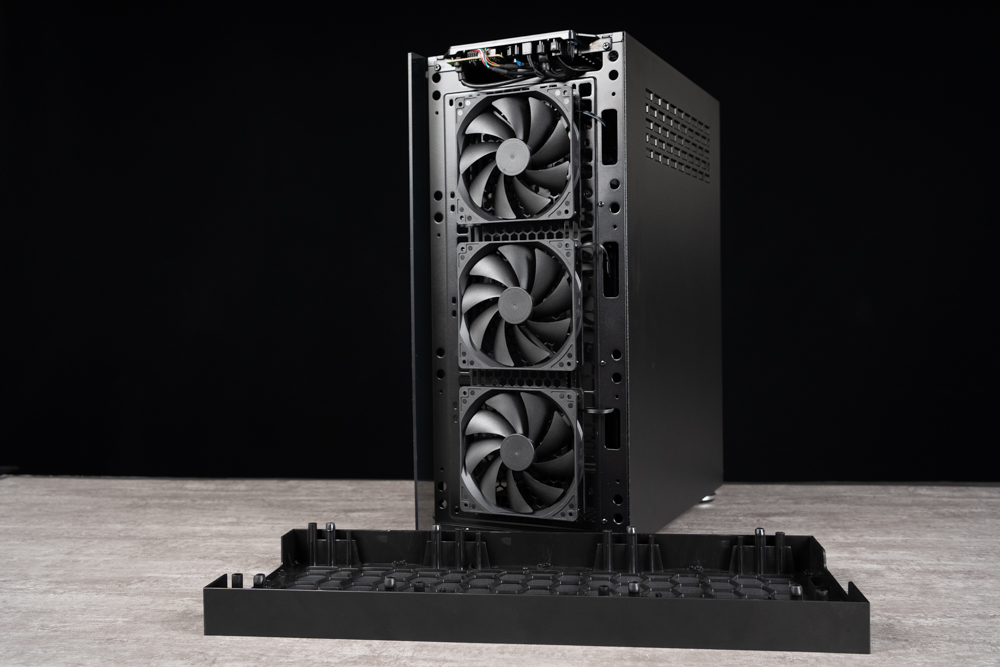
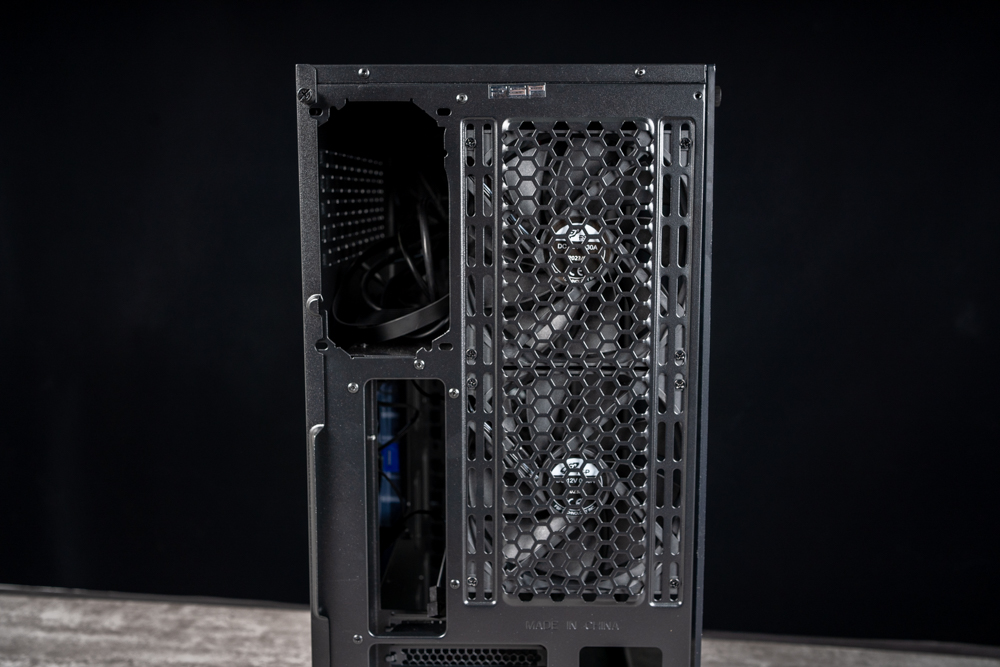
The FSP CUT610 PC case with the front panel removed, revealing the fan setup behind it. This particular configuration features three large fans mounted vertically, which suggests a strong emphasis on front intake airflow to cool the components inside efficiently.
The case’s open front bay area is designed to allow for maximum air intake, which is crucial for maintaining optimal temperatures during heavy computer use, such as gaming or intense computational tasks. The removed front panel also indicates the ease of access for maintenance or upgrades, a feature that is valued by PC builders who frequently modify their setups.
With the front panel off, we can also see the internal dust filter which sits just behind where the panel would be. This is a feature that helps to minimize the ingress of dust into the case, keeping internal components cleaner and potentially extending their lifespan. The design appears to be user-friendly, considering the needs of those who want both functionality and simplicity in their PC case design.
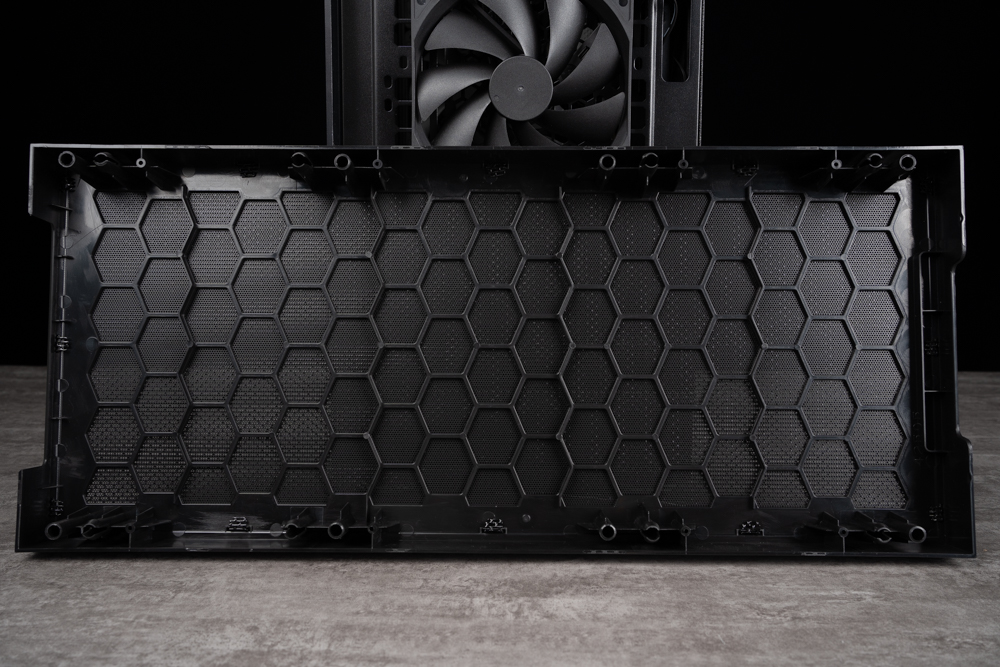
The front panel of the FSP CUT610 PC case highlights the non-removable dust filter. This filter features a hexagonal pattern that is both functional and visually appealing. The design of the mesh is optimized to block dust particles while allowing maximum airflow, which is crucial for maintaining optimal thermal performance of the internal components.
The presence of a fixed dust filter simplifies maintenance, as it eliminates the need for regular removal and cleaning that detachable filters require. Users can simply use a vacuum or compressed air to clean the dust filter through the mesh, ensuring that the interior of the case remains clean with minimal effort.
This integrated approach to dust filtration is a thoughtful detail that underscores the case’s design focus on user convenience and system longevity. It caters to the needs of users who want a balance between high-performance cooling and low maintenance.
The features of an acrylic side panel on the FSP CUT610 case. Acrylic panels offer a full view inside the case, and they come with protective films applied during manufacturing to prevent scratches during transit. These panels are typically secured at the corners with hand-tightened screws, which makes them easy to remove without tools.
While acrylic is more prone to scratching compared to glass, it also has advantages. It’s less transparent than glass, which can give the case a different visual appeal, and more importantly, it’s flexible and shatter-resistant, providing durability and safety from breakage.
When comparing acrylic to tempered glass, each material has its pros and cons. Acrylic is lighter and safer but less scratch-resistant and clear. On the other hand, tempered glass is heavier and can shatter but offers a premium, crystal-clear view and is more resistant to scratches.
For those building a PC, the choice between acrylic and glass may come down to personal preference, the importance of the case’s appearance, and the intended use or placement of the PC. If you need to maintain a pristine look, glass might be the preferred choice, but for transport or environments where the case might be bumped or moved regularly, acrylic could be the safer option.
The FSP CUT610 case after the protective film has been removed from the acrylic side panel. The clarity of the panel is significantly enhanced, offering a much clearer view of the interior of the case. This clarity allows for a better display of the case’s contents, which is a desired feature for those who want to showcase their PC’s components, lighting, and overall build aesthetics.
The acrylic side panel allows users to observe the internal workings of their PC without opening the case, providing both a functional and aesthetic benefit. The panel’s transparency after removing the protective film suggests a high-quality acrylic material, which can offer a glass-like appearance while maintaining the resilience and shatter resistance that acrylic is known for.
Acrylic side panels are a popular choice for PC enthusiasts who want to create a visually appealing computer setup. The use of thumb screws at the corners for securing the panel facilitates easy removal and installation, which is convenient for users who regularly upgrade or tweak their PC components.
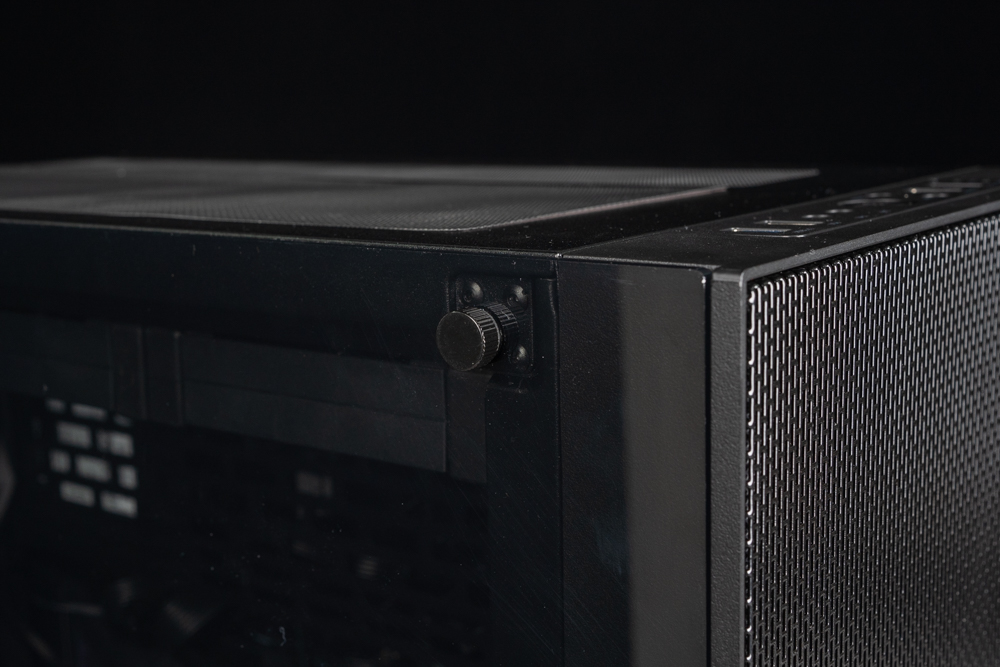
The corner of an acrylic side panel on a computer case, likely the FSP CUT610. It clearly shows the thumb screw which is used to secure the panel in place. These types of screws are convenient because they can be tightened or loosened by hand without the need for additional tools, making the process of accessing the inside of the case quick and easy.
Thumb screws are a popular feature in modern PC cases as they enhance the user’s ability to perform maintenance, upgrades, and modifications to their system with ease. They are especially appreciated by PC enthusiasts who frequently tweak their hardware.
The use of acrylic for the side panel, as opposed to glass, also suggests that the case is designed to be durable and less prone to shattering, offering a safer option for transport and regular handling. Despite being more scratch-prone than glass, acrylic panels are lighter and can provide a similar level of transparency to display the case’s interior components.
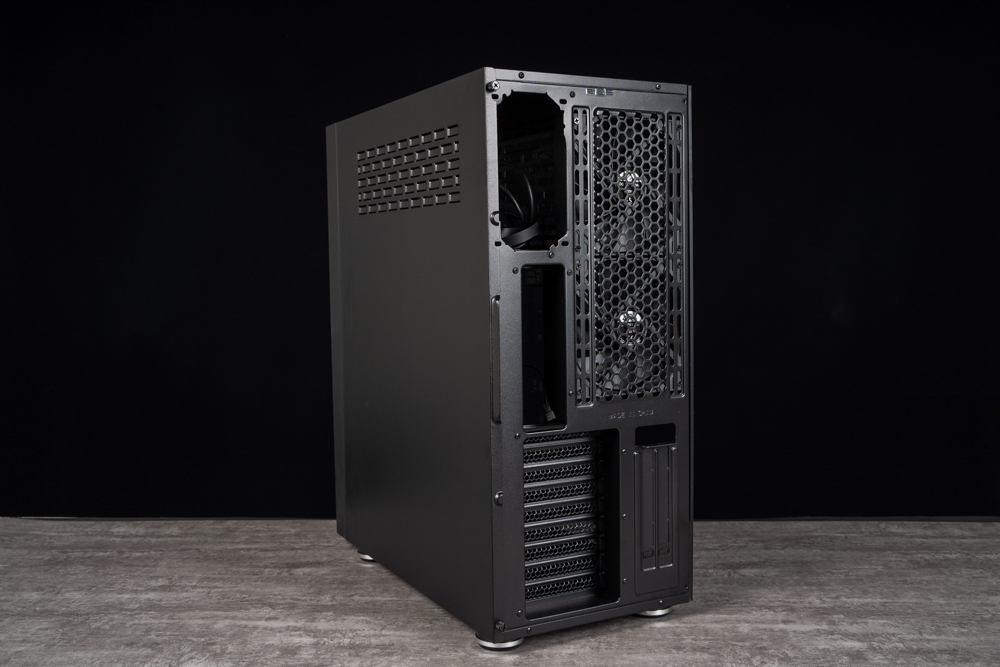
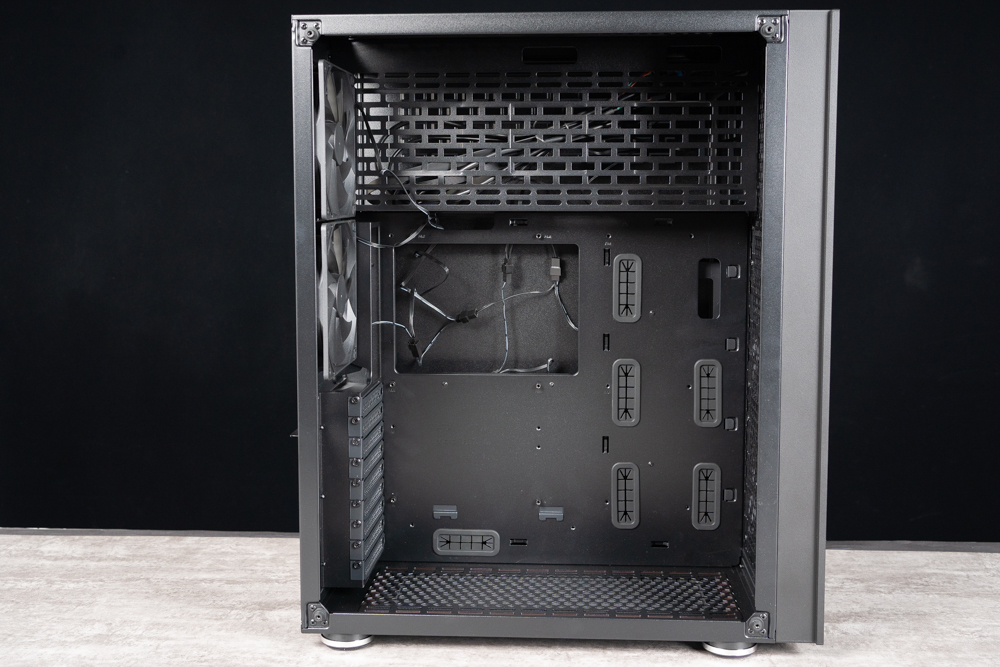
The rear-right perspective of the FSP CUT610 PC case highlights its distinctive configuration. Notably, the power supply unit (PSU) is installed upright at the top of the case, which is an unconventional choice compared to the more common bottom-mounted PSU design seen in many modern cases. This strategic placement of the PSU contributes to a more spacious lower rear section of the case, allowing for the installation of two additional fans, either 120mm or 140mm in size, to enhance the system’s cooling capabilities.
The case’s design also features ventilation holes located at the top-right side to facilitate airflow and heat dissipation from the power supply area. This aids in preventing heat accumulation inside the case, ensuring that the system maintains a cooler operating temperature which is crucial for optimal performance and longevity of the components.
Below the PSU area, the case boasts a generous provision of 9 PCIe slots, which offers flexibility for multi-GPU setups, such as dual graphics cards, or for installing other PCIe expansion cards. This level of expandability is a significant advantage for users who may want to upgrade their system or require additional hardware for enhanced performance or connectivity.
Overall, the FSP CUT610’s design choices around the PSU placement and rear fan configuration demonstrate a focus on maximizing internal space and promoting efficient cooling solutions, which are essential considerations for high-performance PC builds.
A closer look at the unique vertical placement of the power supply unit (PSU) in the FSP CUT610 PC case. This orientation is less common than the traditional horizontal placement found in most cases. The vertical position of the PSU can potentially contribute to better case airflow and make for an overall more efficient cooling system, as it allows more space for air movement or additional fans in the lower part of the case.
The rear of the case also features a honeycomb mesh design which is optimized for ventilation, further enhancing the cooling efficiency by allowing for hot air to exit from the back of the case effectively. This design choice underscores a commitment to maintaining optimal temperatures within the PC, which is especially beneficial for high-performance setups that generate more heat.
The picture also shows the PSU mounted at the top right, with a visible cutout for the PSU’s fan, ensuring it has enough ventilation for its own cooling needs. This design choice may influence the overall thermal dynamics of the case, providing a distinct cooling advantage.
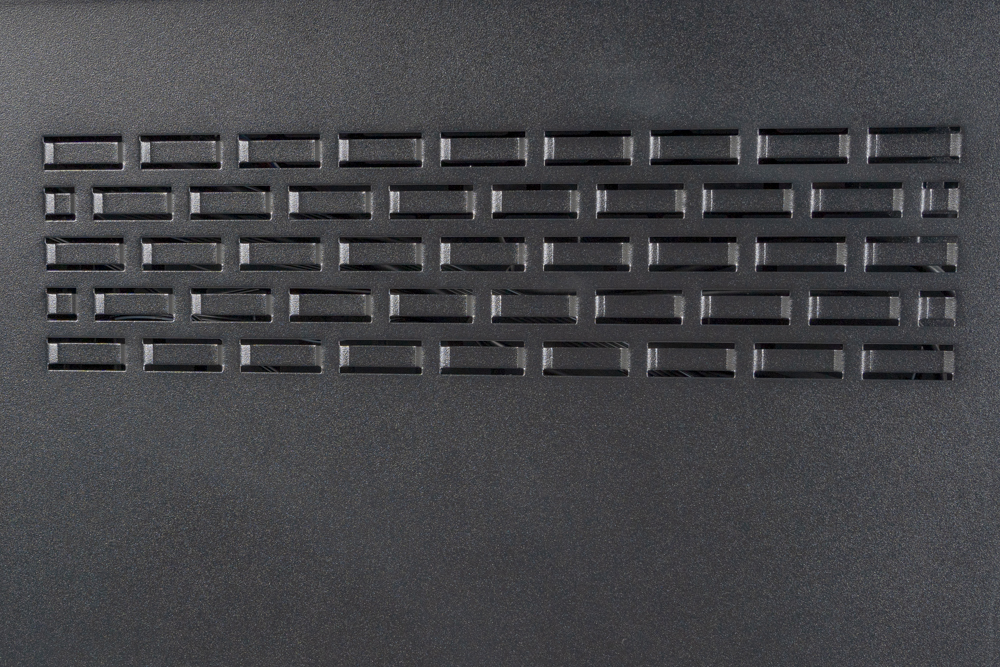
A close-up of the ventilation holes on the side of a computer case, likely located near the top of the right side when viewed from the front. This venting pattern is designed to facilitate air exchange, allowing warm air inside the case to escape and cooler air from the outside to enter, which can help maintain an optimal operating temperature for the internal components.
The slots are rectangular with rounded edges, which is a common design that balances airflow efficiency with dust filtration. The specific layout and positioning of these vents near the top of the case might also suggest they’re aligned with a particular internal component that requires additional cooling, such as the CPU area, especially if there is a tower cooler installed that directs air toward the back or top of the case.
Effective case ventilation is crucial for high-performance computing where components can generate significant heat. The design shown in the image indicates a thoughtful approach to thermal management in the case’s construction.
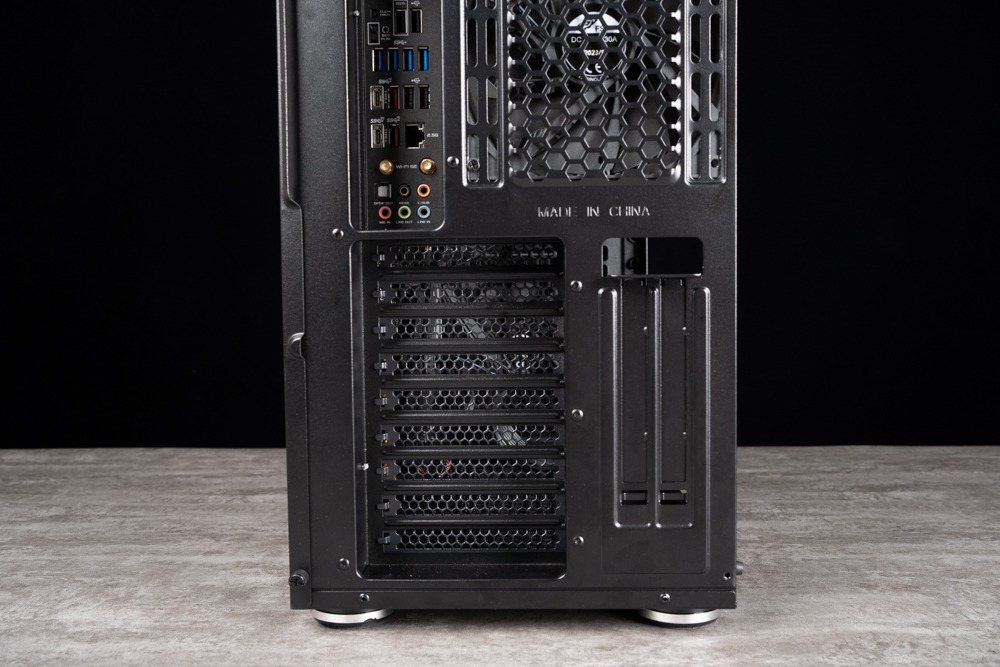
The back of a PC case with 9 PCIe expansion slots, indicates support for multi-GPU configurations such as dual graphics cards. This feature is particularly beneficial for users interested in high-performance computing tasks, such as gaming, rendering, or machine learning applications that can leverage the power of multiple GPUs.
Having 9 slots also provides flexibility for other types of expansion cards and ensures that users won’t be limited by space when building their systems. The layout and design suggest that the case is geared toward enthusiasts and professional users who require robust expansion capabilities.
The presence of multiple PCIe slots is an important aspect for future-proofing a PC build, allowing for upgrades and additions of new hardware over time. This is a significant advantage for those who might want to expand their system’s capabilities without changing the entire case.
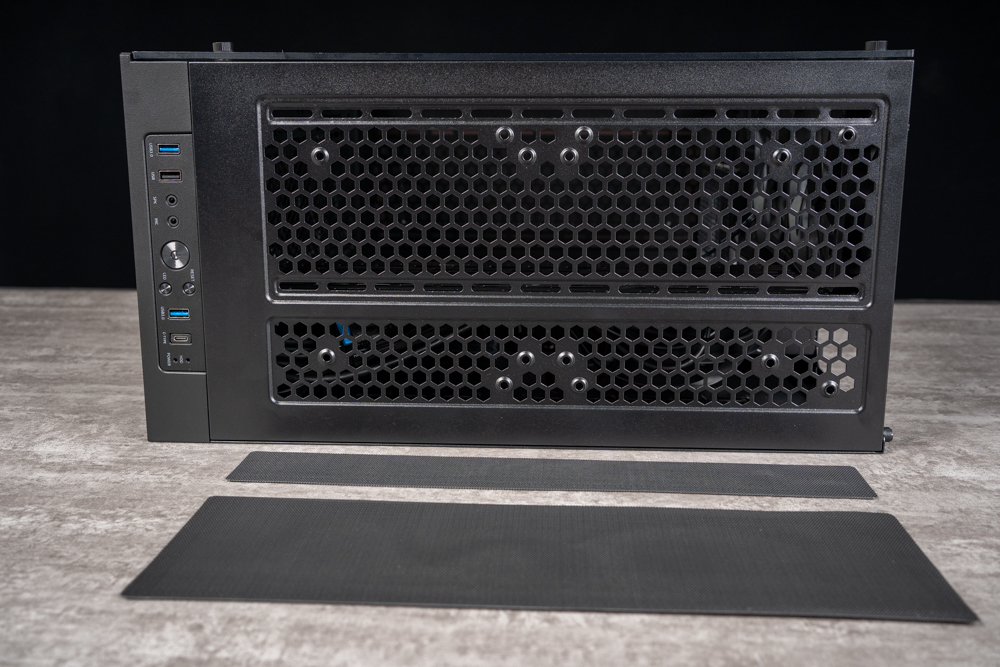
The top section of a PC case, which appears to be the FSP CUT610. It features a honeycomb-style mesh design for the vent holes, coupled with a magnetic dust filter. This combination not only promotes efficient airflow but also simplifies maintenance by making it easy to remove and clean the filter.
The case is designed to support advanced cooling solutions, accommodating up to three 120mm fans or a 360mm radiator for water cooling, which is ideal for users looking to build a high-performance system with superior thermal management.
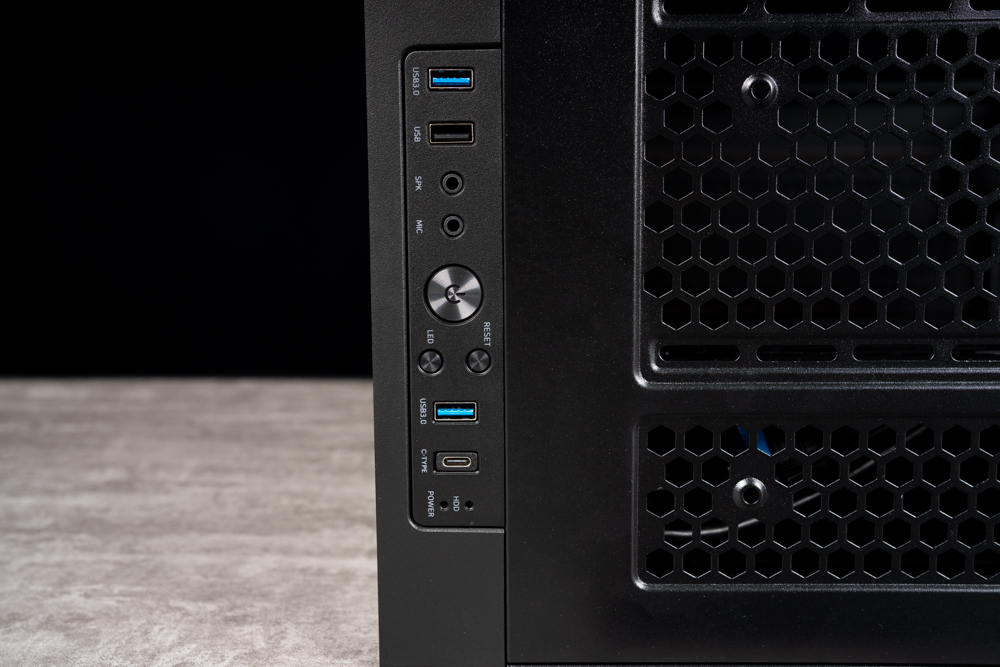
The image displays the case’s top-mounted I/O panel that includes a variety of ports and controls for easy access. The I/O panel comprises power and reset buttons, two USB 3.0 ports, one USB 2.0 port, a USB Type-C port, and audio jacks for a microphone and headphones, as well as an LED control button. This array of connectivity options is convenient for users, offering ample possibilities for connecting a wide range of peripherals and devices. The LED control button is a nice touch for users who have LED lighting within their setup, allowing for easy control over lighting effects.
The top placement of these I/O ports and controls is a thoughtful design choice, making them easily reachable when the case is placed on the floor or within a desk setup. The inclusion of a USB Type-C port is particularly noteworthy, as it shows a commitment to modern standards and the needs of users who may have newer devices that utilize this type of connection.
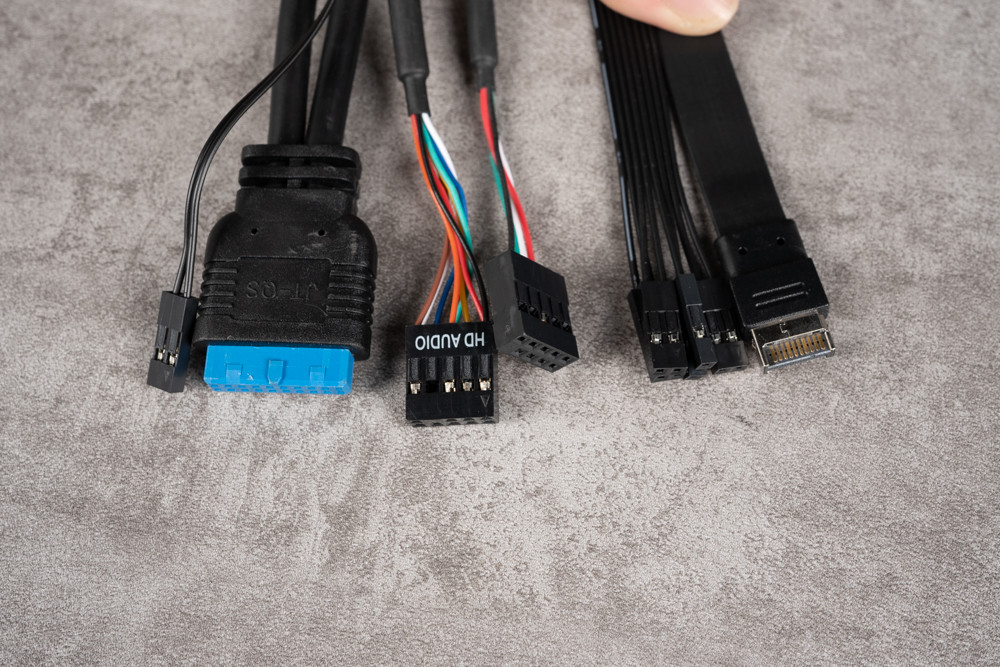
A variety of internal cables commonly used to connect the front panel inputs and outputs (I/O) of a computer case to the motherboard. These typically include connectors for USB ports, audio jacks, and sometimes buttons or switches for power and reset functions. Here’s a brief explanation of the types of cables shown:
- USB Connector: The large blue one is likely a USB 3.0 connector that enables high-speed USB ports on the front panel of the case.
- Audio Connector: The cable labeled ‘HD AUDIO’ connects to the motherboard to enable the case’s headphone and microphone jacks.
- Front Panel Connectors: These small, individual connectors are usually for the power button, reset button, power LED, and hard drive activity LED. They have to be plugged into the specific pins on the motherboard according to the manual.
- SATA Connector: This flat, wide cable is a SATA data cable, used to connect storage devices like SSDs and HDDs to the motherboard.
- Other Connectors: There may also be connectors for additional features such as a USB Type-C port if supported by the case.
When building a PC, it’s important to refer to the motherboard’s manual to know exactly where to plug each of these cables. Proper connection ensures that all front I/O ports and case buttons will function as intended.
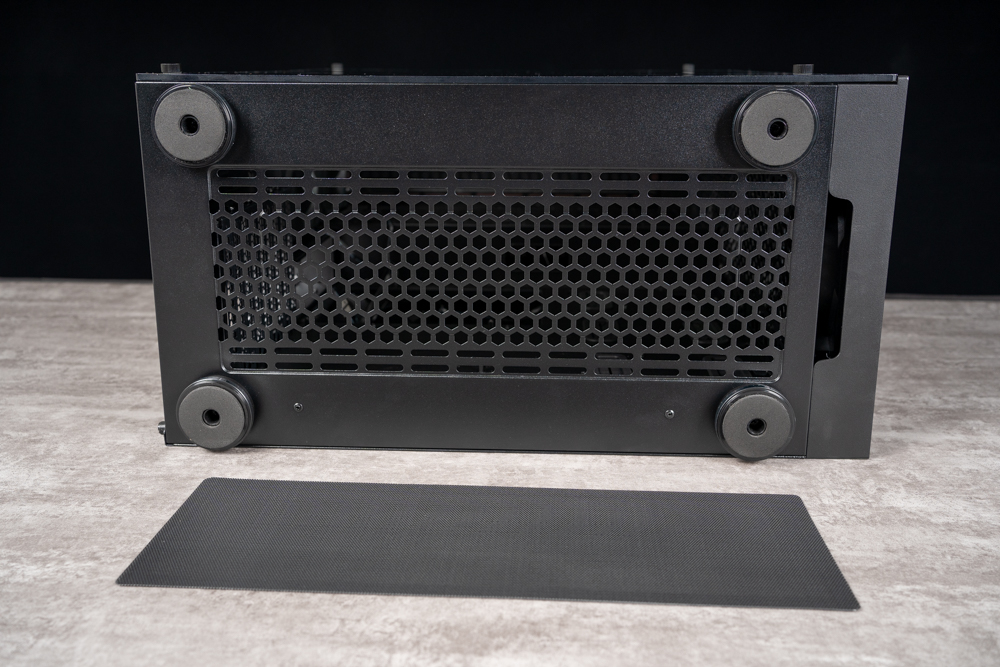
The bottom part of a PC case highlights its design features for cooling and dust prevention. The case includes ventilation holes, likely for additional airflow to components such as the power supply unit, and is equipped with a dust filter to maintain a clean interior environment. The cylindrical feet elevate the case, enhancing air circulation underneath and contributing to the overall cooling strategy. These feet are accented with a silver ring, adding a decorative touch that makes the case stand out visually.
The inclusion of a removable dust filter is a practical design choice, as it simplifies the cleaning process and ensures that dust accumulation does not hinder the performance of the PC’s components over time. The aesthetic combination of functionality and style with the silver accent on the feet adds to the case’s appeal, striking a balance between form and function. This attention to detail might be particularly attractive to users who value both the performance and appearance of their PC setup.
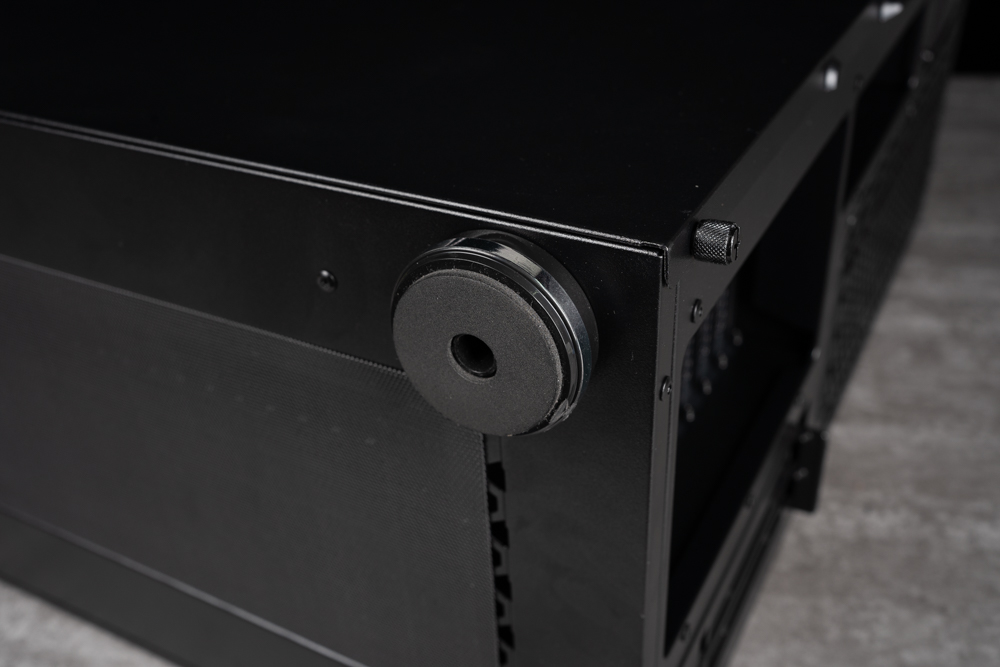
A close-up view of a cylindrical case foot, which is part of a computer case – likely the FSP CUT610. The foot is accented with a silver decorative ring on its side, providing a contrast to the black color of the case and adding a subtle aesthetic touch. This kind of foot design serves a practical purpose as well; it raises the case off the ground to improve airflow underneath, which is important for cooling components such as the power supply unit. The elevation also helps to prevent the intake of dust from surfaces and can reduce the transmission of vibrations from the case to the desk or floor, potentially reducing noise.
The attention to detail in the case design, such as the incorporation of decorative elements like the silver ring, suggests that aesthetics are considered alongside functionality. This can make the case more appealing to users who appreciate a visually pleasing PC build without compromising the performance aspects.
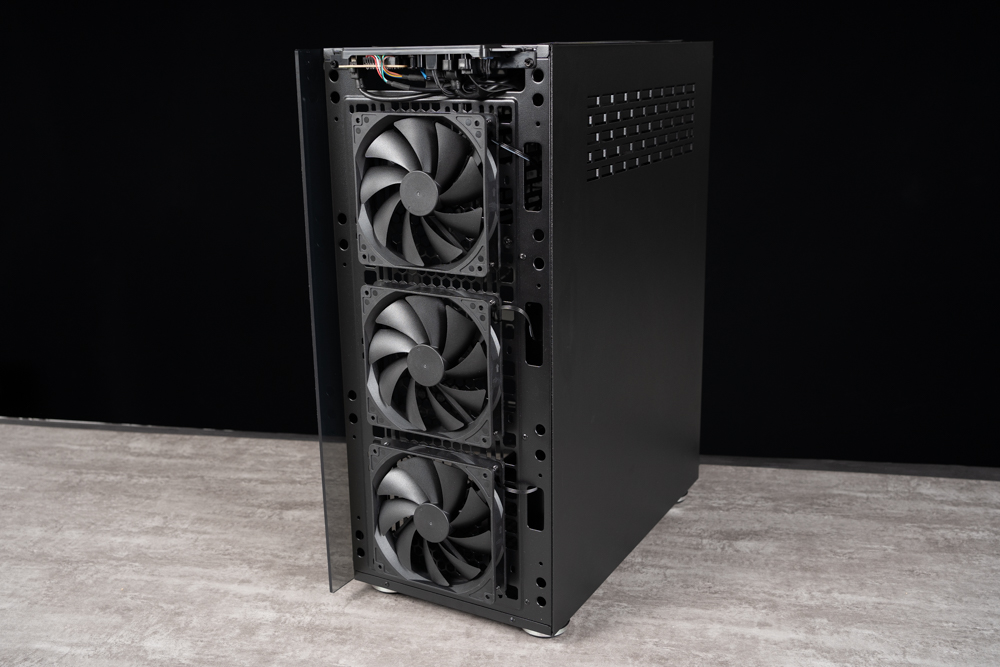
The FSP CUT610 PC case with three 140mm fans mounted at the front, emphasizing the case’s focus on cooling efficiency. The FSP CUT610 is designed with a total of five 140mm fans, with three located at the front and two at the rear, to ensure optimal airflow across the internal components for superior cooling performance.
The front fans are especially critical as they draw in cool air from outside the case, which then travels over the components, absorbing heat before being expelled by the rear fans. This setup is ideal for high-performance computing environments where maintaining lower temperatures is crucial to ensure system stability and longevity.
The 140mm size of the fans is a choice that balances airflow and noise levels, as larger fans can move a significant amount of air at lower RPMs, resulting in quieter operation compared to smaller fans at higher RPMs. This feature is particularly attractive to users who need a quiet work environment or who engage in activities such as gaming or content creation that demand minimal noise distractions.
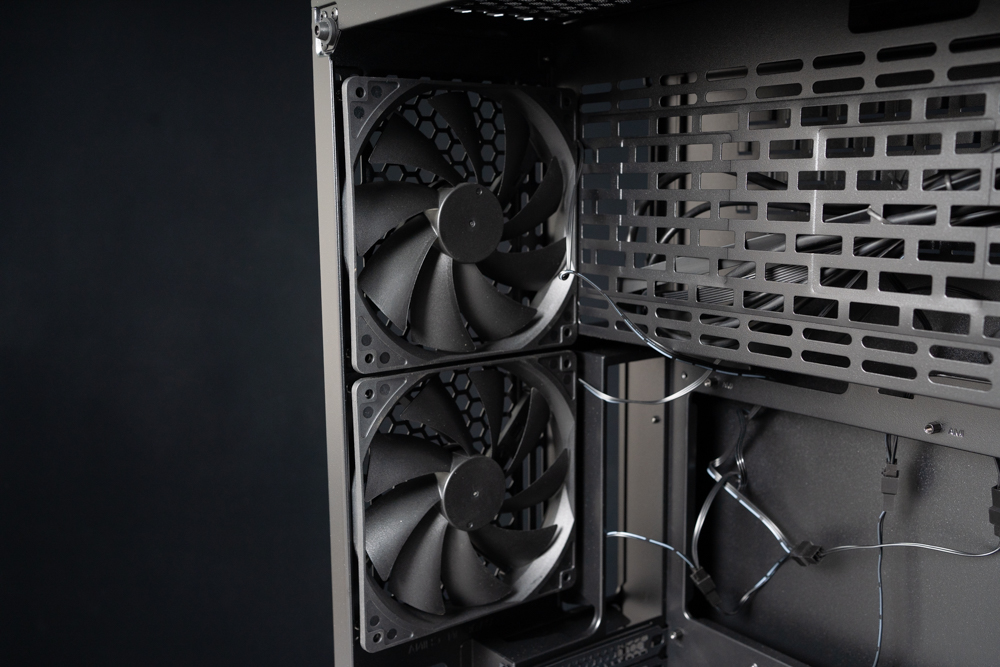
The rear interior of what appears to be the FSP CUT610 PC case, with a focus on two 140mm fans mounted at the back. This setup suggests that the case design prioritizes efficient airflow management, as rear fans are crucial for exhausting warm air out of the case, completing the air circulation process started by the front intake fans.
The honeycomb mesh pattern surrounding the fans is optimized for air passage while also protecting internal components from dust and other particulates. The use of 140mm fans typically indicates a focus on achieving high airflow volumes while maintaining lower noise levels, as larger fans can move more air through the case without the need for high-speed rotations that smaller fans might require.
This configuration is a common feature in cases designed for high-performance systems, where effective heat dissipation is essential. The strategic placement and choice of fan size reflect a design that supports both enthusiast-level PC builds and workstations that may have components generating considerable heat.
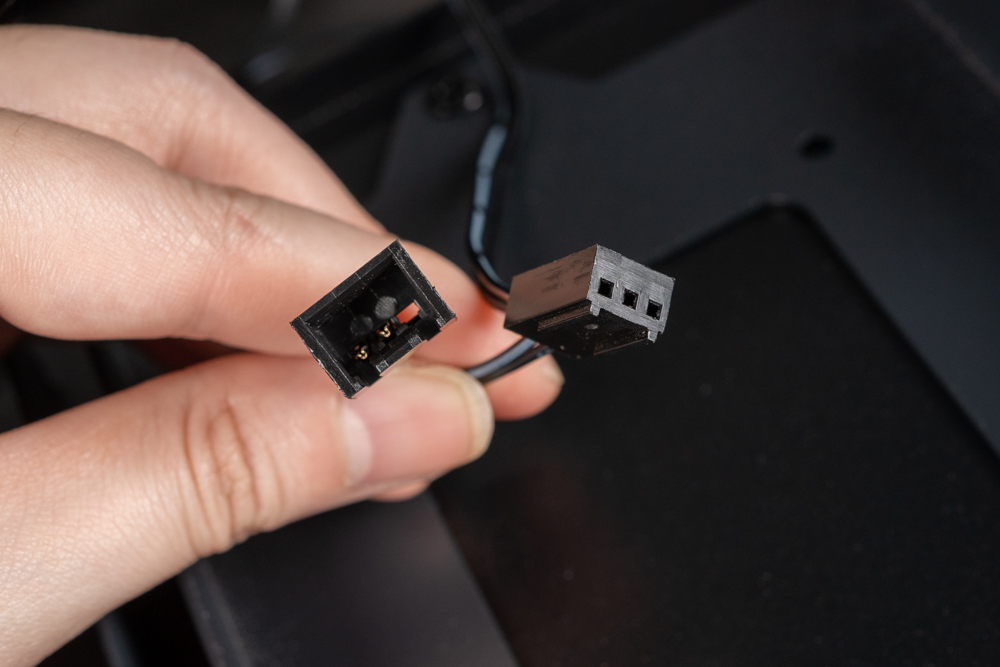
A 3-pin fan connector is held in hand, which is commonly used to connect case fans to the motherboard. These connectors can be daisy-chained, which means they can be connected to each other to form a series, allowing multiple fans to be controlled through a single motherboard fan header.
The 3-pin design typically includes one wire for power, one for ground, and one for a tachometer signal, which sends fan speed information back to the motherboard. However, unlike the 4-pin PWM (Pulse Width Modulation) fan connectors, 3-pin connectors usually do not allow for variable speed control from the motherboard and run at a fixed speed, unless the motherboard supports voltage-based speed control for 3-pin connectors.
The ability to daisy-chain these connectors is convenient when there are more fans than available headers on the motherboard or when you want to ensure that a group of fans operates at the same speed. It’s important to check the motherboard’s manual for the maximum current rating for each fan header to avoid overloading it when connecting multiple fans.
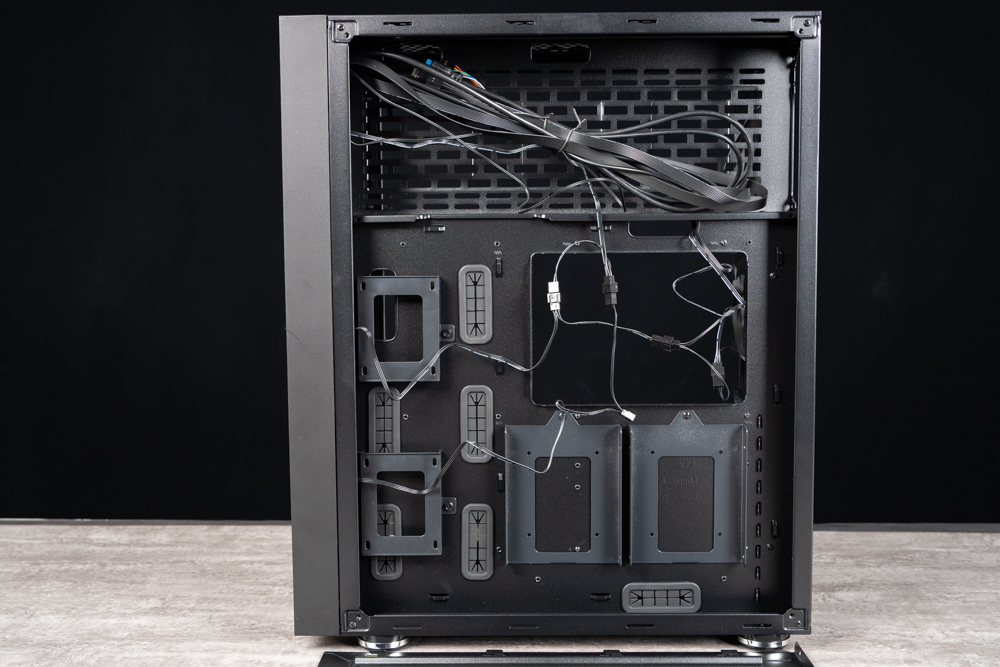
The back panel area of the FSP CUT610 PC case. This area is designed for cable management and storage drive installation. It features a two-tiered space with approximately 73mm of depth in the upper section for the power supply unit (PSU) and about 31mm of depth in the lower section. This generous space allocation allows for efficient cable management, making it easier to maintain a clean and organized interior for optimal airflow.
The back panel includes dedicated mounts for storage drives, with 2 slots for 3.5-inch hard drives and 2 slots for 2.5-inch drives. The 3.5-inch bays are also compatible with 2.5-inch drives, providing flexibility for various storage configurations. These drive bays are designed to be removable, which simplifies the process of installing or replacing drives as needed.
The case’s design with ample space for cable management and storage options caters to enthusiasts who prioritize a neat internal appearance and seek to optimize their system’s performance. The ability to easily access and manage components is a valuable feature for users who frequently upgrade their systems or for those who appreciate the ease of maintenance.
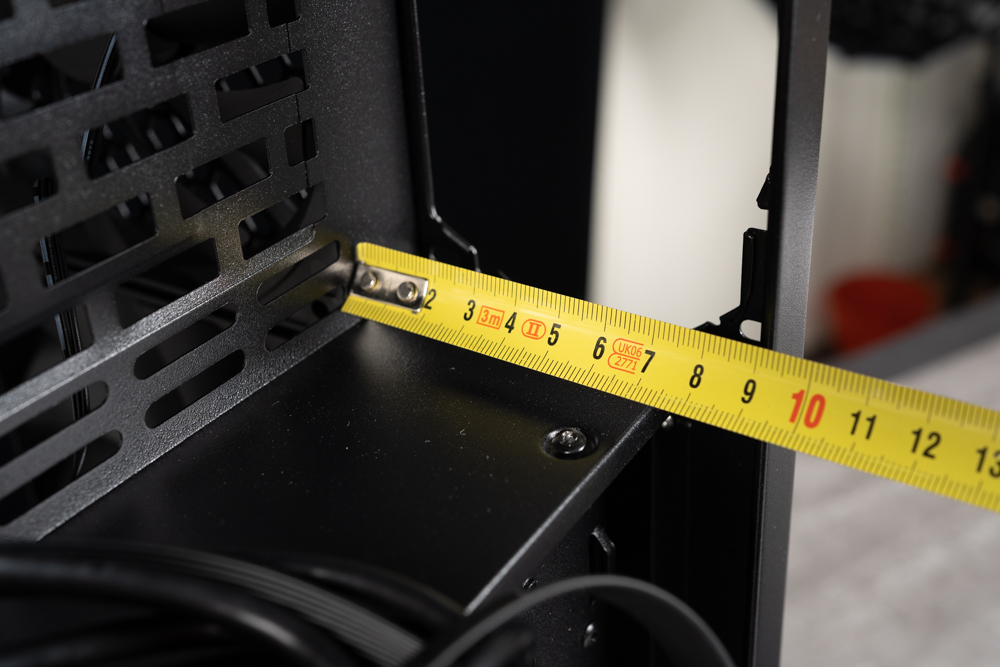
A tape measure extended across what seems to be the interior of a computer case, likely the FSP CUT610, measuring the depth of the upper section. The measurement on the tape reads approximately 73mm, which confirms the space available for components or cable management in that area of the case. This depth is particularly significant for users who might want to install a larger power supply unit, or for those who need extra space to manage cables and ensure a clean build with optimal airflow.
Having ample space behind the motherboard tray is a valuable feature for system builders. It allows for better cable routing, which not only improves the appearance of the build but can also have a positive impact on the system’s thermal performance by reducing clutter that can restrict airflow.
If you need more detailed information or have further questions about the case’s dimensions and how they can accommodate your build, it’s often helpful to consult the manufacturer’s specifications or reach out to their customer support for guidance.
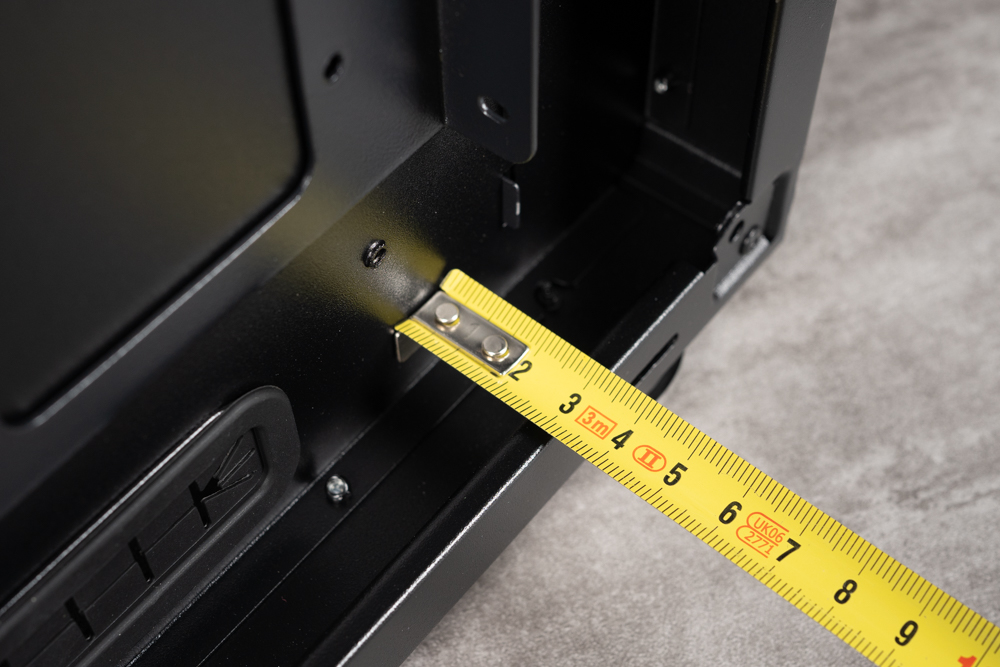
A tape measure extending across the lower section of the interior of a computer case, with the measurement indicating a depth of approximately 31mm. This space in the lower section is likely designed for cable routing and possibly for SSD or slim cooling components that don’t require as much room as other parts.
A depth of 31mm for cable management is relatively standard in modern PC cases and is usually sufficient to neatly tuck away cables, preventing them from obstructing airflow or causing clutter. Proper cable management is essential for both aesthetics and function, as it contributes to the overall cooling efficiency and cleanliness of the build.
It’s worth noting that when managing cables in a space with this depth, it’s important to use the provided cable tie points or velcro straps that are often included with cases to secure the cables flat against the back panel, ensuring the side panel can be replaced without bulging or putting undue pressure on the cables or the motherboard.
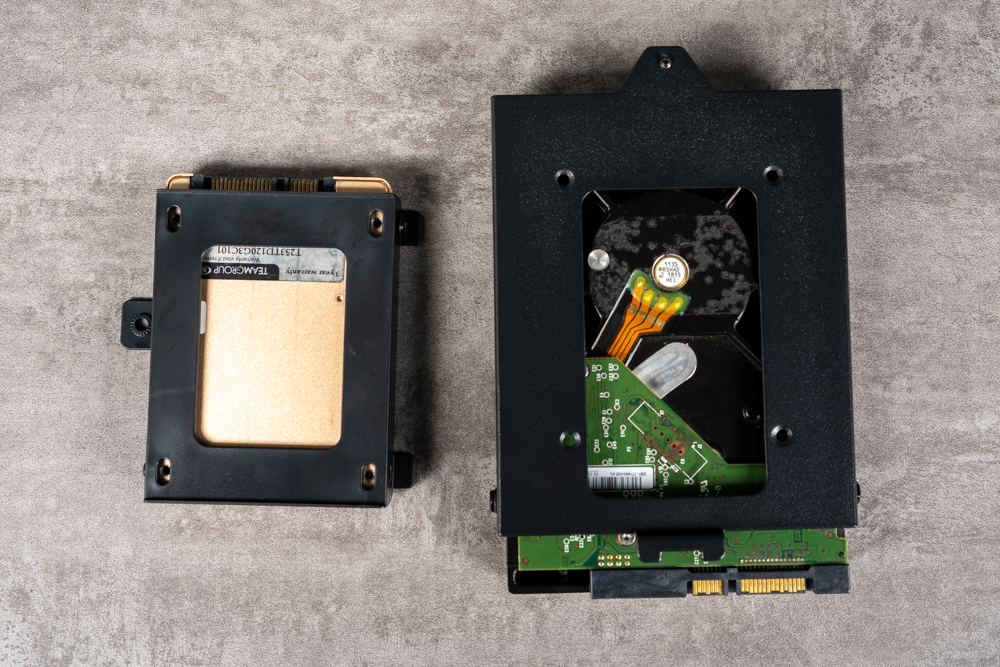
Two hard drive mounting brackets or caddies, one designed for a 3.5-inch hard drive and the other for a 2.5-inch drive. The 3.5-inch bracket typically houses standard desktop hard drives, while the 2.5-inch bracket is suitable for solid-state drives (SSDs) or smaller hard drives commonly used in laptops.
These brackets are used to securely install the drives into a computer case, like the FSP CUT610. They usually feature screw holes that align with those on the drives, allowing the drives to be fastened into place. The brackets may then slide into dedicated slots in the case or be screwed into position, depending on the case’s design. This system ensures the drives are stably mounted and less prone to vibration, which could potentially cause data errors or mechanical issues.
Having such brackets facilitates a cleaner build, easier upgrades, and maintenance, as drives can be swapped out without the need for tools or significant disassembly of the system. The adaptability of using a 3.5-inch bay for 2.5-inch drives is especially useful for cases that have limited space or for users who want to add more storage without compromising on available slots.
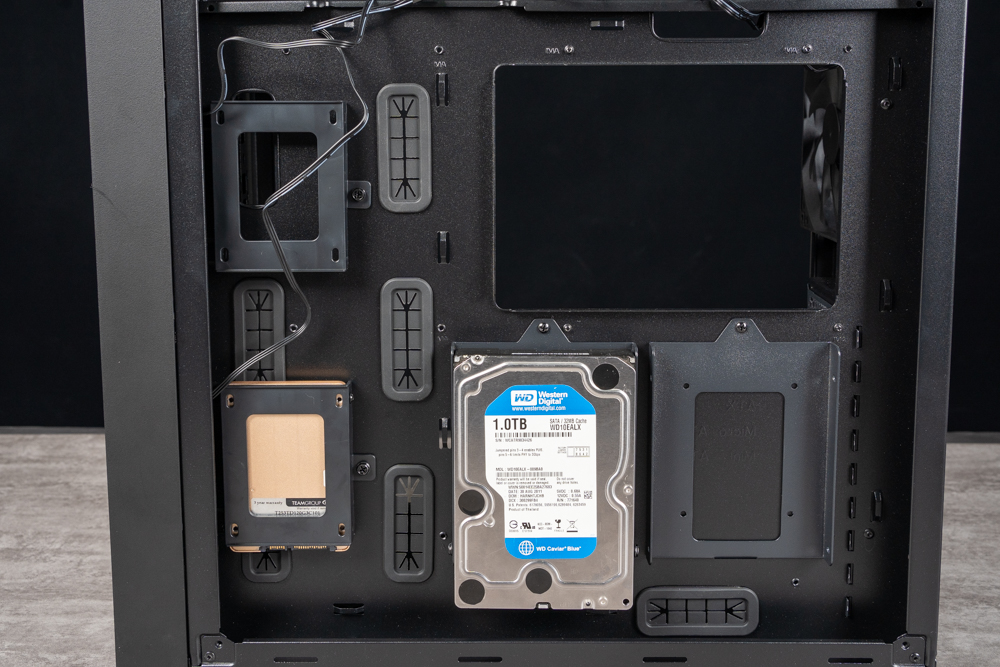
The interior of a PC case with designated mounting areas for storage drives. There is a 3.5-inch hard drive installed on the lower bracket, which is typical for larger mechanical hard drives, and above it is an empty bracket for a 2.5-inch drive, generally used for solid-state drives (SSDs). The positioning allows for efficient use of space within the case, providing a dedicated area for each drive type.
This layout aids in optimal cable management and airflow, as it keeps the drives out of the way of other components that may require more cooling. The brackets are usually designed to be easily accessible, making the process of installing or swapping out drives straightforward.
In such cases, it’s important to secure the drives properly using screws or tool-less mounting systems provided with the case, ensuring that the drives are stable and the connections to the motherboard are secure. Proper installation helps protect the drives from excessive movement that could cause data corruption or damage.
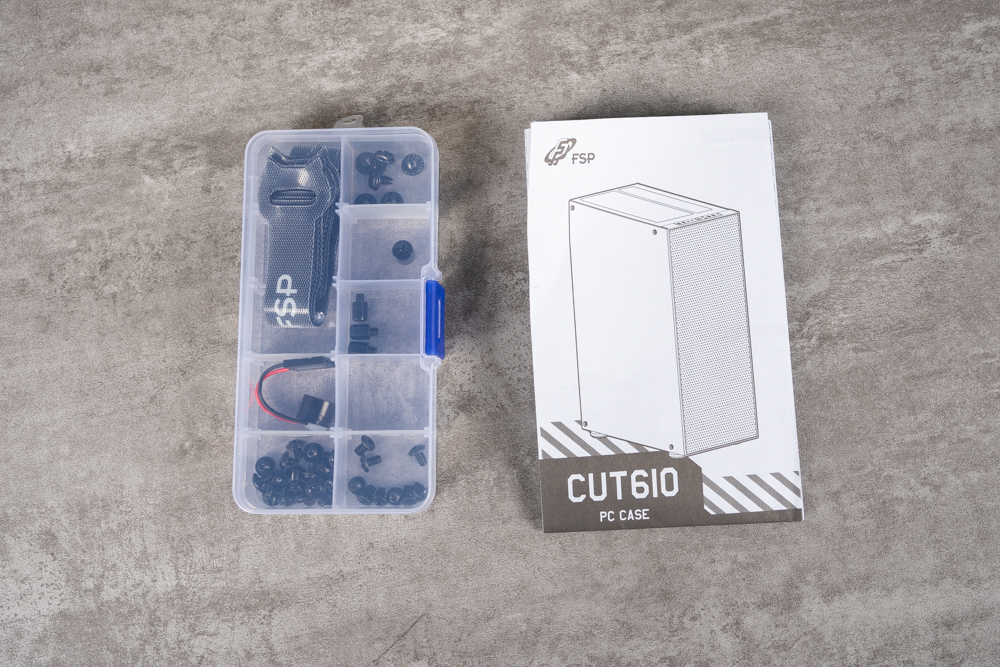
The accessories are included with the FSP CUT610 PC case. There’s a clear plastic box containing various screws, which are used for mounting components such as the motherboard, power supply, and drives within the case. There are several Velcro ties included, which are extremely useful for cable management. These allow for neat bundling of cables within the case, promoting better airflow and ease of maintenance or hardware changes.
Accompanying the hardware is the case’s manual, which provides instructions for installing the PC components and details about the case’s features and specifications. Having a manual is crucial for understanding how to properly utilize all the case’s functionalities and for troubleshooting any issues that may arise during the build process.
The inclusion of such accessories is common with PC cases, as manufacturers aim to provide a complete solution that enables users to assemble their systems without needing to purchase additional mounting hardware. The transparent screw box is particularly helpful for keeping the small parts organized and easily accessible during and after the build.
Optimizing FSP CUT610 Setup: A Guide to Installing 360mm Water Cooling and Efficient Cable Management
The interior space of the FSP CUT610 PC case, which has been designed to accommodate a 360mm water cooling system at the top. The installation tip provided suggests that it’s easier to install the water-cooling radiator if you first remove the two built-in rear fans. This is a common recommendation because it provides more room to maneuver the radiator into place.
The advice also highlights that the radiator should be mounted towards the front of the case to avoid issues with reinstalling the rear fans. If the radiator is not positioned correctly, it could obstruct the area where the fans are supposed to fit. The recommended installation sequence is to attach the top rear fan first, followed by the bottom one, ensuring that everything fits properly.
Such considerations are crucial when building a PC, as they can impact both the ease of installation and the effectiveness of the cooling system. The FSP CUT610’s spacious interior and flexible mounting options suggest it’s designed for enthusiasts who are looking for a case that can support advanced cooling solutions for high-performance setups. Always refer to the case and cooling system manuals for specific instructions on installation procedures.
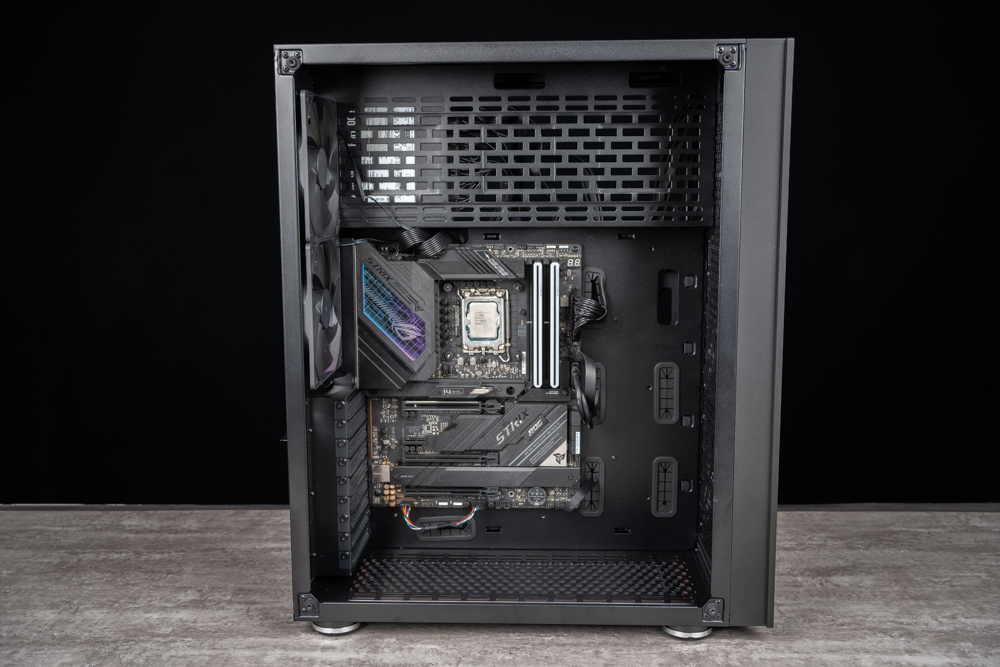
A PC case with a motherboard installed, showcasing how it fits within the FSP CUT610 chassis. The motherboard is secured to the case’s standoffs, ensuring proper clearance from the metal frame to prevent electrical shorts. Visible is the rear I/O area, PCIe expansion slots, and multiple cutouts for cable routing, which help maintain a clean and organized build.
Proper installation of the motherboard is critical, as it serves as the foundation for other components. This case seems to provide ample room for cable management and component installation, with strategically placed cutouts around the motherboard tray and ample space for airflow and cooling solutions.
When installing a motherboard, it’s important to refer to both the motherboard and case manuals to ensure compatibility, proper spacing, and that all connections are accessible and usable. It’s also important to handle the motherboard carefully to avoid damage to sensitive components.

The interior of the FSP CUT610 PC case with a 360mm water cooling radiator installed at the top. This type of setup is indicative of a high-performance system, as a radiator of this size can dissipate a significant amount of heat generated by powerful components.
Mounting a water-cooling solution in this manner is a strategic choice. It utilizes the top of the case where there is typically more space and can take advantage of the natural rise of hot air for more efficient cooling. The placement of the radiator also appears to allow for a push or pull configuration with fans, which can further enhance cooling efficiency.
The image also shows the routing of various cables, which appears tidy and well-organized, suggesting that the case design effectively supports cable management, an important factor in maintaining optimal airflow and system cleanliness.
For those interested in building a system with similar cooling capabilities, it’s crucial to ensure compatibility between the case, radiator size, and the motherboard dimensions to avoid any issues with fitment or obstructions to other components.
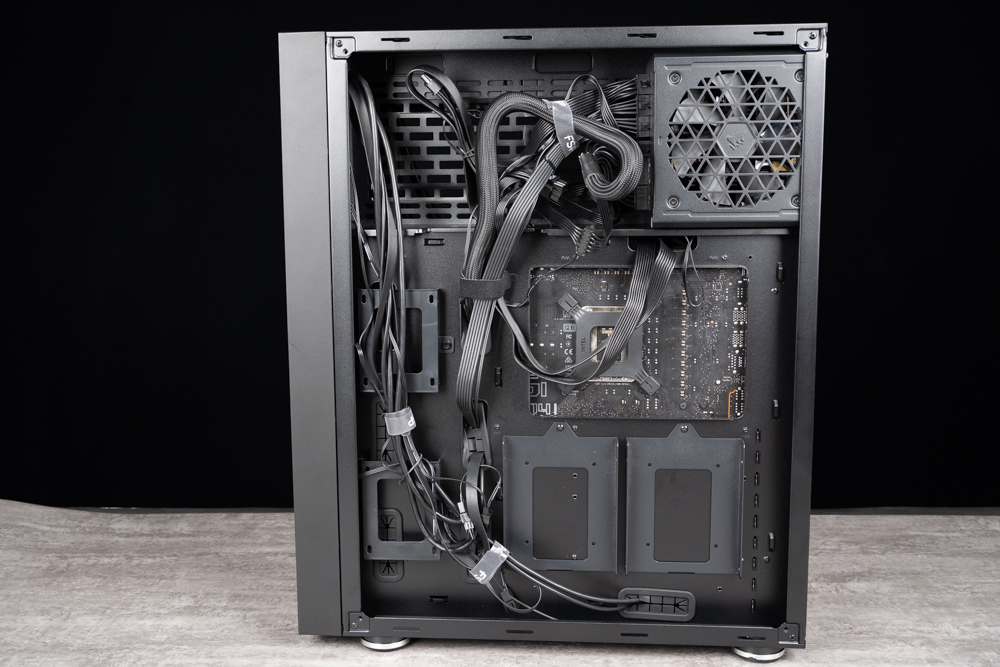
The rear panel of the FSP CUT610 PC case, highlighting the cable management capabilities. The case features multiple cutouts for routing cables, which is essential for a clean and organized build. The upper section appears deeper, offering more room for thicker cables like those from the power supply unit, or to tuck away excess cables that are not immediately needed.
Good cable management is key to maintaining optimal airflow, making system upgrades easier, and enhancing the overall aesthetics of the build. It appears that this case is designed with these considerations in mind, providing ample space and strategic routing options for builders at all levels. The velcro ties shown in the image are often used to group cables together and can be easily adjusted as needed.
Cable management is an often underrated aspect of building a PC that can significantly affect both the performance and the maintenance of the system. The FSP CUT610 is built to accommodate builders who value a tidy internal appearance and want to ensure their system operates efficiently.
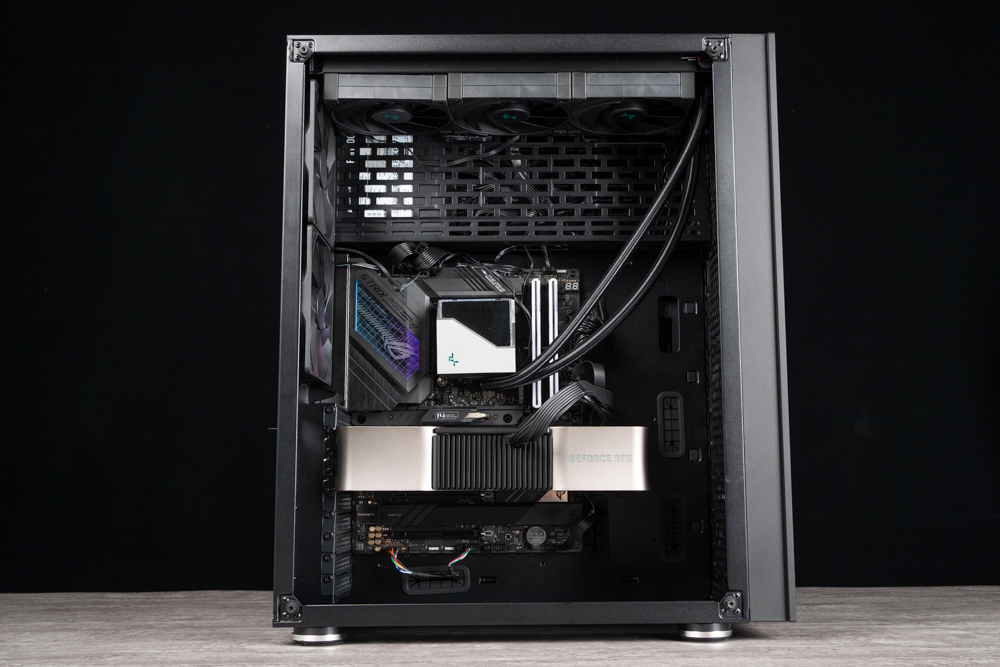
The image depicts a fully assembled PC within the FSP CUT610 case. The case supports up to 9 PCIe slots and can accommodate graphics cards up to 390mm in length. While this case is capable of housing dual graphics cards, the practicality of this setup can be affected by the thickness of the cards. Thicker, high-performance GPUs often take up more than one slot’s width, which could make it challenging to fit two cards side by side.
This setup demonstrates effective cable management and component organization within the case. The power supply is neatly installed at the bottom, and all cables are routed to minimize interference with airflow or component access. When considering a dual GPU setup, it’s important to account for not only the physical space but also the additional heat output and power requirements. The case’s spacious design and cooling capabilities are showcased here, emphasizing its suitability for advanced and high-power builds.
For those interested in setting up a multi-GPU system, it’s essential to ensure that the motherboard and power supply can handle the additional GPUs. Appropriate cooling solutions must be in place to manage the heat generated by multiple cards. It’s always recommended to consult the case’s specifications and compatibility with your chosen components to ensure a successful build.
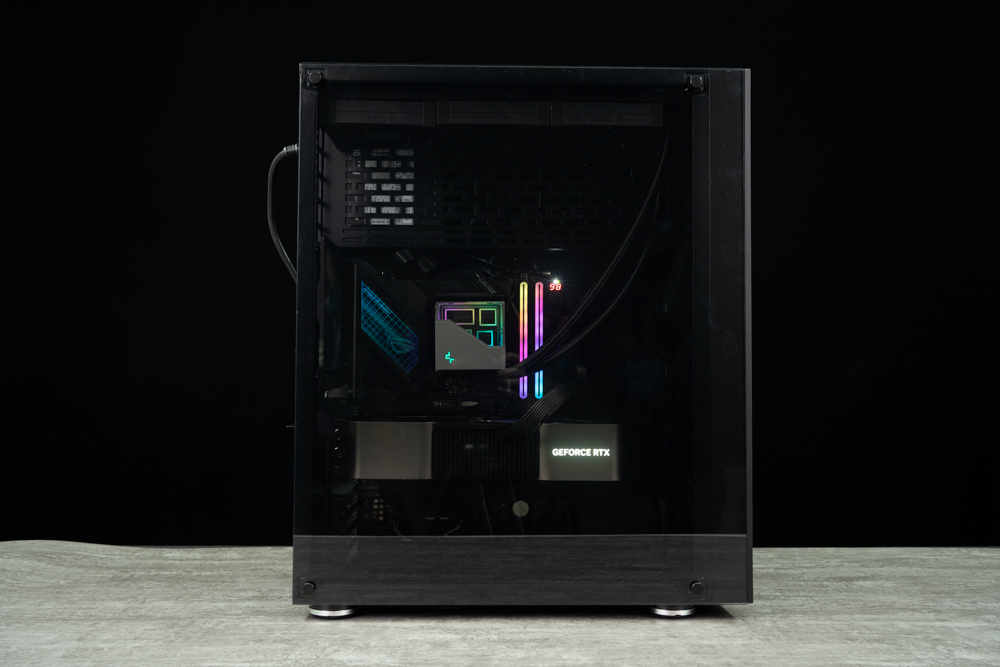
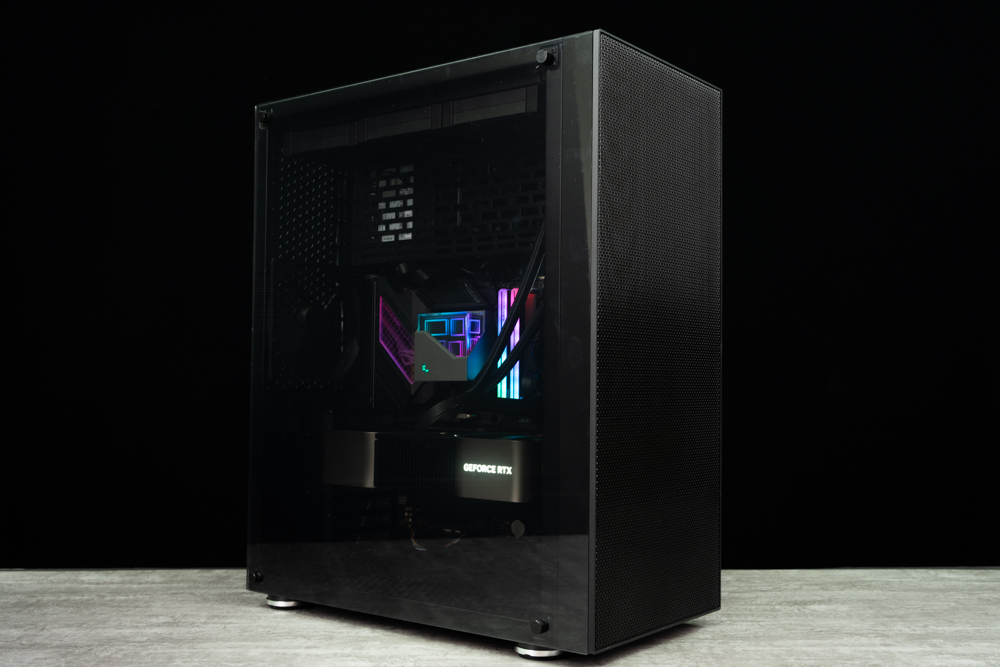
The completed build inside the FSP CUT610 case with RGB lighting effects on display. The first image provides a view of the interior with the side panel removed, showing the illuminated components, while the second image shows the case from a side perspective with the side panel on, showcasing how the RGB lighting looks when the build is fully enclosed.
RGB lighting within a PC case not only enhances the aesthetic appeal but also allows for personalization of the setup. Users can typically customize the lighting to display a range of colors and effects that can be synced with other components, such as fans, motherboards, and even peripherals, to create a cohesive and visually striking system.
The FSP CUT610’s side panel, which appears to be acrylic, offers a clear view of the internal components and lighting, which is a popular feature for those who want to showcase their hardware and customized lighting schemes. The lighting can usually be controlled via software provided by the hardware manufacturers or through a motherboard’s RGB control system, allowing for dynamic or static lighting setups depending on the user’s preference.
The visual impact of RGB lighting in a build is significant, often attracting those who appreciate the combination of technology and art in their computing experience.
Intel Core i9-13900K Performance in FSP CUT610: Temperature and Noise Analysis with High-End Gaming Setup
The test platform is a high-end setup with components optimized for performance:
- Processor (CPU): The Intel Core i9-13900K is a top-tier processor known for its high core count and speed, making it suitable for demanding applications and gaming.
- Motherboard: The ASUS ROG STRIX Z690-E GAMING WIFI is a feature-rich board designed for the latest Intel CPUs, offering robust power delivery and connectivity options.
- Memory (RAM): KLEVV DDR5-6200 16GB*2 provides a fast and responsive system experience, especially beneficial for tasks that require high memory bandwidth.
- Graphics Card (GPU): The NVIDIA GeForce RTX 4080 is a powerful graphics card that can handle intensive gaming and creative workloads.
- System Drive: The AGI AI818 1TB NVMe PCIe 4.0 SSD will ensure swift boot times and rapid load times for applications and games.
- Cooler: The DEEPCOOL LT720, presumably an AIO (All-In-One) liquid cooler, paired with the additional 360 mm radiator, indicates a robust cooling solution for maintaining CPU temperatures.
- Power Supply Unit (PSU): The CORSAIR RM1000e is a reliable and efficient power supply that can easily support the power demands of the system.
- Operating System: Windows 11 Pro is the latest Microsoft OS, offering the newest features and optimizations for modern hardware.
The thermal performance observations indicate that the cooling setup is adequate for daily use, managing to keep CPU temperatures within a reasonable range during normal activities. Stress tests pushing the CPU to high temperatures suggest that the cooling system is reaching its limits under load, which is not uncommon in high-performance CPUs like the i9-13900K. The GPU temperatures are reported as satisfactory, comparable to an open-air test bench setup.
In terms of acoustics, while there’s some audible noise at full fan speed, it’s within acceptable limits for you. This is an important consideration, as high-performance components can generate significant noise when cooling under load.
For optimal performance, ensure that your BIOS and all drivers are up to date, which can help with both performance and thermal management. Also, consider the airflow of your environment, as good case positioning can aid in cooler operation. If you find the noise level during load to be too high, you may want to look into adjusting fan curves or exploring other cooling solutions that prioritize low noise levels.
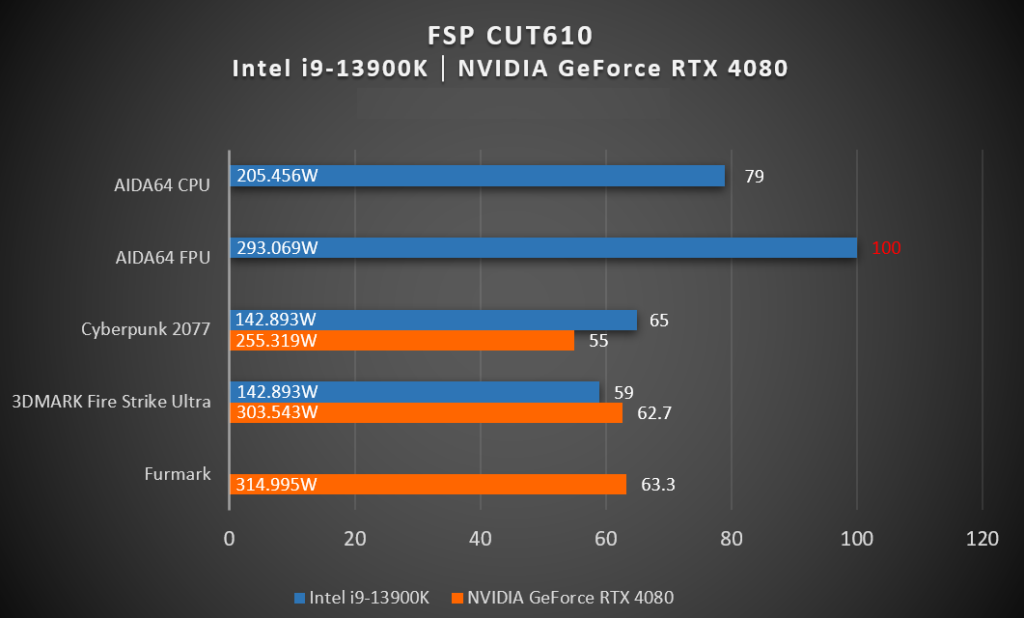
The temperature test graph shared shows the performance of an Intel i9-13900K CPU and an NVIDIA GeForce RTX 4080 GPU housed in the FSP CUT610 case. The data points on the chart represent the power consumption (in Watts) of both the CPU and GPU under various stress tests and real-world gaming scenarios.
Here’s a summary of the data points:
- AIDA64 CPU Test: The CPU is consuming 205.456W, reaching a certain temperature threshold indicated as 79.
- AIDA64 FPU Test: A more intensive test on the floating-point unit of the CPU, showing a consumption of 293.069W with a temperature score of 100, likely indicating a maximum or peak temperature reached.
- Cyberpunk 2077: While gaming, the CPU consumes 142.893W, and the GPU 255.319W, with respective temperature scores of 65 and 55, which seem to be within acceptable ranges.
- 3DMARK Fire Strike Ultra: Another gaming benchmark where the CPU consumes 142.893W and the GPU 303.543W, with temperature scores of 59 and 62.7 respectively, again suggesting good thermal performance.
- Furmark: A stress test primarily for GPUs, here the GPU consumes 314.995W and has a temperature score of 63.3, which is a good performance for such a demanding test.
The temperature scores next to the power consumption figures appear to indicate the relative thermal performance, with 100 likely being a threshold or a peak value. The results suggest that the FSP CUT610 case, along with its cooling setup of 5 internal fans and a 360mm water cooler, manages to maintain the temperatures within a reasonable range during various types of load. This is a good indication that the case provides efficient cooling for high-end components.
It’s important to consider that these temperature scores are relative and do not provide specific temperature values. For a comprehensive analysis, looking at the actual temperature readings in Celsius or Fahrenheit would be necessary. Room temperature can also affect these results, so it’s ideal to compare these scores to the known safe operating temperatures for the specific CPU and GPU you are using.
Summary
The FSP CUT610 case is designed with high-end setups in mind, featuring 9 PCIe slots that cater to enthusiasts interested in running dual graphics card configurations. It has five 140mm fans and several vents, ensuring robust cooling capabilities. is compatible with E-ATX motherboards and has generous dimensions of 465mm in length, 235mm in width, and 565mm in height, providing ample internal space.
For builders, this means there are virtually no restrictions on the size of CPU coolers and graphics cards, with support for tower coolers up to 180mm in height and graphics cards up to 390mm in length. With a price tag of NT$2990, the FSP CUT610 offers a spacious and versatile option for building a high-performance PC with excellent cooling and component flexibility. It could be a good investment for gamers and professionals who require powerful hardware for their computing needs.
If this article is helpful for you, please share this article with your friends on social media. Thank you!
This article is based on the personality of the reviews. You are responsible for fact-checking if the contents are not facts or accurate.
Title: FSP CUT610 Case Review: Acrylic Full-Side View Design with Advanced Cooling Features and E-ATX Support