Enermax has recently launched an exciting addition to their lineup of cooling solutions: the LIQMAXFLO 360 ARGB. This all-in-one liquid cooler is notable for its thick, 38mm radiator, which is less common in the market. It features a water block with a built-in 6cm VRM cooling fan, specifically designed to reduce temperatures around the CPU, including the motherboard’s power modules and M.2 SSD areas. Moreover, it incorporates Enermax’s latest patented dual-chamber water block technology for enhanced cooling efficiency.
The LIQMAXFLO series, under the “Wind Crystal” collection, offers a variety of sizes including 420mm, 360mm, and 240mm models, with this review focusing on the 360mm ARGB version.
Key Specifications of the ENERMAX LIQMAXFLO 360 ARGB (38mm):
- Compatibility: Supports a wide range of sockets including Intel LGA 1700, 1200, 115x, 2066, 2011-3 (Square ILM), 1366, and AMD AM4/AM5.
- Radiator Dimensions/Material: 400 x 120 x 38 mm, made of aluminum.
- Tubing Dimensions/Material: 400 mm, made from rubber.
- Water Block Base: Copper.
- Water Block RGB LED Current: 0.24 A.
- Pump Speed: Ranges from 1200 to 3000 RPM.
- Pump Bearing: Ceramic.
- Pump MTBF (Mean Time Between Failures): ≥50,000 hours.
- Pump Rated Voltage/Current: 12 V/0.43 A.
- VRM Fan Size: 60 mm.
- VRM Fan Speed: 500-3000 RPM.
- VRM Fan Airflow/Pressure: 18.73 CFM/2.17 mmH2O.
- Cooling Fan Dimensions: 120 x 120 x 26.8 mm.
- Cooling Fan Airflow/Pressure: 58.03 CFM/2.4 mm-H2O.
- Cooling Fan Rated Voltage/Current: 12 V/0.08A.
- Cooling Fan Noise Level: 23.46 dBA.
- Fan Interface/VRM Fan Interface: 8 Pin/4 Pin.
- Thermal Paste: Dow Corning TC-5888.
- Thermal Design Power (TDP): 400W.
- Warranty: 5 years.
This comprehensive cooling solution from Enermax, designed with precision for high-performance systems, not only ensures efficient heat dissipation but also offers a stunning visual appeal with its ARGB lighting. The inclusion of a dedicated VRM fan for additional cooling around critical components is a thoughtful touch, making the LIQMAXFLO 360 ARGB a top contender for enthusiasts seeking to optimize their system’s thermal management without compromising on aesthetics.
Unveiling the ENERMAX LIQMAXFLO 360 ARGB: A Comprehensive Review of the High-Capacity, Silent Cooling Marvel
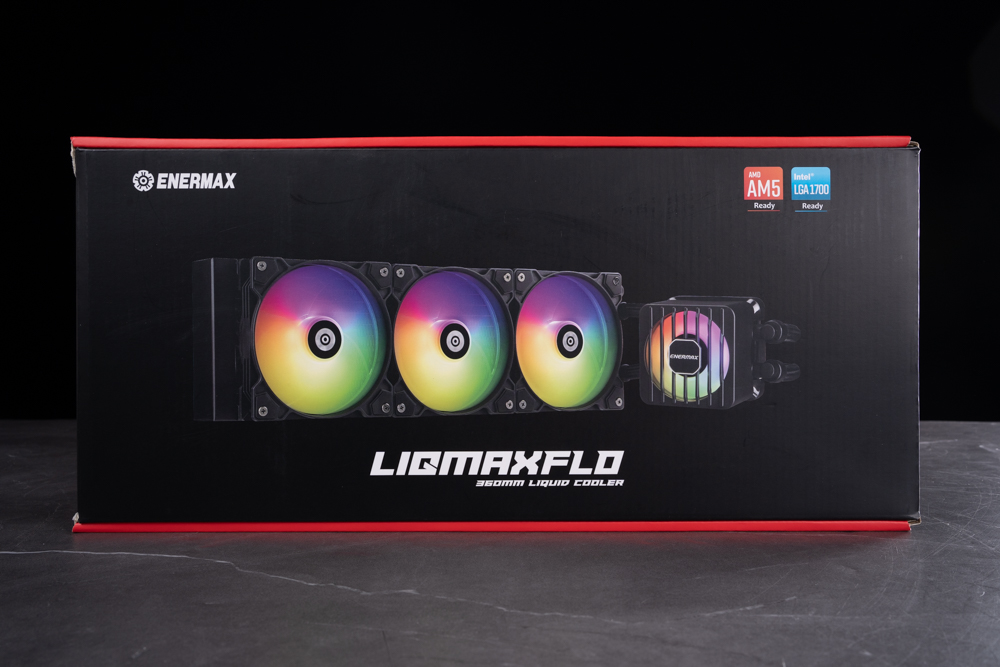
The front packaging of the Enermax LIQMAXFLO 360 ARGB 38mm liquid cooler. The packaging is sleek and professional, featuring a large, clear image of the cooler itself. Prominently displayed are three fans with ARGB (Addressable RGB) lighting, which gives potential buyers a preview of the colorful illumination they can expect. The Enermax logo is at the top left corner, ensuring brand visibility.
The product name, “LIQMAXFLO 360mm Liquid Cooler,” is boldly printed along the bottom, with the distinctive ARGB feature highlighted. On the top right, compatibility is clearly stated with badges indicating that the cooler is ready for AMD AM5 and Intel LGA1700 sockets, assuring customers that the cooler is compatible with the latest CPU platforms. This package design is clearly aimed at attracting enthusiasts who value both aesthetics and performance in their PC builds.
The side of the Enermax LIQMAXFLO 360 ARGB’s packaging, which smartly includes detailed diagrams and dimensions of various components. These specifications give potential users a clear understanding of the size and fit of the product, aiding in determining compatibility with their PC setup.
The side panel lists dimensions for the water block (70 x 70mm), tubing length (400mm), and radiator size (400mm in length with a notable thickness of 38mm). This detail underscores the larger-than-average thickness of the Enermax radiator, which stands out from the common 27mm thickness found in many AIO (All-In-One) coolers, providing a greater volume for coolant and enhanced flow space. For enthusiasts with ample chassis space, this is a welcomed design feature as it implies a potentially higher cooling capacity and efficiency.
Below the component diagrams, there are logos indicating RGB compatibility with various motherboard software such as RGB Fusion from Gigabyte, Aura Sync from ASUS, Mystic Light Sync from MSI, and Polychrome Sync from ASRock, suggesting that the product is versatile and can be synchronized with a wide range of gaming motherboards for RGB lighting control. These integrations are important for users looking to maintain a cohesive aesthetic across their gaming rig’s components.
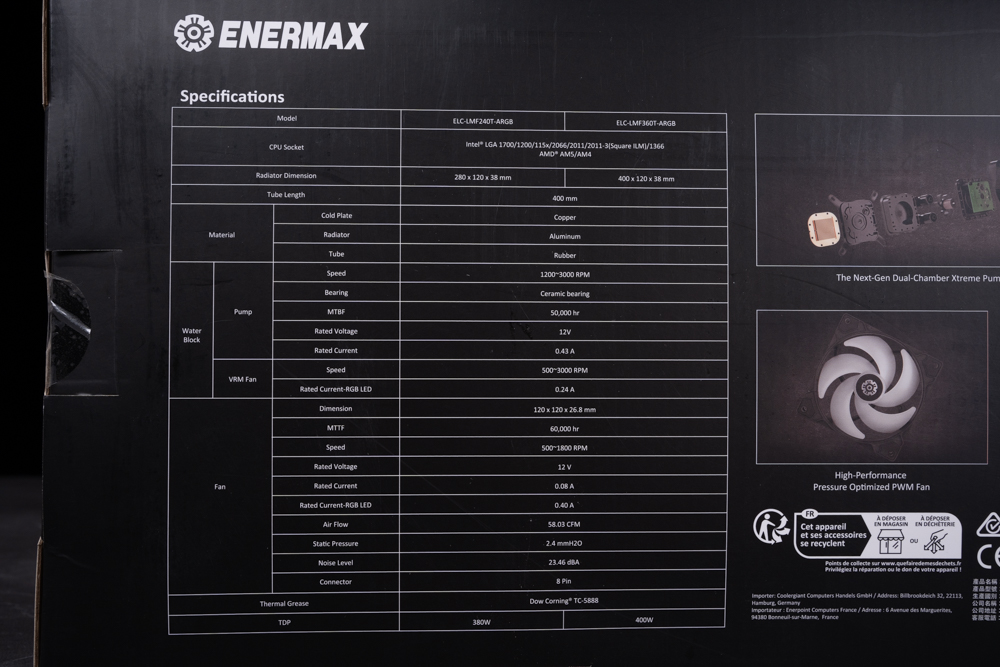
The back of the Enermax LIQMAXFLO packaging, which provides a detailed specifications chart for both the 240mm and 360mm cooler models. This section is designed to inform prospective buyers about the precise technical details and capabilities of the product.
For the ENERMAX LIQMAXFLO 360 ARGB model, some highlighted specifications are:
- CPU Socket Compatibility: A comprehensive list including Intel’s LGA 1700, 1200, 115x, 2066, 2011-3 (Square ILM), 1366, and AMD’s AM5/AM4.
- Radiator Dimension: Measures 400 x 120 x 38 mm.
- Tube Length: 400 mm.
- Materials: Utilizes copper for the cold plate, aluminum for the radiator, and rubber for the tubing.
- Pump: Features a speed range of 1200-3000 RPM with a ceramic bearing and a MTBF (Mean Time Between Failures) of 50,000 hours. It operates at a rated voltage of 12V and current of 0.43A.
- VRM Fan: Indicates a speed range of 500-3000 RPM and an RGB LED rated current of 0.24A.
- Fan: Specifications include a 120 x 120 x 26.8 mm dimension, 500-1800 RPM speed range, and a noise level of 23 dBA. It also states airflow and static pressure ratings as 58.03 CFM and 2.4 mm-H2O, respectively.
On the right side of the specifications chart, there’s a visual guide to the next-generation dual-chamber water block and the high-performance, pressure-optimized PWM (Pulse Width Modulation) fan. This graphic emphasizes Enermax’s focus on advanced cooling technology.
The packaging includes certification logos at the bottom, indicating compliance with various environmental and safety standards. This part of the packaging reassures consumers of the product’s quality and adherence to industry norms.
Notably, the packaging highlights the use of Dow Corning’s TC-5888 thermal grease and a TDP (Thermal Design Power) rating of 380W, which are crucial details for users concerned about thermal conductivity and the cooler’s capacity to handle high-performance CPUs.
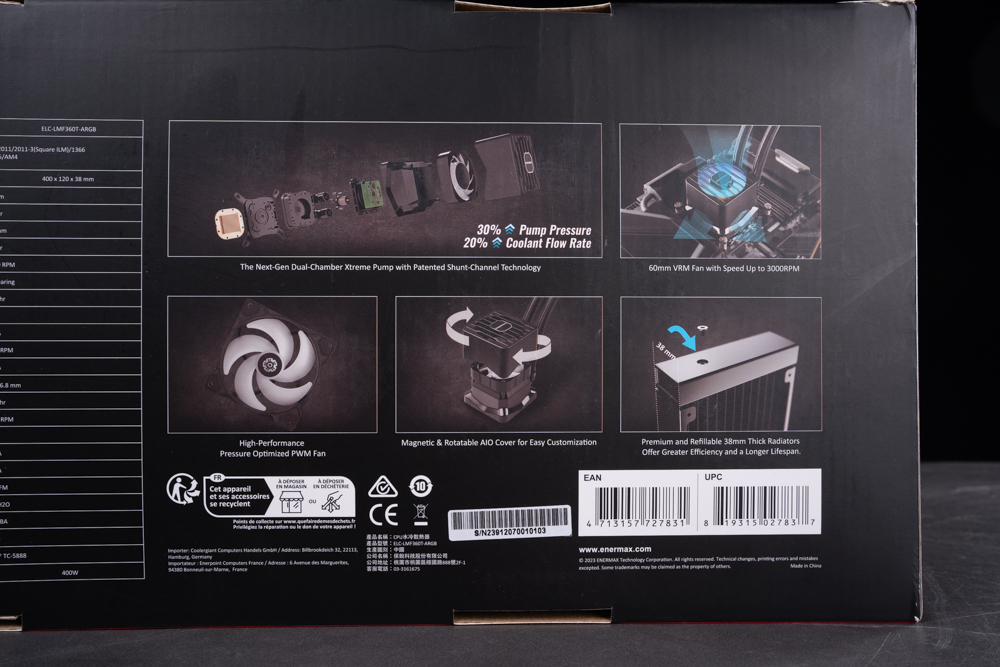
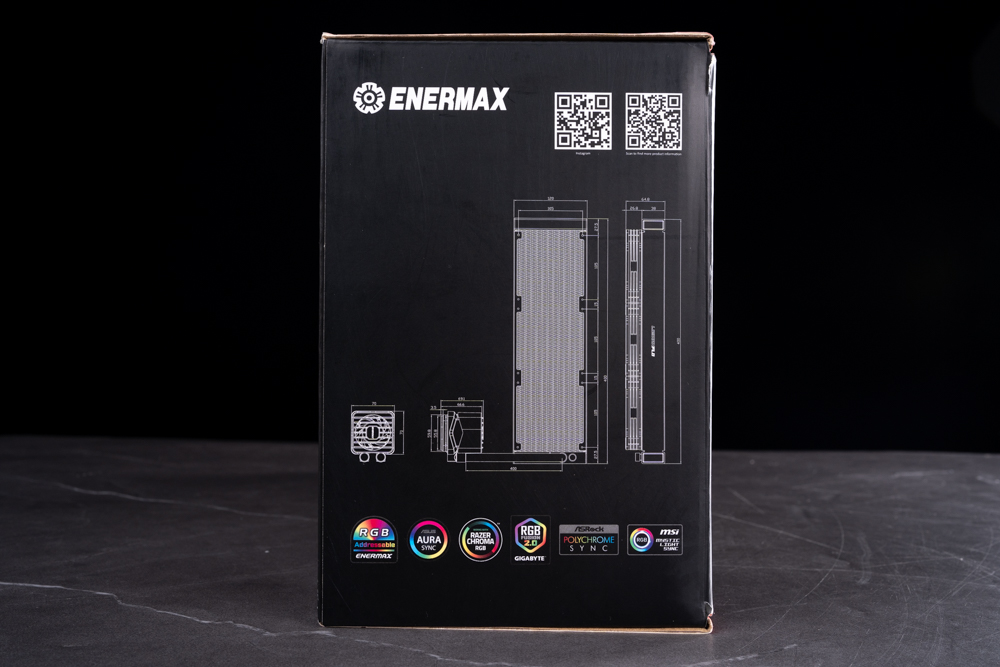
The back of the packaging for the Enermax LIQMAXFLO series, focusing on the unique features that set this line of AIO liquid coolers apart.
Featured prominently is Enermax’s innovative patented dual-chamber water block structure. This next-gen design includes:
- Patented SCT (Shunt-Channel Technology): A technique that enhances the cooling performance by increasing coolant flow.
- Increased water block pipe diameter: This enlargement allows for a higher volume of water to move through, significantly improving the flow rate.
- Improved pump pressure and coolant flow rate: According to Enermax’s data, these features are engineered to boost the overall water pressure by 30% and the flow rate by 20% compared to standard designs.
- Integrated VRM fan within the water block: Capable of speeds up to 3000 RPM, this fan provides additional targeted cooling around the CPU, particularly beneficial for the motherboard’s VRM (Voltage Regulator Module) and other nearby components.
The side also highlights other components and benefits:
- High-Performance Pressure Optimized PWM Fan: Designed for optimal airflow, these fans can be crucial in maintaining lower temperatures within the system.
- Magnetic & Rotatable AIO Cover: This feature allows for easy customization, catering to users who appreciate a personalized aesthetic in their build.
- Premium and Refillable 38mm Thick Radiators: The extra thickness is indicated to offer greater efficiency and a longer lifespan, an important consideration for users looking for durability and sustained performance.
These features are illustrated with clear images and informative captions, creating a compelling case for the efficiency and innovation of the LIQMAXFLO series. The packaging communicates the careful engineering that went into the product, targeting users who are serious about cooling and possibly interested in overclocking, where efficient heat dissipation is critical.
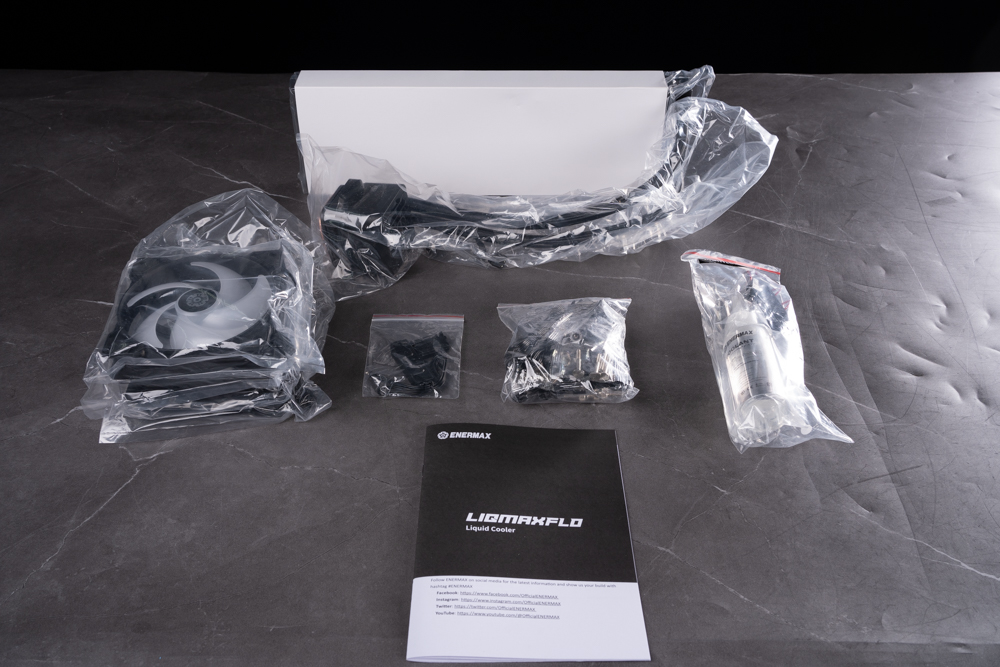
The complete set of components that come with the Enermax LIQMAXFLO 360 ARGB liquid cooling system, freshly unboxed and laid out. It includes the following items:
- 3x 120mm Silent Fans: Designed to deliver efficient airflow while keeping noise levels down.
- All-In-One Liquid Cooler Main Unit: The central part of the system that includes the pump and water block with integrated VRM cooling.
- 3x Tubing Clamps: These are used to secure the tubing in place and prevent any leaks or disconnections.
- Coolant Refill Bottle: Allows for maintenance and refill of the cooling liquid, ensuring longevity and performance.
- Mounting Brackets for Different Sockets: These provide compatibility with various CPU socket types across both Intel and AMD platforms.
- Extra Thermal Paste: For improved heat transfer between the CPU and the cooler.
- Fan Power Cables: Necessary to provide power to the cooling fans from the motherboard.
- SATA to 4-Pin Pump Power Cable: This cable is used to power the pump from the power supply unit via a SATA connection.
- User Manual: Instructions for installation and maintenance.
This assortment emphasizes the manufacturer’s commitment to providing a complete cooling solution, ensuring that users have everything they need for installation and operation. The inclusion of extra thermal paste and a coolant refill bottle is a thoughtful addition, allowing for immediate setup as well as future maintenance. The user manual is an essential component, guiding users through the installation process and offering tips for optimal usage and maintenance of the system.
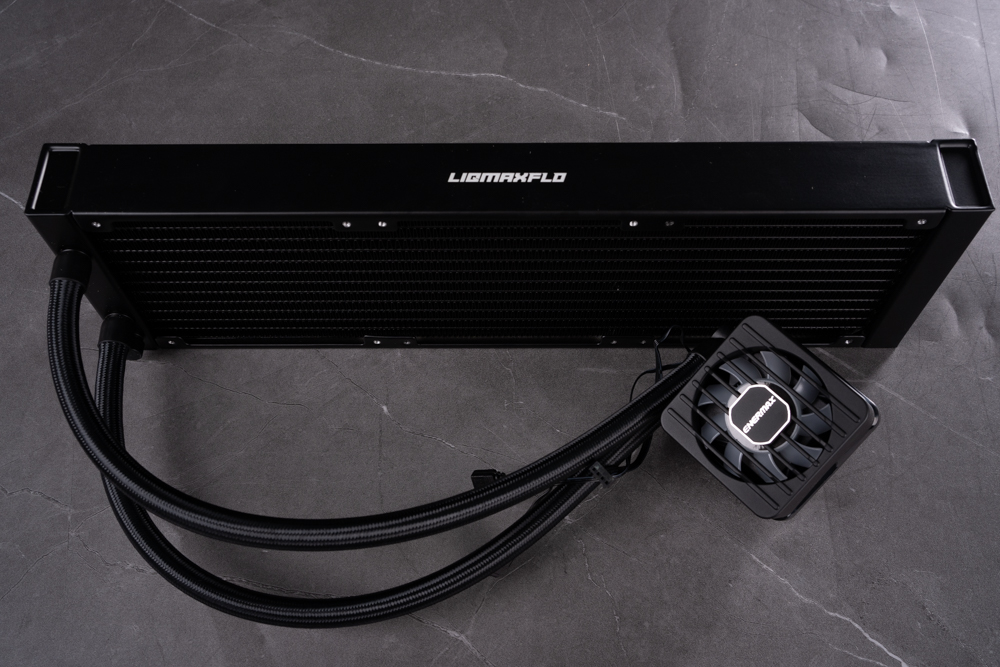
The main unit of the Enermax LIQMAXFLO 360 ARGB liquid cooler system. The cooler features a large, black radiator with the “LIQMAXFLO” branding prominently displayed along its length, indicating a sleek and coherent design. The braided tubing extending from the radiator ensures durability and protection against wear and potential leakage.
Attached to the radiator is the pump and water block assembly, showcasing Enermax’s distinctive design. The pump housing includes the Enermax logo backlit presumably by ARGB lighting, which suggests that it will contribute to the system’s aesthetic with customizable colors and effects.
The 360mm size of the radiator implies that it’s designed for cases that can accommodate this larger size, which is typically associated with higher cooling efficiency due to a larger surface area for heat dissipation. The quality of the materials and the finish of the product suggest a premium build designed for enthusiasts looking for top-tier cooling solutions for high-performance computing tasks.
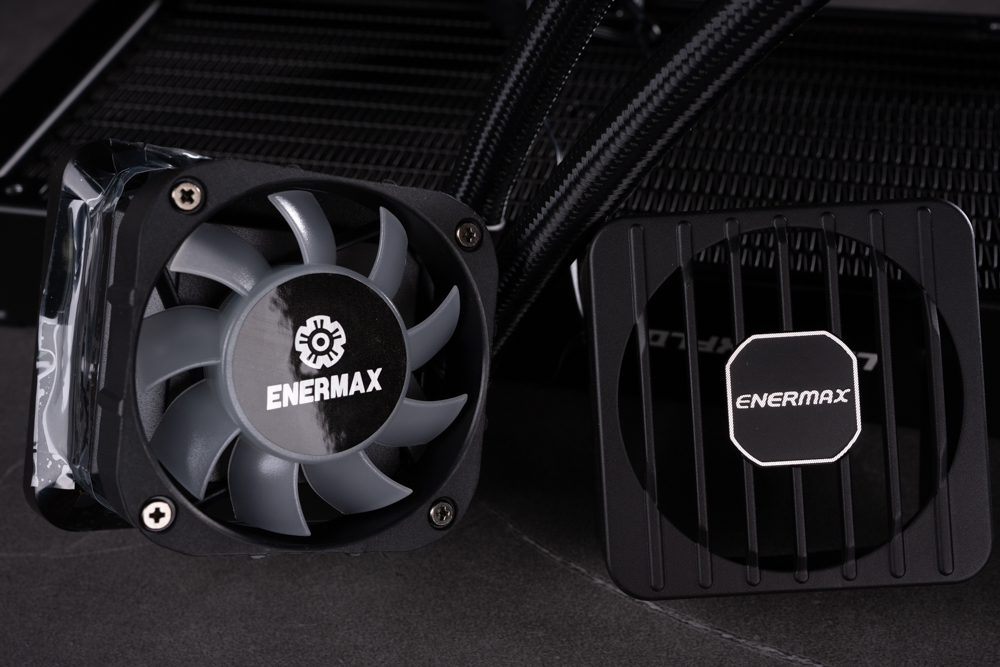
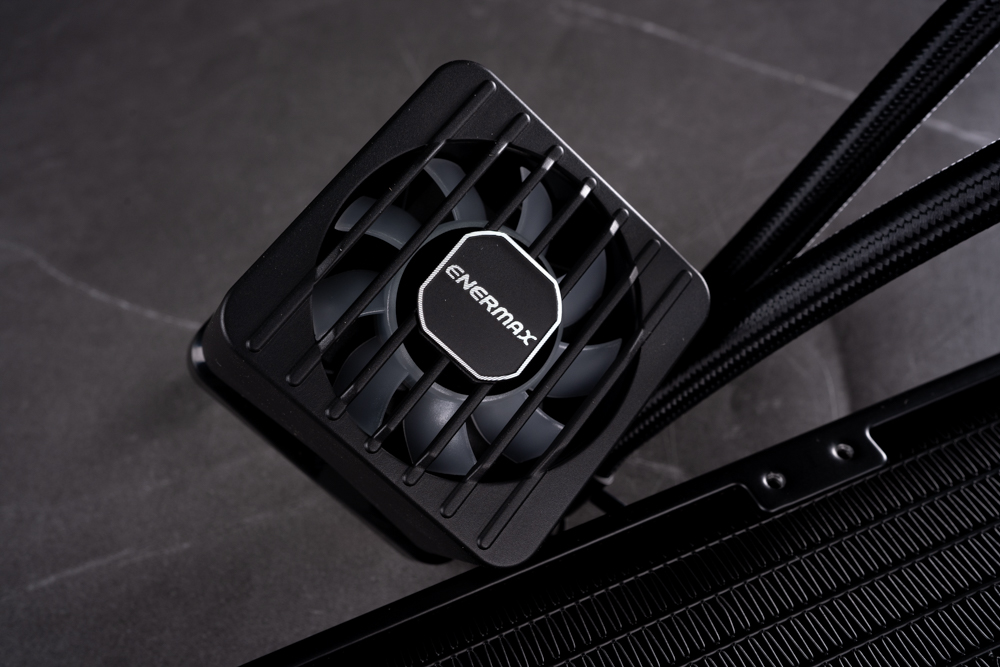
This close-up showcases the fan and the water block from the Enermax LIQMAXFLO 360 ARGB unit. The fan features the Enermax logo at its center, with a design that speaks to its purpose of ensuring optimal airflow and quiet operation. The attention to detail in the fan’s design, including the securing screws and the structure of the blades, suggests that it’s engineered for efficiency and noise reduction.
Next to it is the magnetic water block cover, which is also adorned with the Enermax logo. This cover not only protects the cooling elements but also adds to the overall aesthetic of the cooler. The magnetic attachment method for the water block cover suggests ease of access and simple customization, aligning with the modern demand for PC components that combine functionality with a personalized touch.
The neat braided sleeving of the tubing adds to the premium feel of the product, indicating that the manufacturer has considered both durability and design aesthetics. The use of such sleeving is a common feature in high-end cooling solutions, aimed at users who are meticulous about the internal appearance of their PC builds.
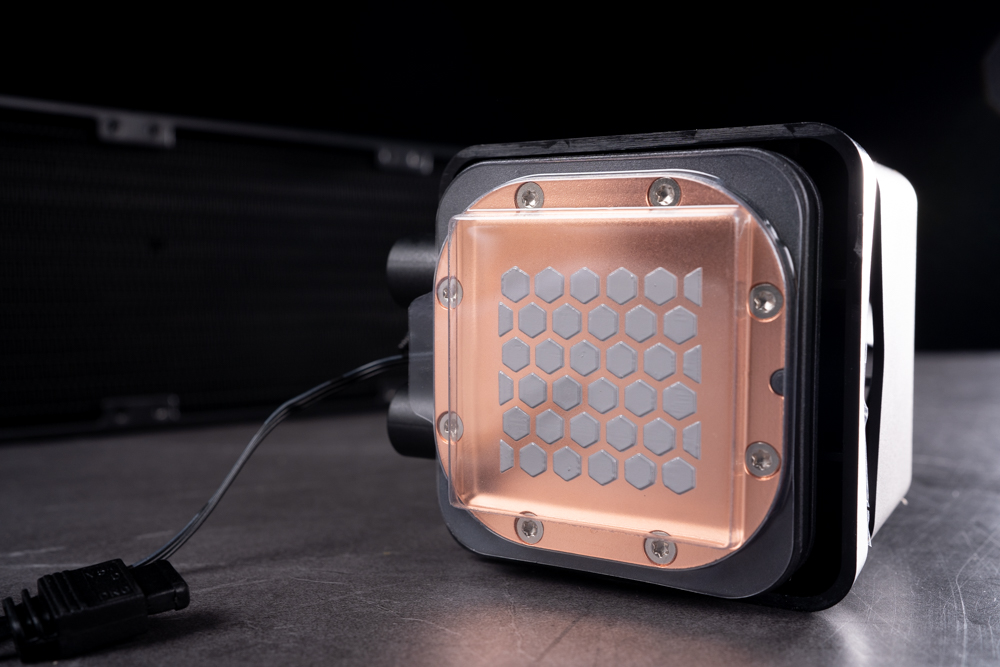
A clear view of the water block of the Enermax LIQMAXFLO 360 ARGB cooler, which sits at the heart of the liquid cooling system. The water block’s copper base is exposed, showcasing the pre-applied Dow Corning TC-5888 thermal compound, a high-performance thermal interface material designed to efficiently transfer heat from the CPU to the cooler.
The geometric pattern on the copper base not only contributes to the aesthetic but might also play a role in optimizing heat transfer. A protective plastic cover is placed over the base to keep the pre-applied thermal paste clean and intact until installation. This cover ensures that the thermal paste remains uncontaminated, which is essential for optimal thermal conductivity when the cooler is mounted onto the CPU.
The image also gives us a hint at the build quality and attention to detail with its clean design, precision screws, and the overall robust construction of the water block, indicating a product built to offer efficient cooling performance and durability.
The connectors for the pump and ARGB lighting of the Enermax LIQMAXFLO 360 ARGB cooler. In view are a 4-pin PWM (Pulse Width Modulation) connector and a 3-pin ARGB (Addressable RGB) connector, each featuring a male and a female end.
The 4-pin PWM connector is used to power the pump and control its speed based on CPU temperature, which allows for an optimized balance between cooling efficiency and noise levels. PWM control is a standard for modern CPU coolers as it provides precise speed control.
The 3-pin ARGB connector is responsible for powering the customizable RGB lighting on the water block. Addressable RGB allows each LED to be controlled independently, enabling a variety of lighting effects and colors that can be synchronized with other ARGB-compatible components in a user’s PC setup.
The presence of these connectors confirms the cooler’s compatibility with a wide range of motherboards and customizability options, appealing to users who prioritize both performance and aesthetics in their builds. Having separate connectors ensures that users can easily integrate the cooler’s controls into their existing system configurations.
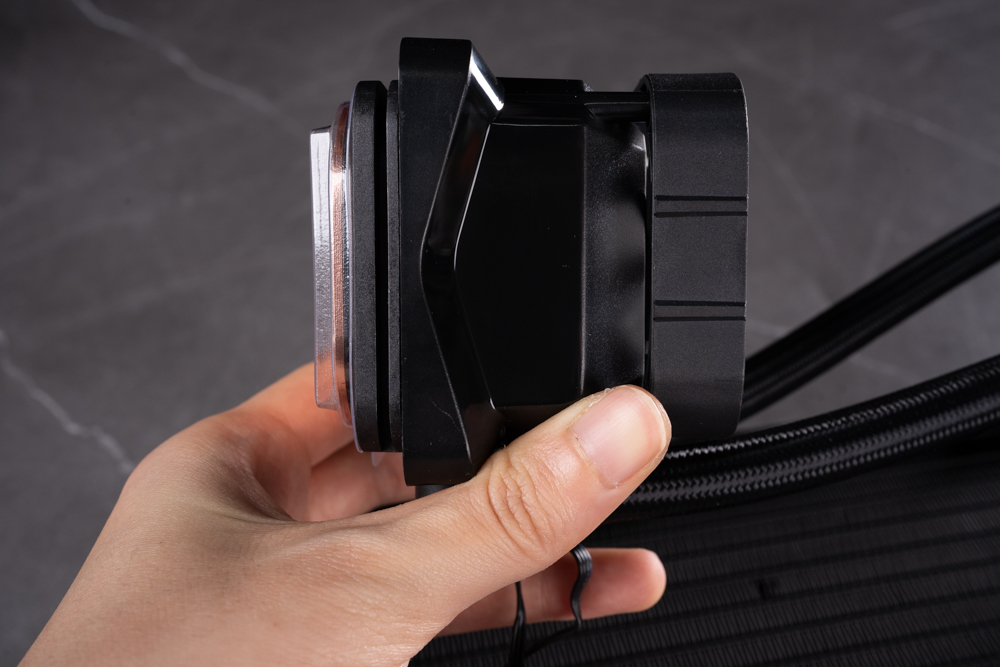
A close-up view of the side of the LIQMAXFLO liquid cooler’s water block. This component is crucial as it makes direct contact with the CPU to absorb heat. The water block appears robust and houses the integrated VRM fan that is part of its innovative cooling design, contributing to the dissipation of heat from critical areas around the CPU. The visible copper base indicates a preference for high thermal conductivity, ensuring efficient heat transfer from the processor to the coolant. We can see the sleeved tubing that provides a clean and durable connection to the radiator, an essential feature for maintaining coolant flow and overall aesthetics of the cooling system. This water block embodies the advanced engineering that is typical of the LIQMAXFLO series, aiming to deliver top-tier thermal management for high-performance computing setups.
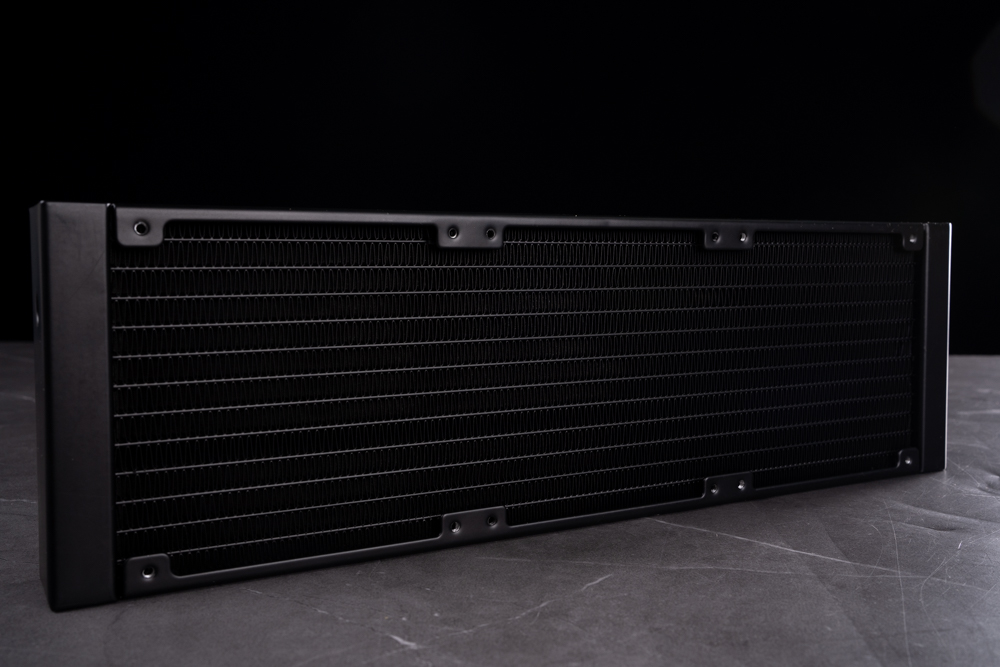
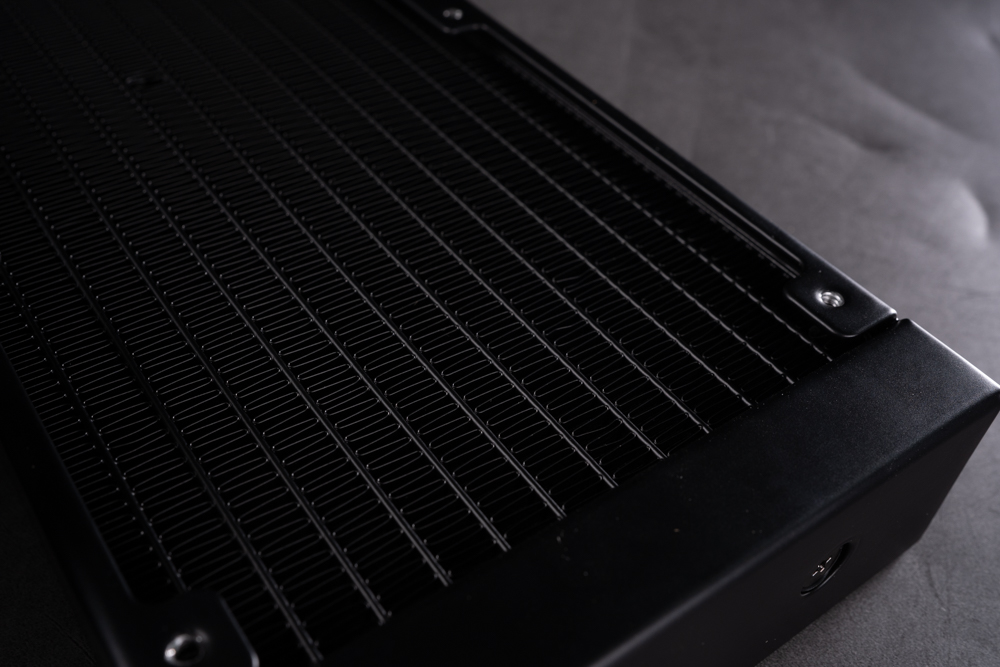
A sleek, wide-angle view of the LIQMAXFLO series radiator, which is a critical component of the all-in-one liquid cooling system. The dimensions, as mentioned, are 400 x 120 x 38 mm, showcasing the impressive 38mm thickness that provides a substantial surface area for heat exchange. The dense array of fins is optimized to increase contact with the air, which, when combined with the appropriate fans, maximizes the heat dissipation away from the liquid coolant after it has absorbed the CPU’s heat. The black finish of the radiator not only gives it a sophisticated appearance but also ensures it can seamlessly integrate into most computer build color schemes. Its considerable size suggests it’s designed for systems that require robust cooling solutions, suitable for high-performance tasks and overclocking scenarios. The construction seems sturdy, and the overall design is in line with the LIQMAXFLO’s focus on combining performance with aesthetic appeal.
A detailed look at the micro water channels and the wave-shaped fins of the LIQMAXFLO series radiator. The structure is designed with 12 distinct micro-channels that increase the surface area for the coolant to transfer heat to the fins. This intricate network ensures efficient thermal exchange as the liquid travels through the radiator.
The wave-shaped fins, also referred to as single-wave fins, are engineered to create turbulent airflow, which enhances heat dissipation by breaking up the air’s laminar flow. This design innovation optimizes cooling by increasing the interaction between the passing air and the heated fins, leading to more effective heat transfer.
This close-up highlights the radiator’s meticulously engineered features aimed at high-performance cooling, showcasing the attention to detail that goes into the design of such components to deliver optimal thermal management in computer systems.
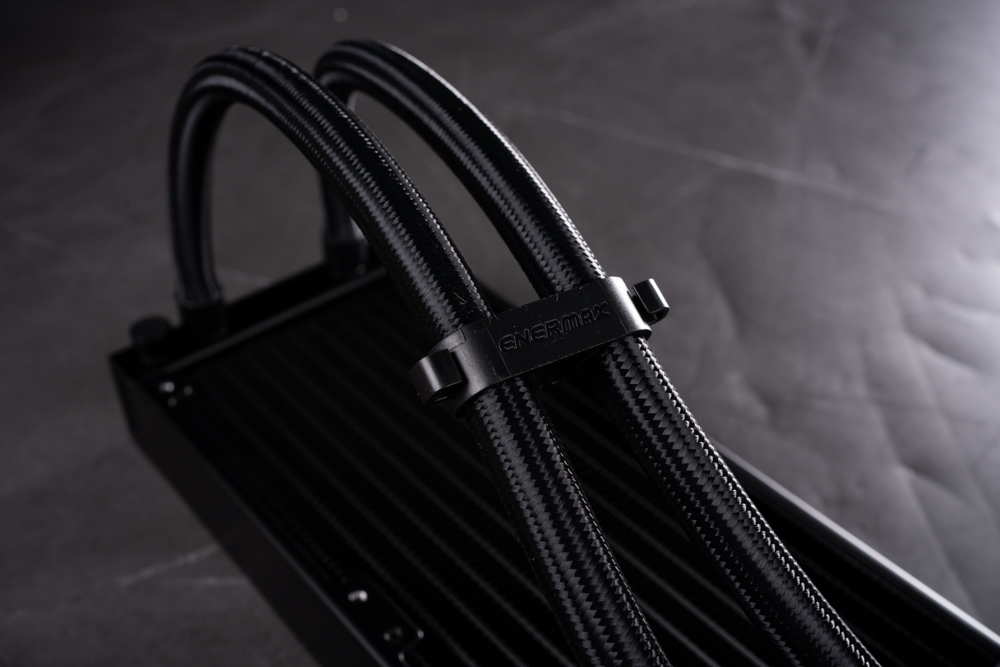
A detailed view of the sleeved tubing of an Enermax liquid cooling system, with a focus on the branded clamps that secure the tubes. These clamps are embossed with the Enermax logo, adding a touch of branded sophistication to the setup. The sleeved design of the tubes not only enhances durability, protecting the tubes from wear and potential damage, but also contributes to the overall aesthetics of the system. The precision and attention to detail in the design reflect Enermax’s commitment to quality, ensuring that even the smallest components align with the brand’s standards. These secure and stylish line clamps play a crucial role in maintaining the integrity of the cooling system by preventing leaks and ensuring a stable connection between the tubes and the radiator.
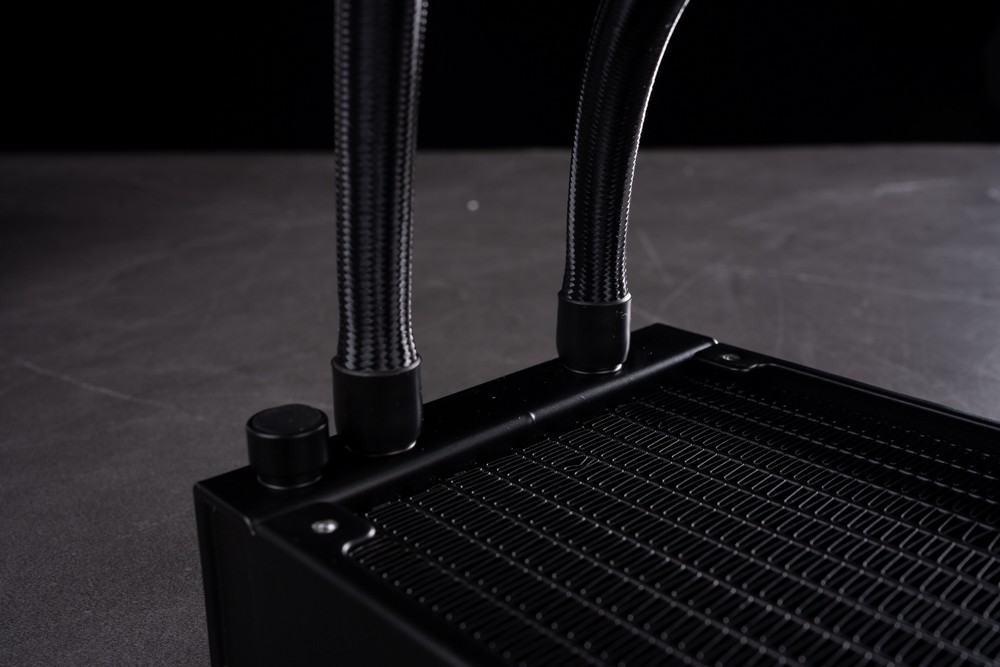
A closer look at the tubing of the Enermax liquid cooling system, showing where the tubes connect to the radiator. The sleeved tubing is a hallmark of quality, providing a combination of durability and flexibility. It allows for a secure and stable route for the coolant to pass between the radiator and the water block, which is vital for maintaining the system’s cooling efficiency. The sleeves help to protect the tubes from potential damage due to kinking or abrasion, which is important in preserving the integrity of the system over time. This close-up also gives us a glimpse of the fine detail in the radiator’s fin design, emphasizing the compact and efficient construction designed to maximize heat dissipation. The quality of materials and construction seen here are indicative of Enermax’s attention to reliability and performance in their cooling solutions.
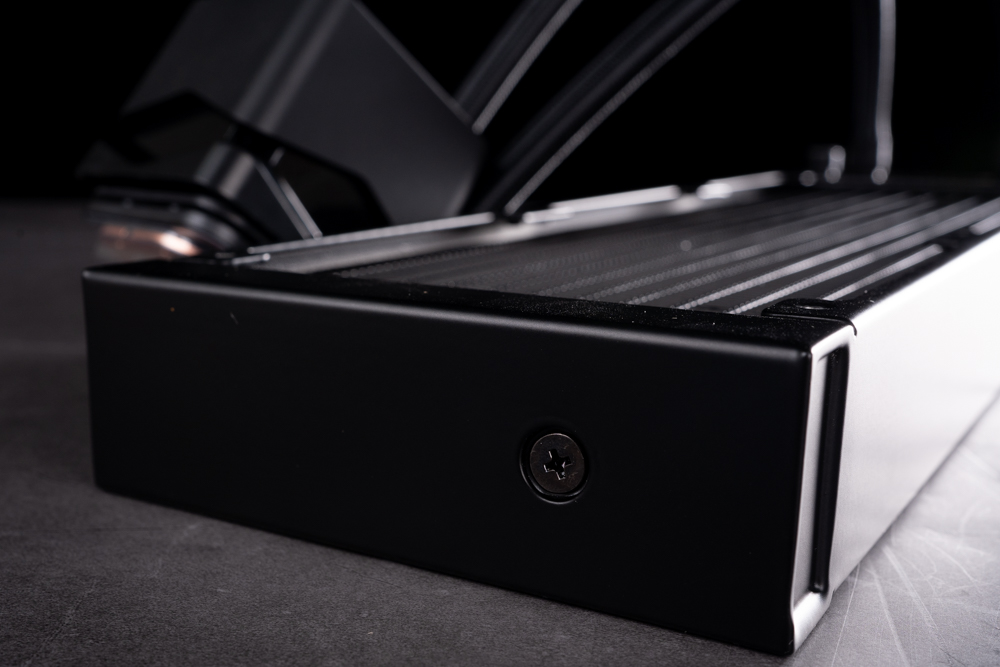
We are presented with an angled view of the radiator, highlighting the refill port which is secured with a cross-head screw. This port is an essential feature for maintenance or replenishment of the liquid coolant over time. The design allows users to easily access the internal liquid chamber to top off or replace the coolant, ensuring the cooling system operates at peak efficiency throughout its lifespan. The use of a standard cross-head screw means that users can perform this maintenance with commonly available tools, reflecting Enermax’s commitment to user-friendly design. This level of accessibility is a thoughtful addition for enthusiasts who prioritize the longevity and performance of their cooling solutions. The port is seamlessly integrated into the radiator’s sleek exterior, which maintains the system’s aesthetic while offering practical utility.
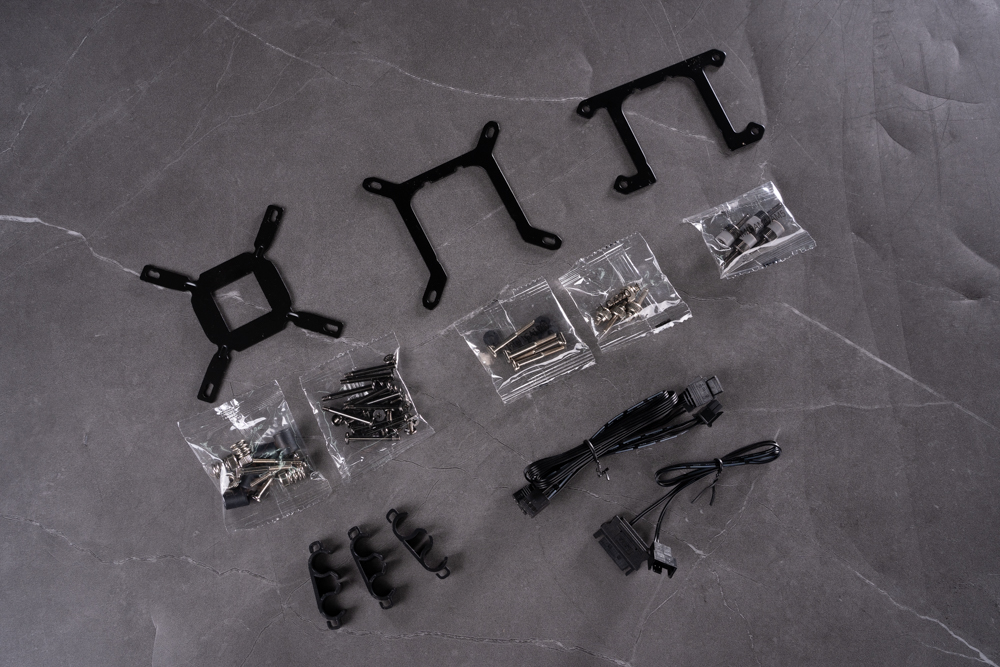
A neatly arranged overview of the various mounting brackets, screws, and other components that are included with the Enermax liquid cooling system. These parts ensure compatibility across both Intel and AMD platforms, allowing for a broad range of installations. The assortment includes:
- Different mounting brackets specifically designed to fit a variety of CPU socket types from both Intel and AMD, making the cooler versatile across multiple builds.
- Various screws and fasteners, each likely designated for specific parts of the installation process. These are probably differentiated by thread size and length to match the corresponding components they will secure.
- Rubber dampers to minimize vibration and noise from the cooler when it is in operation, which is crucial for maintaining a quiet PC environment.
- Cable sets for connecting the cooler’s fans and RGB lighting to the motherboard or fan controller, ensuring that users can manage the cooler’s functions and aesthetics.
These accessories are essential for the proper and secure installation of the cooling system, and the attention to detail in providing the necessary parts for both Intel and AMD platforms speaks to Enermax’s dedication to compatibility and user convenience. The subsequent detailed introduction of each part will likely provide insight into the installation process, ensuring users can effectively set up their new cooling system with confidence.
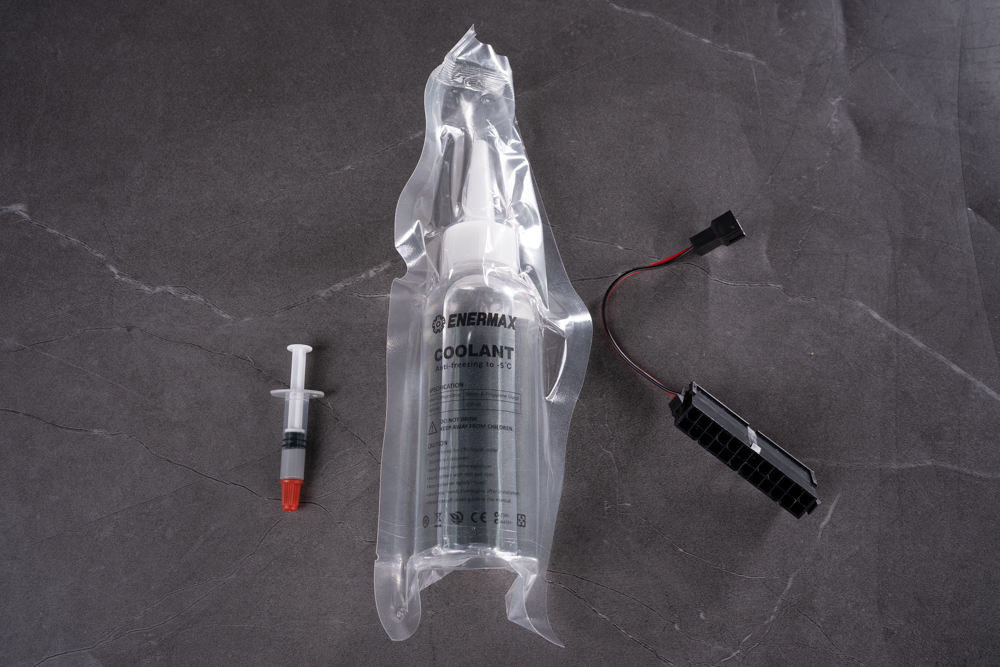
The supplementary components for maintaining and operating an Enermax liquid cooling system, which include:
- Enermax Coolant: A bottle of specially formulated coolant for use in the liquid cooling system. This liquid is designed to transfer heat efficiently and usually contains anti-corrosive and anti-bacterial substances to maintain the integrity and longevity of the system.
- Thermal Paste: There’s a syringe of thermal paste, which is critical for establishing a good thermal interface between the CPU and the cooler’s water block. This paste fills microscopic imperfections on the surfaces to enhance heat transfer.
- 24-Pin to 4-Pin Cable: This cable adapter is often used to provide power to the pump or fans of the cooling system from the power supply, utilizing a connection that typically powers a motherboard.
These items are crucial for the initial setup and ongoing maintenance of the liquid cooling system, ensuring optimal performance and durability. The coolant needs to be periodically checked and refilled, the thermal paste should be replaced during cooler installation or maintenance, and the power cable is vital for the system’s operation. The inclusion of these accessories underscores the comprehensive approach Enermax takes in providing everything necessary for users to manage their cooling solution effectively.
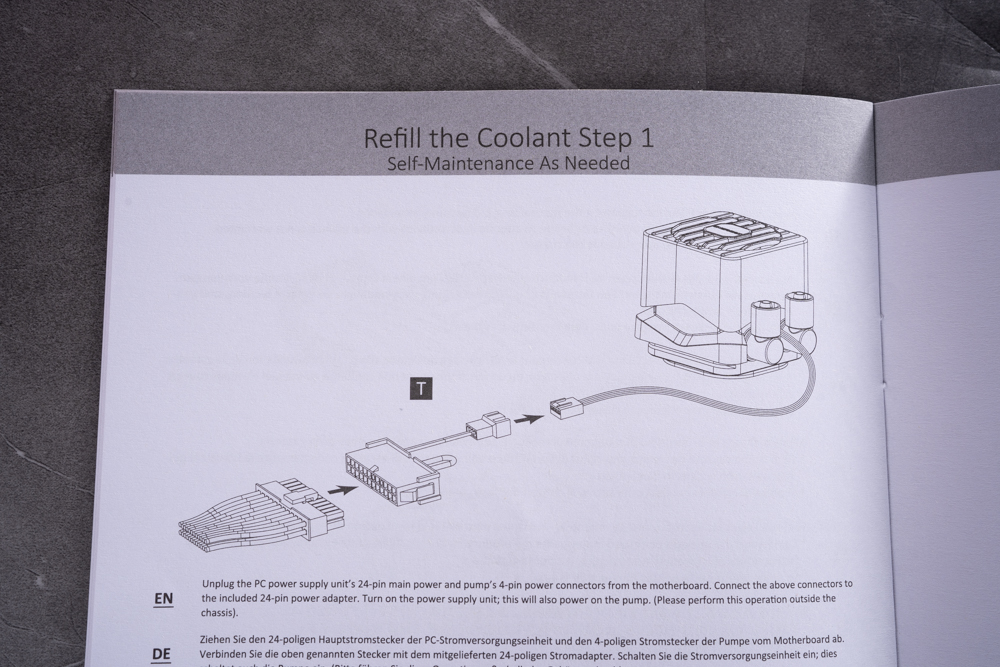
A manual showing the steps for refilling the coolant in the LIQMAXFLO 360 ARGB liquid cooling system. To refill the coolant, the process involves using the access point on the radiator, which should be done outside of the computer case to prevent any potential spills or damage.
Here’s a brief overview based on the described steps:
- Power Preparation: Disconnect the PC power supply’s 24-pin main power and the pump’s 4-pin power connectors from the motherboard. Using the included 24-pin power adapter, you will bridge the necessary pins. This setup will power the pump during the refilling process without powering the entire system.
- Filling the Coolant: With the 4-pin connected to the power supply via the adapter, the pump can operate independently. This allows you to fill the coolant while the pump is running, which helps to remove any excess air bubbles from the system. Ensuring that air bubbles are removed is crucial as they can impede the cooling system’s effectiveness.
The manual likely includes detailed illustrations and instructions to assist users through this maintenance task, ensuring that the cooling system can be refilled with precision and safety. It’s important to follow the manual’s instructions closely to avoid any operational issues with the cooler and to maintain system stability.
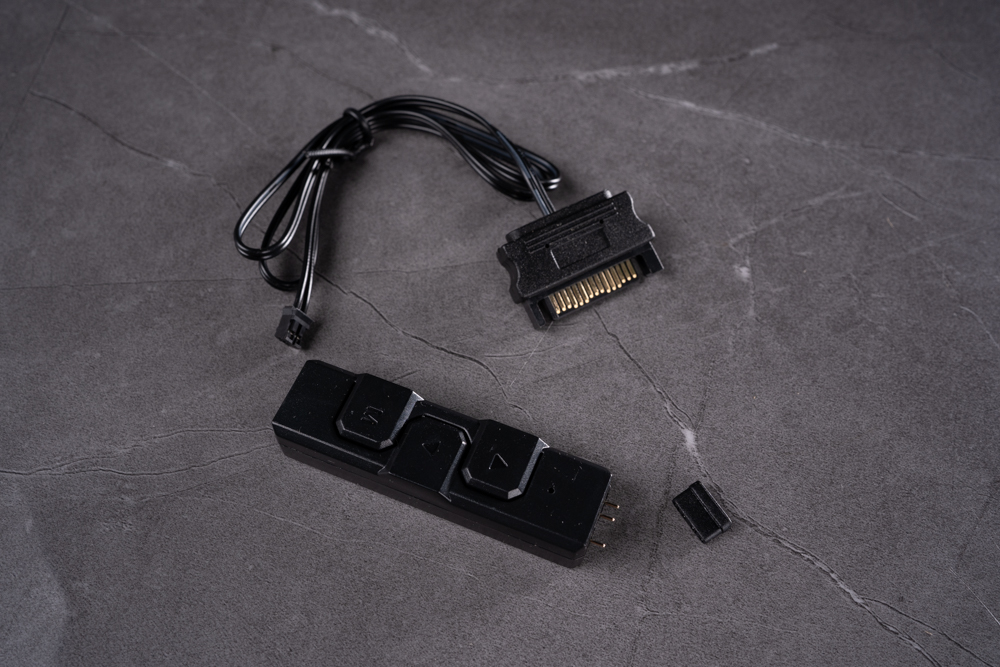
An ARGB (Addressable RGB) lighting controller along with a cable that is likely used for auxiliary power supply, with a SATA power connector. This setup allows users to manage the lighting effects of their ARGB-compatible devices, such as fans or LED strips, within their PC build.
Here’s a breakdown of the components:
- ARGB Controller: This compact device with buttons is likely used to switch between different lighting modes, adjust brightness, or change colors. It offers users manual control over their system’s lighting without the need for software.
- Power Cable with SATA Connector: The SATA connector is designed to plug into the power supply’s SATA cable, providing the necessary power to the ARGB controller and, by extension, to any connected ARGB devices.
- Additional Connectors: The smaller connectors on the cable are typically used to connect to the ARGB header on the motherboard or directly to the ARGB devices.
By using a SATA power supply, the ARGB controller ensures that it receives a stable power source, allowing it to operate independently of the motherboard. This is particularly useful for systems where the motherboard might not have enough ARGB headers or for users looking for a simple plug-and-play solution for their system’s lighting.
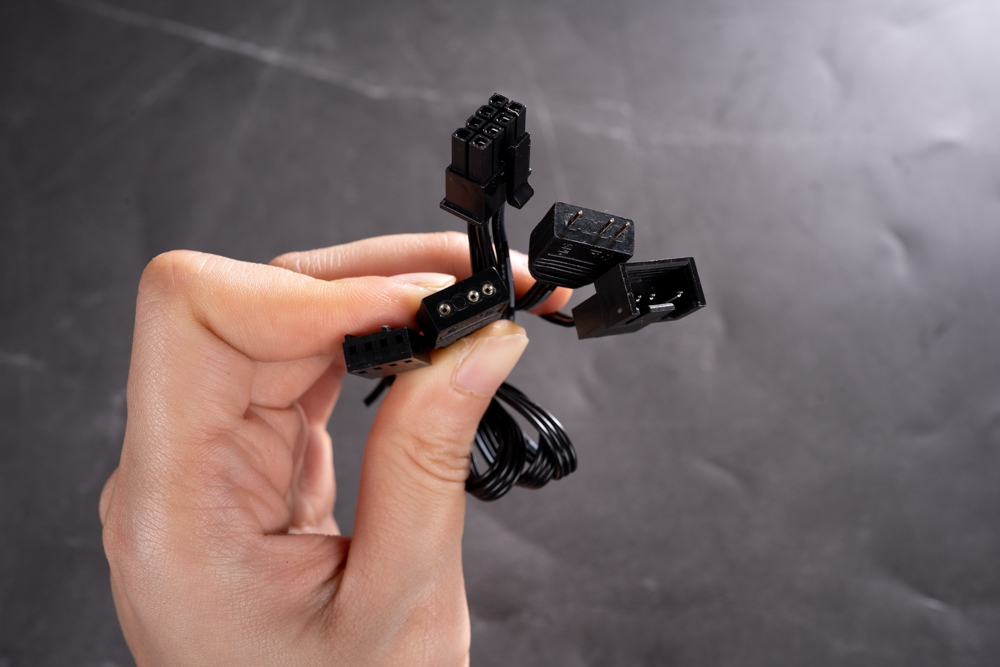
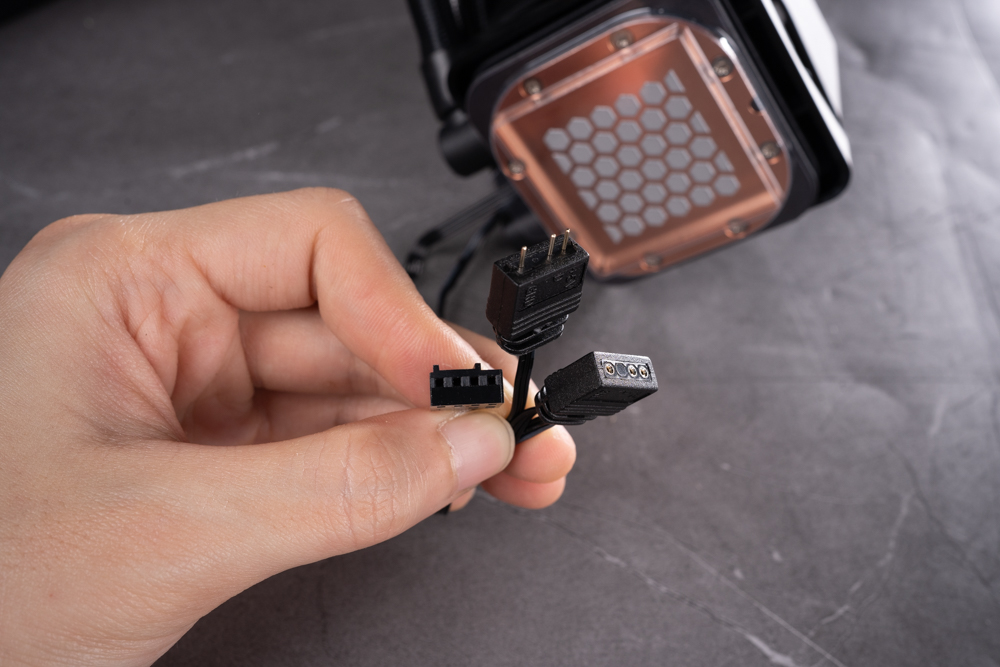
A hand holding a set of cables that are part of the LIQMAXFLO cooling system setup. These cables are adapters that allow for the conversion and connection of the system’s fan and ARGB (Addressable RGB) components to the motherboard.
- 8-Pin to PWM 4-Pin Adapter: This adapter splits the 8-pin connector typically used by the cooler’s fans into a 4-pin PWM (Pulse Width Modulation) connection. PWM allows for precise control of the fan’s speed through the motherboard, enabling dynamic speed adjustment based on the CPU’s temperature or user-defined settings.
- ARGB 3-Pin Connector: Alongside the PWM adapter, there is also an ARGB connector with a 3-pin configuration. This is used to connect the cooler’s ARGB lighting to an ARGB header on the motherboard, which controls the lighting effects. The daisy-chain design of this cable means multiple ARGB devices can be connected in series, allowing them to be controlled in unison or in a sync pattern defined by the motherboard’s software or ARGB controller.
These types of cables are essential for providing power and control to the fans and lighting of the cooling system, ensuring they can be easily integrated with the motherboard for comprehensive system management. They are designed to standardize connections across different components and motherboard headers, simplifying the installation process.
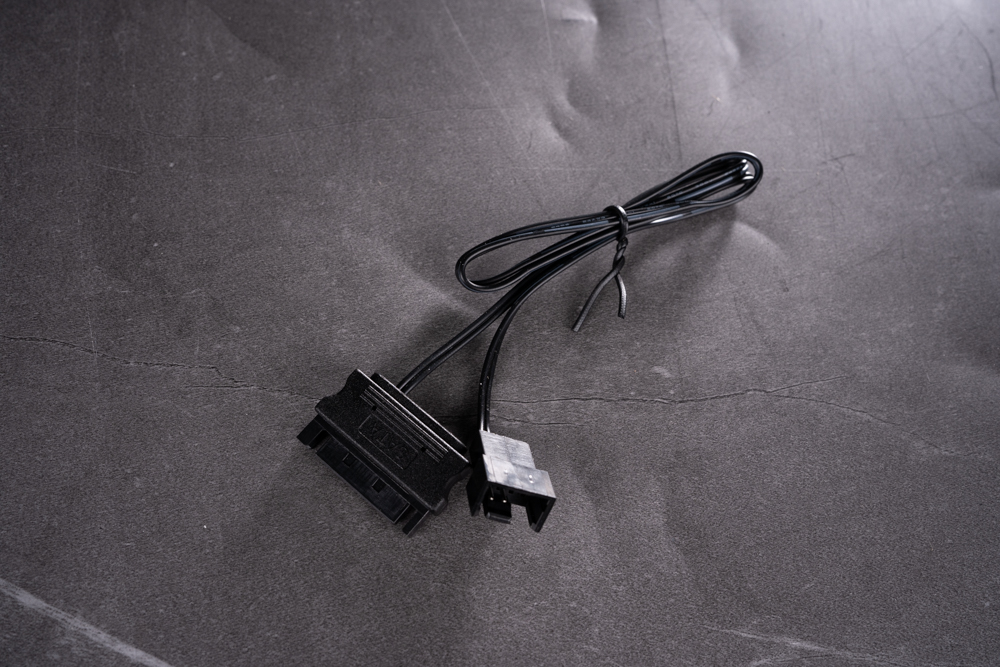
A cable with a SATA power connector on one end and what appears to be a connector for a fan or a pump on the other. This kind of adapter is used to supply power directly from the power supply’s SATA power cable to a component within the computer, such as a case fan or the pump of a liquid cooling system.
The SATA end plugs into one of the available SATA connectors from the power supply unit (PSU), which are typically used for powering hard drives or SSDs. The other end connects to the power input of the fan or pump, ensuring that it receives the necessary voltage and current for operation.
Using a SATA power connector for fans or pumps is common when either the motherboard does not have enough fan headers, the headers are being used for other fans, or the pump requires more power than a standard motherboard fan header can provide. This configuration simplifies the wiring and can be particularly useful for cable management, as SATA power cables are often more easily routed in a case than multiple individual fan cables.
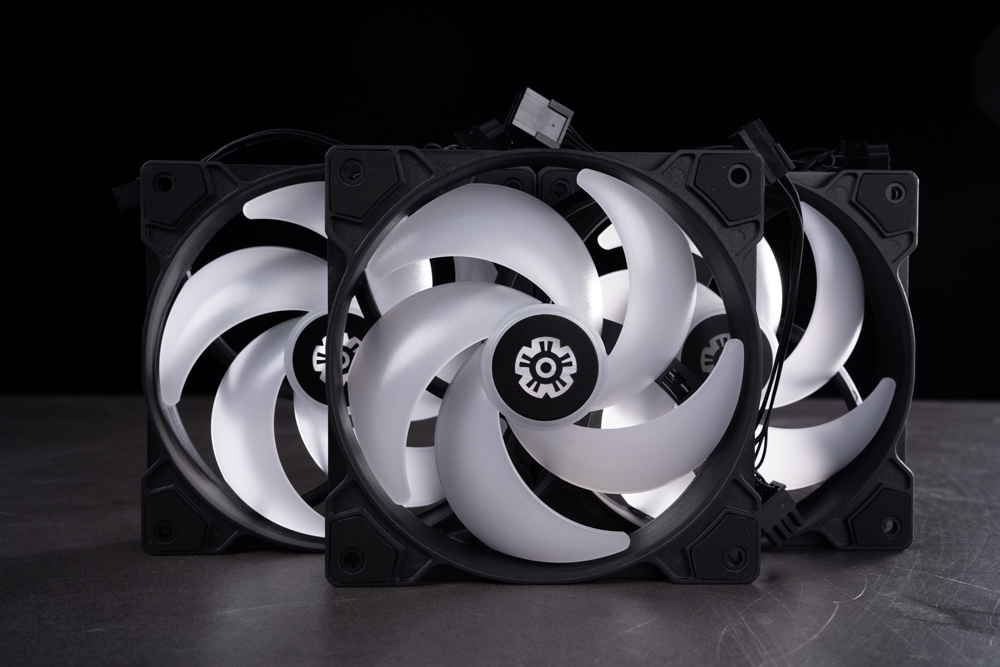
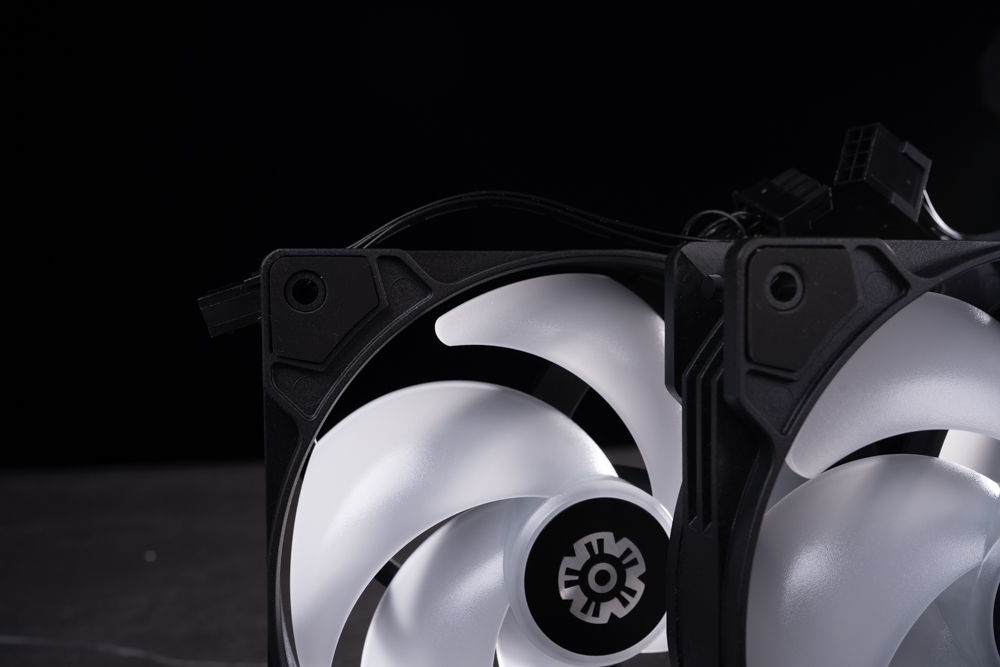
A visual of three 120mm silent fans, part of the LIQMAXFLO all-in-one liquid cooling system. These fans feature a unique five-blade design with a notable blade thickness of 3mm, which, as per the manufacturer’s specifications, is intended to minimize frame vibration and thus reduce noise during operation.
Comparing the 3mm blade thickness to the common market standard of 1.8~2.2mm, these fans are designed to deliver a quieter performance. The capability to reach speeds up to 1800 RPM while maintaining a maximum noise level of 23.46dB(A) speaks to their efficiency in delivering high airflow with minimal acoustic footprint. Even at mid-range speeds, the fans are engineered to be virtually inaudible, which is an essential aspect for users seeking a quiet computing environment.
The fans are connected using Enermax’s proprietary 8-pin connector interface, which is designed to provide power and also transmit ARGB lighting signals. This type of connector likely supports daisy-chaining, allowing multiple fans to be connected in sequence, simplifying cable management and installation. It’s a testament to Enermax’s dedication to functionality and aesthetics, ensuring users have a powerful yet visually appealing cooling solution.
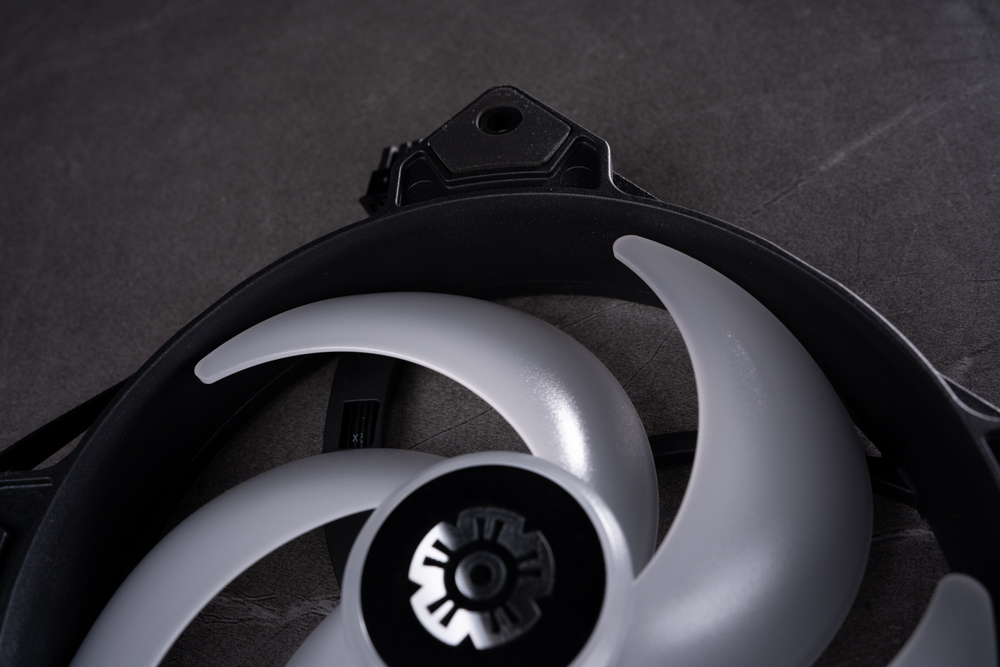
A close-up view of a single fan blade within the 120mm fan of the LIQMAXFLO cooling system. We can observe the “angle of attack” of the five-blade fan, which refers to the angle at which the blades are set relative to the plane of rotation.
The angle of attack on these blades is a result of careful calibration to ensure optimal air pressure and flow characteristics while also reducing noise. By optimizing this angle, the fan can push a greater volume of air through the radiator fins, which is necessary for effective heat dissipation. A precise angle of attack helps to balance between the forces of lift and drag that act on the blade, which in turn contributes to the overall efficiency of the fan.
The angle and the thickness of the blades, along with the blade profile, are all part of the fan’s design that aims to maximize cooling performance while minimizing noise, making it suitable for high-performance cooling solutions where noise levels are a concern. The design reflects a meticulous approach to engineering, with the aim of providing a silent yet powerful component to the cooling system.
We see a close-up of one corner of a 120mm fan from the LIQMAXFLO series, highlighting the anti-vibration rubber pads affixed to the frame. These rubber pads are strategically placed on all four corners on both sides of the fan to serve a dual purpose:
- Vibration Dampening: They act as shock absorbers, reducing the vibration transmitted from the fan to the chassis or radiator to which it’s mounted. This is essential for maintaining a quiet operation, especially at higher speeds where vibration-induced noise can become more pronounced.
- Noise Reduction: By preventing direct metal-to-metal or plastic-to-metal contact, these pads significantly reduce the possibility of resonance, which occurs when vibrations from the fan amplify through the structure of the case or radiator.
This detail in the fan’s design is indicative of a comprehensive approach to noise management in PC cooling solutions, ensuring that performance doesn’t come at the cost of increased acoustic levels. It’s a feature appreciated by users who value a quiet computing environment.
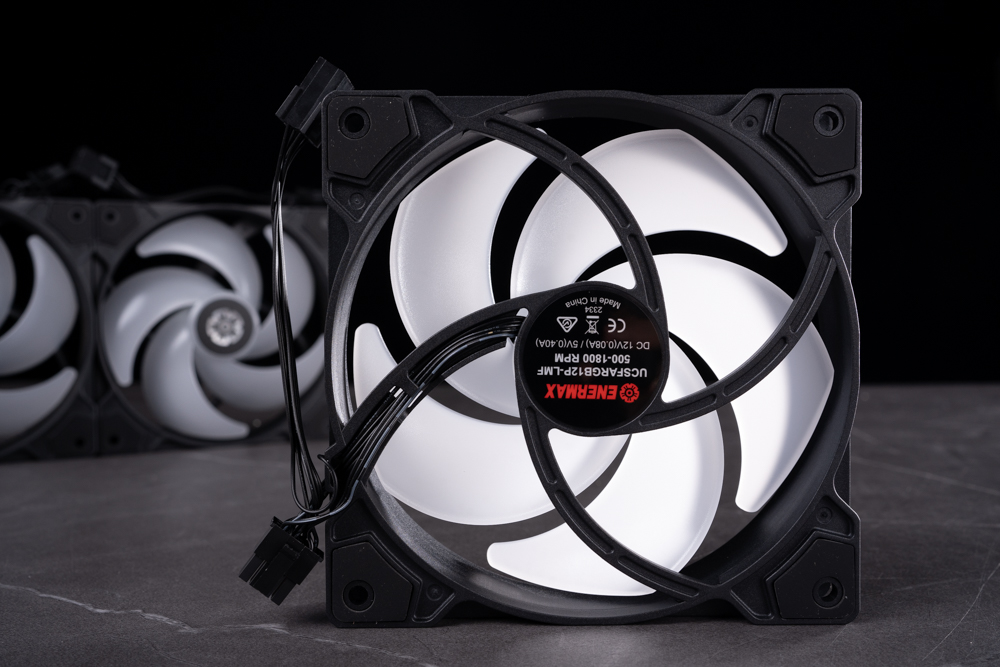
The backside of a 120mm Enermax fan, part of the LIQMAXFLO series, with its specifications label clearly visible. The label includes essential information such as the fan’s model number, electrical requirements, and regulatory compliance marks.
Key points typically found on such labels include:
- DC Input: The voltage and current requirements, which is vital for ensuring compatibility with the PC’s power supply.
- RPM (Revolutions Per Minute): It might list the maximum rotational speed of the fan.
- CFM (Cubic Feet per Minute): This could indicate the volume of air the fan can move, a critical factor in its cooling capability.
- Noise Level: Sometimes measured in dBA, it gives users an idea of how loud the fan will be at its maximum speed.
- Safety and Compliance: Icons and initials like CE, indicating adherence to international safety and operational standards.
The cable extending from the fan features a connector, likely for power and possibly PWM control, and potentially an ARGB connection if the fan supports customizable lighting. Such detailed specification labels ensure that users can accurately gauge the fan’s suitability for their cooling needs and compliance with their system’s power capabilities.
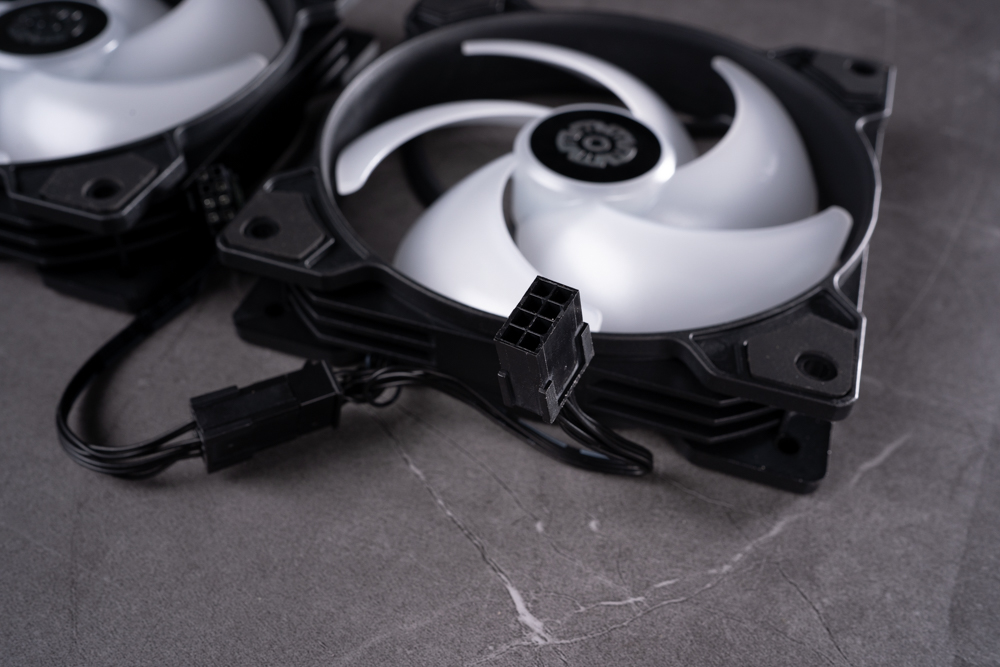
A closer look at the LIQMAXFLO’s proprietary 8-pin fan connector interface. This specialized connector is designed to streamline the process of connecting multiple fans in the series. It’s engineered to carry both power and ARGB (Addressable RGB) signals, allowing users to control the fan speeds and lighting effects with ease.
The connector likely integrates both 4-pin PWM (Pulse Width Modulation) control, which allows for precise fan speed adjustments, and a 4-pin ARGB connection for lighting. This design minimizes the number of separate cables needed, contributing to a cleaner and more organized build by reducing cable clutter.
Enermax’s use of a proprietary connector may also suggest that they provide a hub or motherboard header adapter to accommodate the 8-pin connection, simplifying the installation process while delivering a high level of functionality to the user. This reflects a focus on user-friendly design, allowing for easier setup and management of the cooling system’s features.
Comprehensive Guide: Installing the Enermax LIQMAXFLO Liquid Cooler on Intel and AMD Platforms
The LIQMAXFLO series by Enermax, with its extensive compatibility, supports a wide array of CPU sockets across both Intel and AMD platforms. It’s designed to fit the Intel LGA 1700, 1200, 115x, 2066, and 2011 sockets, which include the majority of modern and past Intel processors. On the AMD side, it is compatible with the current AM4 and the latest AM5 sockets, accommodating a broad range of AMD CPUs as well.
For demonstrating the installation process, utilizing motherboards like the ASROCK Z790 TAICHI and ASROCK B650E TAICHI would be excellent choices. Both are high-end motherboards corresponding to the respective latest Intel and AMD chipsets. The Z790 TAICHI would be representative of Intel’s 12th and 13th generation processors using the LGA 1700 socket, while the B650E TAICHI supports AMD’s latest AM5 socket CPUs.
During the demonstration of the cooler’s installation:
- Highlight the versatility of the mounting hardware included with the LIQMAXFLO series, which allows it to accommodate various CPU socket types.
- Showcase the installation process on each motherboard, detailing any specific steps or considerations required by the different socket types. For example, Intel sockets often use a backplate and push-pin or screw-based mounting system, while AMD installations might use a different mechanism that hooks onto the motherboard’s existing retention module.
- Emphasize the ease of installation and the robustness of the cooler’s mounting system, which are essential for secure cooler attachment and optimal thermal performance.
- Demonstrate how the cooler integrates into the overall build, especially addressing cable management with the included fans and the proprietary 8-pin connector for a clean setup.
This instructional demonstration would be quite valuable for users looking to install the LIQMAXFLO on these platforms, giving them confidence in both the product and the installation process.
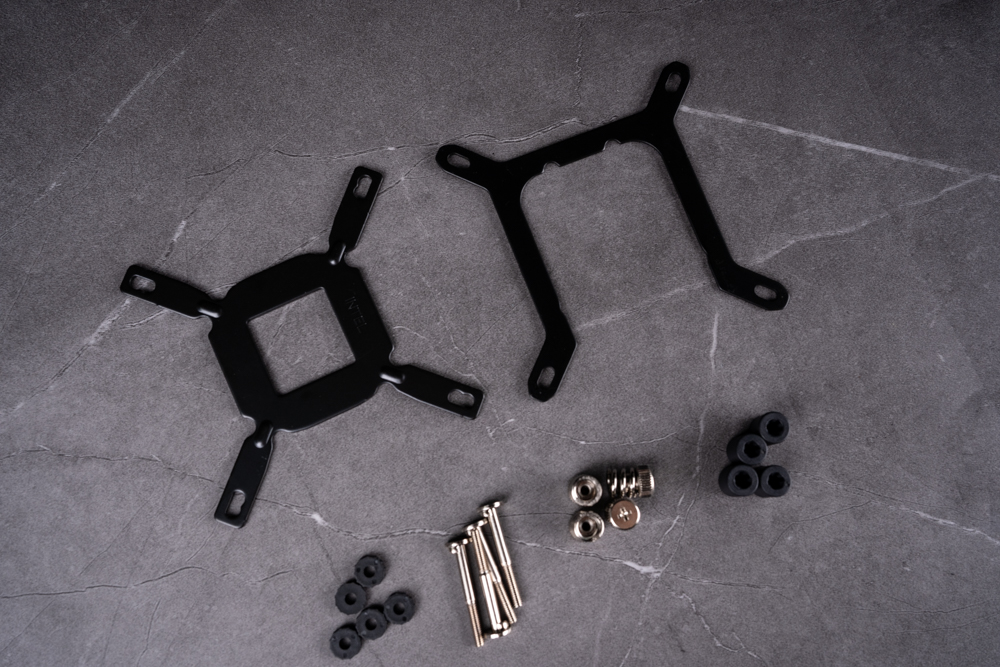
Various components for mounting a CPU cooler on an Intel motherboard, specifically including support for the LGA 1700 socket.
- Intel Backplate: This is the large, central black piece with multiple holes to adjust for different Intel socket types. It’s placed behind the motherboard to provide a stable anchor for the cooler.
- LGA 1700 Bracket: The two black brackets flanking the backplate are designed to fit around the CPU socket, creating a mounting point for the cooler’s cold plate or water block.
- Screws: These are used to secure the brackets to the backplate and the cooler to the brackets.
- Rubber Washers: The small black rubber pieces are likely washers to provide a snug fit and to prevent any metal-on-metal contact that could damage the motherboard.
- Standoffs or Spacers: These small, cylindrical pieces ensure the correct distance between the backplate and the brackets.
With these components, you’d have a secure mounting system that is critical for proper cooler function. The backplate provides the necessary counterbalance to the pressure applied by the cooler, ensuring a good contact between the CPU and the cooler without damaging the motherboard. The specificity of the parts ensures compatibility with the Intel LGA 1700 socket, which is used by the newer generation of Intel processors. The inclusion of such precise mounting hardware demonstrates a commitment to providing a reliable and effective cooling solution for high-performance CPUs.
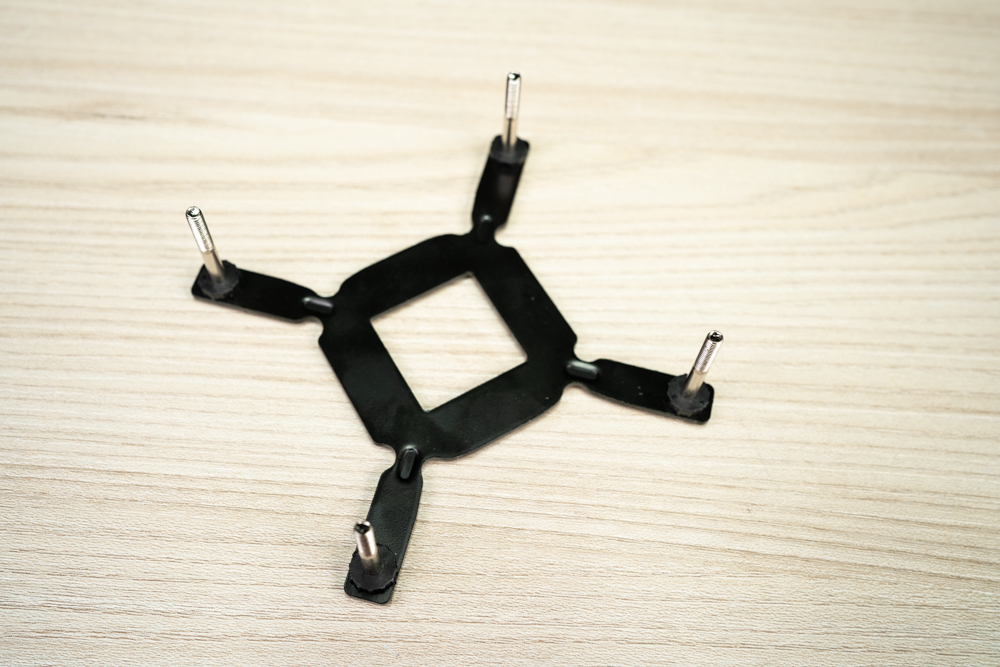
An assembled Intel backplate that’s ready to be installed on an Intel-compatible motherboard. The metal standoffs are already screwed into the correct holes for the corresponding Intel socket, with the ends protruding where the motherboard will be mounted.
Here’s how you would typically assemble and prepare this backplate for installation:
- Identify Socket Type: First, determine the socket type of the Intel motherboard to which the cooler will be attached. This will dictate which holes in the backplate will be used.
- Place Standoffs: Insert the standoffs through the appropriate holes from the underside of the backplate. These are designed to match the socket’s layout, ensuring the cooler will align correctly over the CPU.
- Secure Standoffs: Fasten the standoffs to the backplate. In some designs, they may click into place or may require screwing in. Rubber or foam padding is often pre-applied or added to the backplate’s corners to prevent damage to the motherboard and to ensure the backplate doesn’t short-circuit any motherboard components.
- Installation Ready: With the standoffs in place, the backplate is ready to be placed behind the motherboard. Following this, the cooler’s mounting brackets will be attached to these standoffs from the front side, securing the cooler to the CPU and motherboard.
This backplate is an essential part of the cooler mounting process as it provides the necessary stability and support for the CPU cooler, which is crucial for optimal thermal contact and effective heat dissipation.
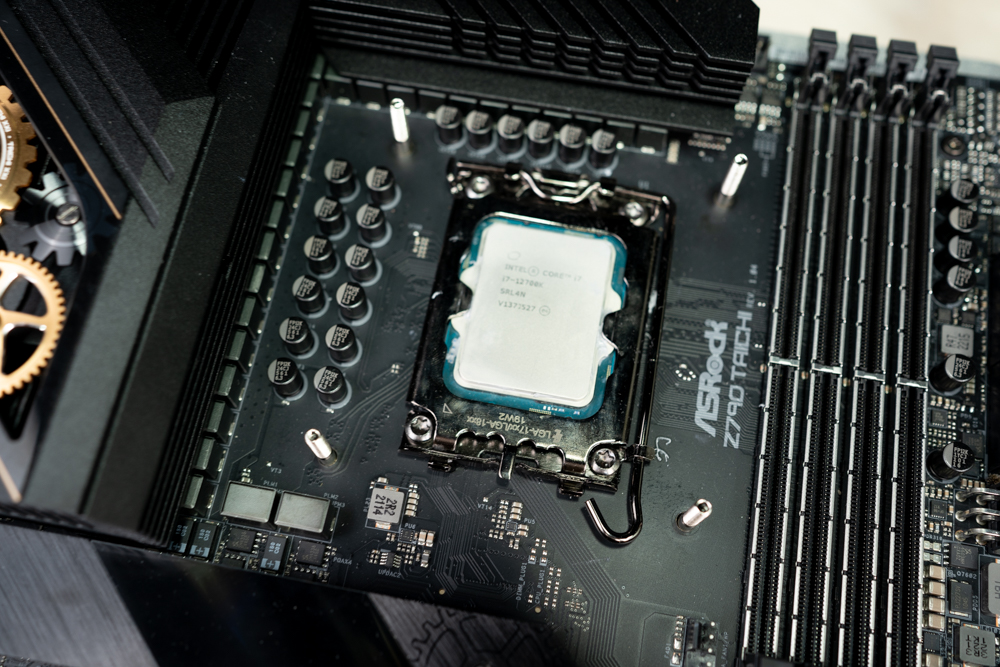
A motherboard with a CPU installed, and a backplate has been placed behind the CPU socket area with four standoffs or screw pillars protruding through the motherboard. These standoffs are where the cooler’s mounting bracket will be attached.
Here’s what we can derive from the image:
- CPU and Socket: The CPU is in place, and the protective cover has been removed, preparing the socket for the cooler installation.
- Backplate Installation: The backplate is correctly positioned behind the motherboard, aligning with the holes around the CPU socket.
- Standoffs: The four standoffs are inserted through the motherboard from the back, standing ready to receive the cooler’s mounting hardware.
At this stage in the installation process, the next steps would typically include:
- Applying thermal paste to the CPU if not already pre-applied to the cooler.
- Attaching the cooler’s bracket to these standoffs.
- Securing the cooler onto the bracket, ensuring even pressure distribution across the CPU for optimal thermal contact.
The image indicates a careful and proper beginning to a CPU cooler installation, emphasizing the importance of precision in such a task to ensure the best performance of the cooling system.
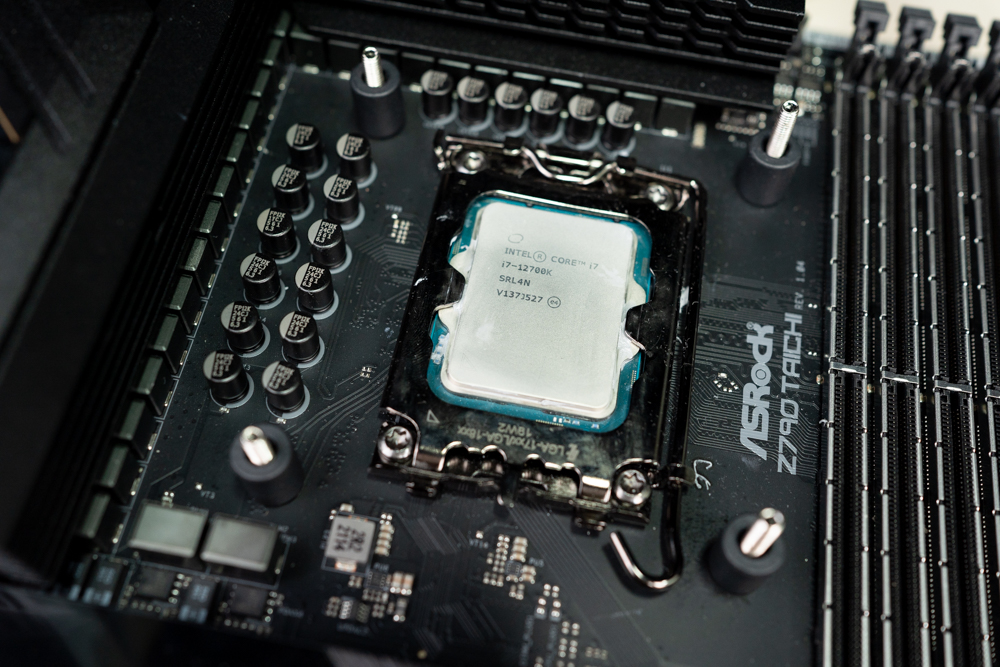
A closer view of an Intel CPU installed on a motherboard, with the backplate in place and the standoffs (or posts) properly positioned through the motherboard’s holes around the CPU socket. The standoffs are the mounting points for the CPU cooler’s bracket.
Here are the specific details:
- CPU: It’s an Intel Core i7 processor, as indicated by the inscription on the integrated heat spreader (IHS).
- Motherboard: The motherboard is an ASRock Z790 Taichi, compatible with Intel’s LGA 1700 socket CPUs.
- Standoffs: The standoffs have been screwed into the backplate from the other side of the motherboard, standing ready for the next step of the cooler installation process.
The next steps in this process would include applying thermal paste to the CPU, placing the cooling unit’s bracket over these standoffs, and securing it with nuts or screws. After that, the cooler itself would be mounted onto the bracket and fastened securely to ensure optimal thermal contact with the CPU. The careful placement of the standoffs and the quality of the backplate are crucial for a stable installation that can support the weight of the cooler and maintain good contact with the CPU for efficient heat transfer.
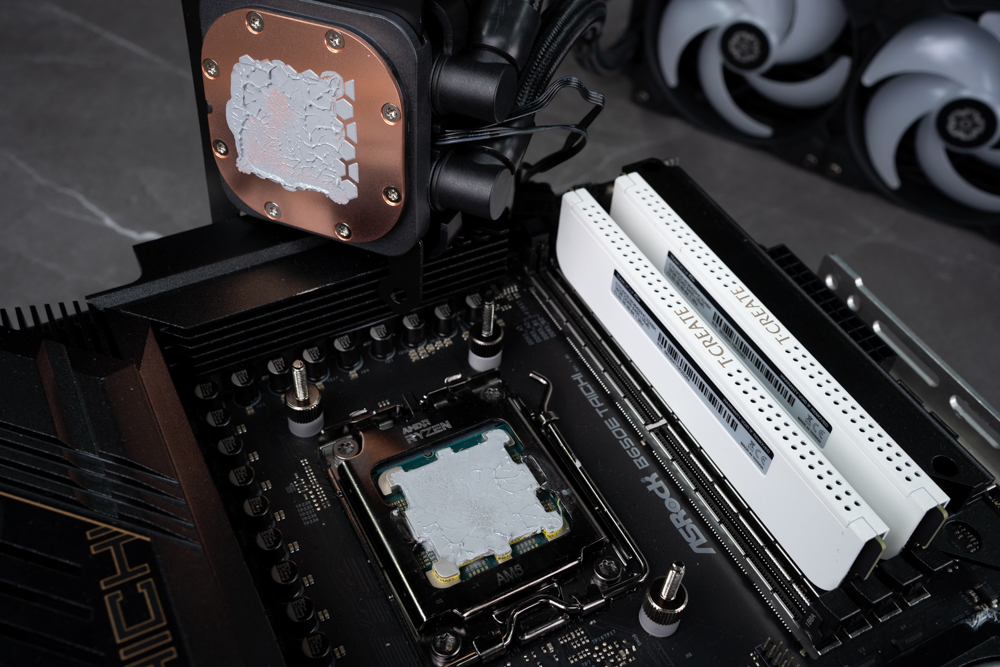
The water block of the Enermax liquid cooling system properly mounted and secured onto the CPU, which is installed on the motherboard. This water block is the component that directly contacts the CPU, transferring heat from the processor into the liquid coolant.
Key features and steps visible or implied in the image include:
- Proper Mounting: The water block appears to be correctly aligned and mounted onto the standoffs, which suggests the cooler’s installation process has reached a critical stage.
- Tubing: The sleeved tubing is neatly routed, indicating a focus on efficient cooling performance as well as aesthetic appeal.
- Secure Fittings: The water block is likely fastened down with screws or thumbscrews, ensuring a tight and even seal over the CPU for optimal thermal transfer.
- Cable Management: The image shows attention to cable management, which is crucial not just for a tidy build, but also for optimal airflow within the case.
This step in the installation process is vital; it’s important that the water block is mounted with even pressure to avoid any hotspots on the CPU, which could impair cooling performance. The presence of a VRM cooling fan on the block is also notable, offering additional cooling for the voltage regulation modules around the CPU socket — a thoughtful design inclusion for systems that may encounter high thermal loads.
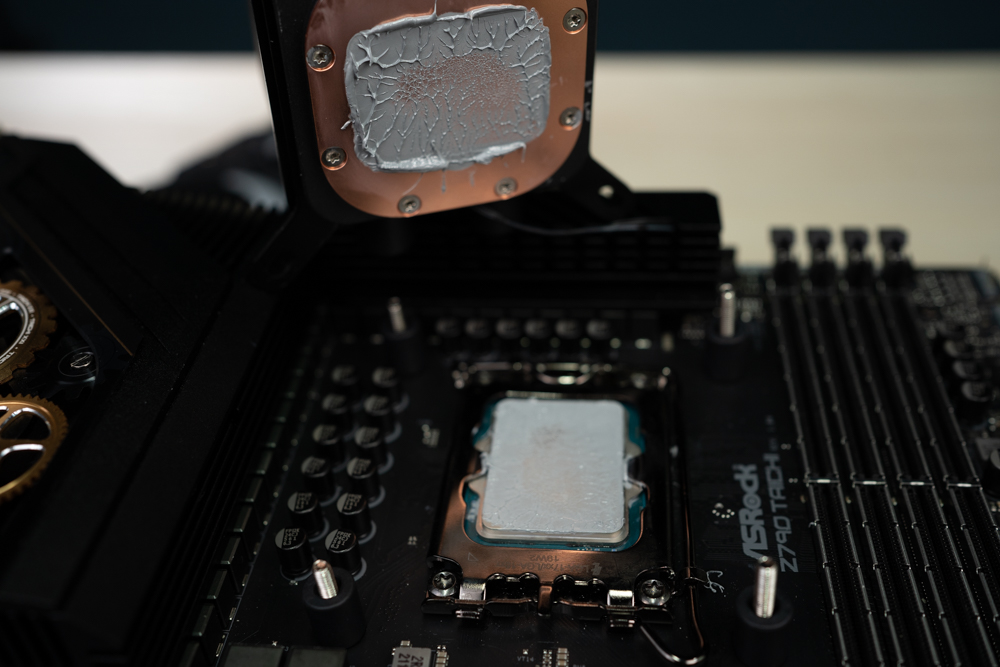
The image shows the CPU with thermal paste applied, ready for the water block to be placed on top. It appears that the thermal paste has been spread evenly across the CPU’s integrated heat spreader (IHS), which is essential for effective heat transfer.
Notable points about this stage of the installation process include:
- Even Spread: The thermal paste has been applied in a manner that should cover the entire surface of the CPU once the water block is pressed against it. The goal is to fill any microscopic gaps between the CPU IHS and the cooler’s base to prevent air pockets, which are poor conductors of heat.
- Correct Quantity: The quantity of thermal paste used seems adequate; too little would not cover the entire IHS, while too much could lead to spillage over the edges, which is not desirable but generally not harmful unless the paste is conductive.
- Preparation: The image also suggests preparation for the final stage of cooler installation. The surrounding area is clear, and the standoffs are in place, indicating readiness for the water block to be mounted.
Once the water block is placed down, it will be secured with mounting hardware, completing the interface between the CPU and the cooler. It’s important to follow the cooler manufacturer’s guidance for the correct amount of thermal paste and application method to ensure the best performance of the cooling system.
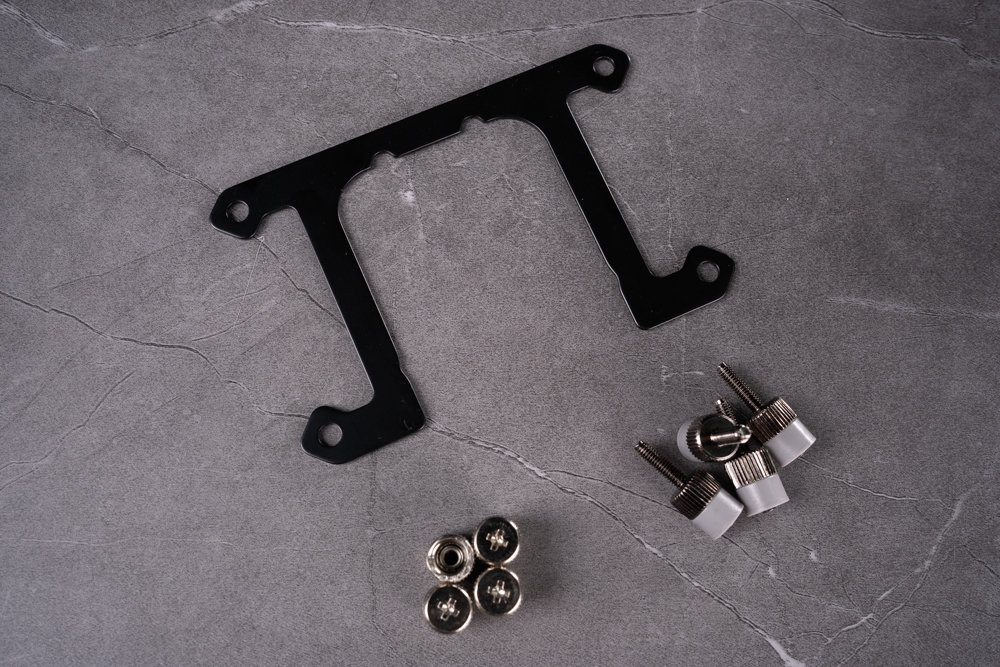
The specific bracket and standoffs required to mount a liquid cooler onto an AMD platform, indicating that the cooler is designed to be versatile enough to accommodate different CPU sockets.
Here’s what we can interpret:
- AMD Bracket: The black metal bracket is designed to fit AMD motherboard layouts. It will attach to the original AMD backplate that comes pre-installed on most AMD motherboards.
- Standoffs: The metallic standoffs screw into the motherboard’s backplate, providing the raised points on which the cooler will be mounted.
For AMD installations, the process typically involves:
- Using the Existing Backplate: AMD motherboards commonly include a backplate with threaded holes that the standoffs in the image will screw into.
- Attaching the Bracket: The bracket is positioned over the CPU socket and secured using the standoffs.
- Mounting the Cooler: Similar to the Intel installation, the cooler’s water block will be attached to these standoffs, ensuring the thermal paste has been applied to the CPU beforehand.
The consistency in installation steps across both platforms simplifies the process for users and reflects the modular design approach taken by cooler manufacturers to cater to a broad market. The specific bracket and standoffs shown provide the necessary compatibility to secure the cooler to the motherboard without the need for additional backplate modifications.
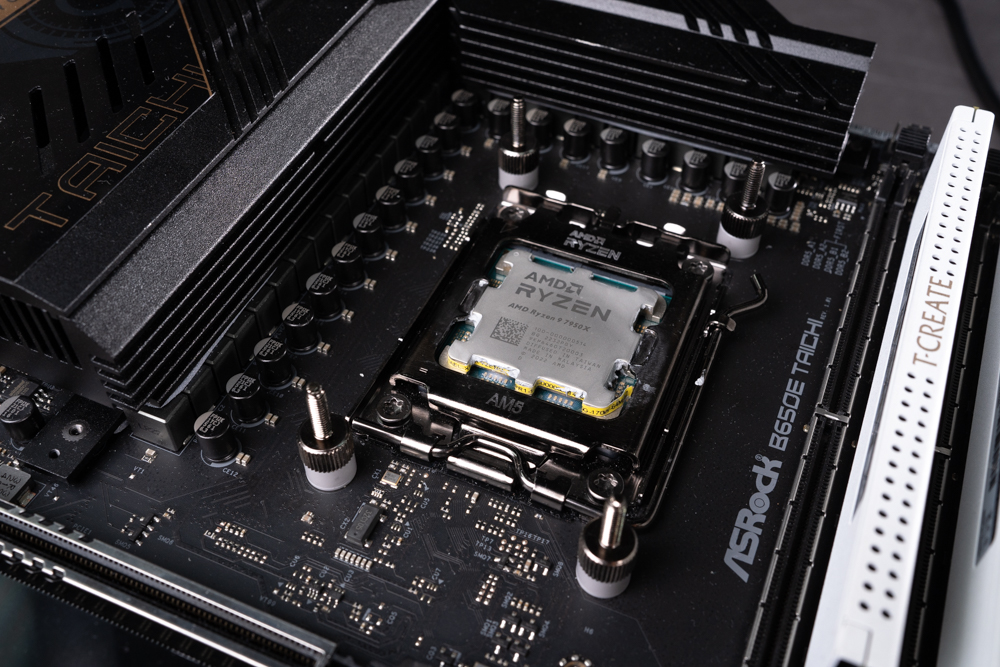
The front side of an AMD motherboard with standoffs installed in preparation for attaching a CPU cooler. An AMD Ryzen processor is already seated in the socket, and the standoffs are screwed into the motherboard’s original backplate, a common method of installation for AMD platforms.
Key steps and details include:
- Preparation: Prior to installing the standoffs, the CPU is correctly installed in the motherboard socket, and the original AMD mounting bracket has been removed, which is typical for many aftermarket cooling solutions.
- Standoffs Installed: The standoffs are securely in place, protruding above the motherboard to allow for the cooler’s bracket to be attached.
- Compatibility: The motherboard is an ASRock B650E TAICHI, indicating compatibility with the Ryzen CPU and, presumably, the cooler being installed.
The next steps would be to:
- Apply thermal paste to the CPU if it hasn’t been applied yet.
- Place the cooler mounting bracket over the standoffs.
- Secure the cooler to the bracket, completing the installation.
The installation process is designed to be user-friendly, with the cooler manufacturer providing all necessary components and instructions for proper setup. Ensuring that the standoffs are installed at the correct height and tightened appropriately is vital for the stability of the cooler and effective cooling of the CPU.
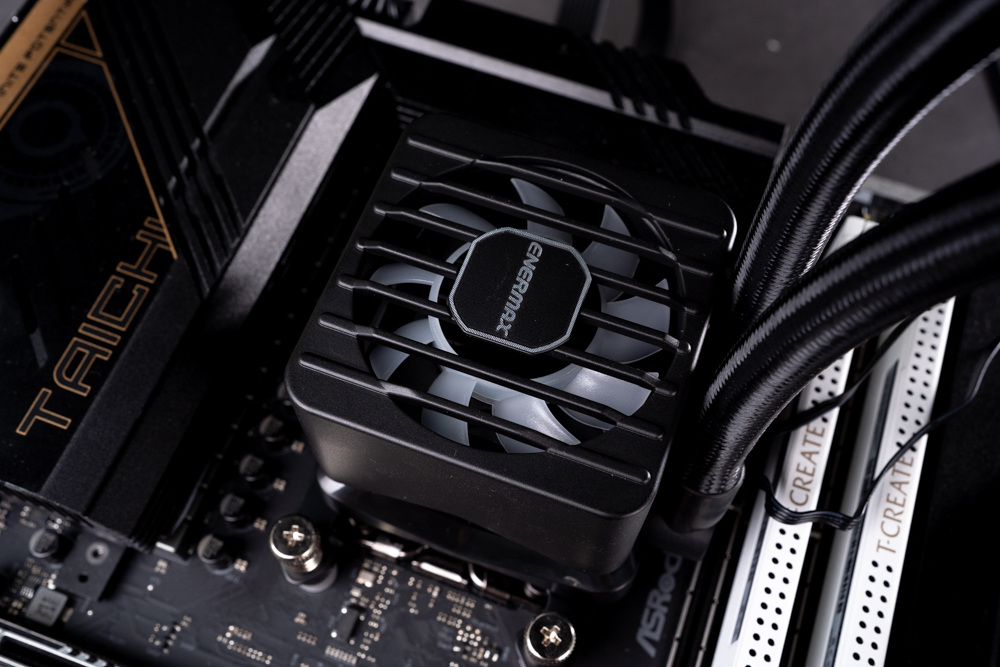
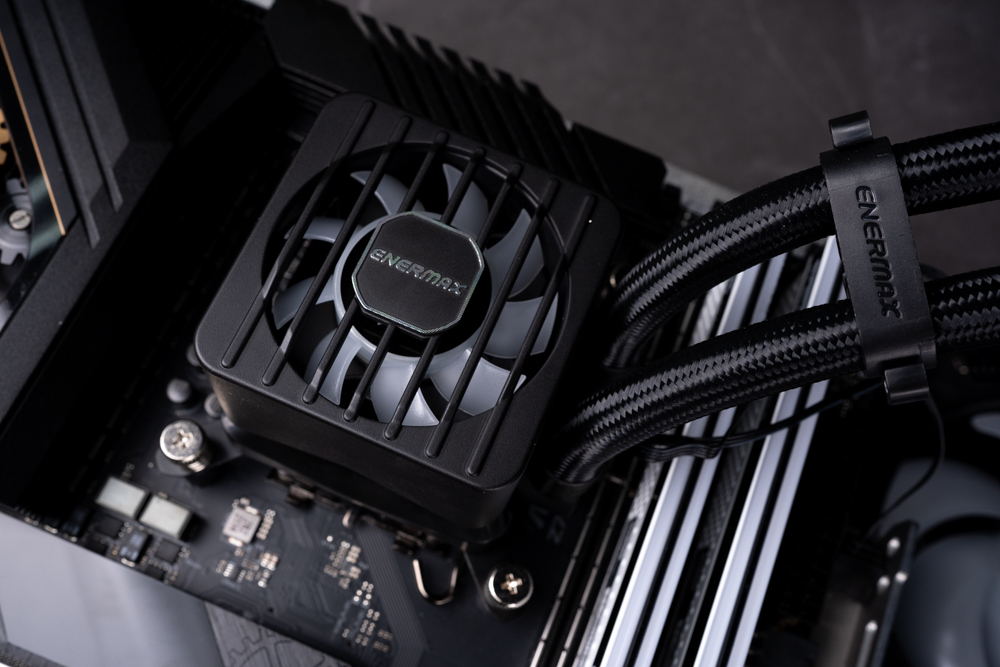
The final stage of the CPU cooler installation, where the water block has been placed on top of the CPU and secured to the motherboard using the four screws attached to the previously installed standoffs.
Key points in the process illustrated here are:
- Water Block Placement: The water block sits flush on the CPU, ensuring proper contact for heat transfer. It’s positioned so that the attached tubing can be routed neatly away from the block.
- Screw Fastening: Each screw is tightened to the standoffs, likely in a cross pattern to apply even pressure across the surface of the CPU for the best cooling performance.
- Final Check: It’s crucial to ensure that all screws are tightened securely but not over-tightened, which could damage the motherboard or the CPU socket.
The presence of the VRM fan atop the water block signifies additional cooling support for the motherboard’s voltage regulator module, providing a comprehensive cooling solution. The clean and professional installation implies attention to both functionality and aesthetics, enhancing the system’s overall performance and visual appeal. With the cooler mounted, the system is ready for operation, ensuring stable temperatures during use.
This image shows the CPU water block of the Enermax cooling system fully installed on the motherboard. Notably, the magnetic cover on the water block, which likely hides the mounting screws and adds a clean, polished look to the installation, seems to be adjustable or reversible, as suggested by the mention of its orientation.
Adjusting the direction of this magnetic cover could be a matter of personal preference or system aesthetics, ensuring that branding and design elements are presented in the intended orientation within the build. It’s a user-friendly feature that allows for easy access to the screws beneath if maintenance is needed, while also contributing to the overall visual appeal of the cooling setup. The magnetic attachment is practical, as it simplifies the process of removal and adjustment without the need for tools.
An open CPU cooling system, with the water block removed from the CPU to inspect the spread of the thermal paste. The paste appears to have been compressed between the water block and the CPU, which is what would happen during normal installation.
Observations and conclusions from the image:
- Thermal Paste Spread: The imprint on the water block indicates that the thermal paste was spread across the majority of the CPU’s IHS (Integrated Heat Spreader), which is essential for efficient heat transfer.
- Proper Application: The pattern suggests that pressure was evenly applied when the water block was mounted, an important factor for effective cooling.
- Amount of Paste: The amount of thermal paste appears adequate. There isn’t an excessive overflow, which is good because too much thermal paste can actually impede heat transfer.
- Re-application Necessary: After checking the thermal paste spread, it’s important to clean off the old paste from both the CPU and the cooler and reapply a new layer before remounting the water block. Reusing old thermal paste can lead to air bubbles or uneven spread, which compromises cooling efficiency.
The state of the thermal paste after removal of the cooler is an important diagnostic tool in ensuring that the cooler is seated correctly and functioning as expected. The image shows that the previous installation was likely successful in terms of thermal paste application.
Enermax LIQMAXFLO Liquid Cooler Performance Review on Intel i7-12700K vs. AMD Ryzen 9 7950X
Based on the provided testing results, both the Intel and AMD platforms showed distinct thermal performance under various stress conditions using the ENERMAX LIQMAXFLO 360 ARGB liquid cooler.
AMD Platform Test Results:
- AIDA64 FPU Test: Reached a maximum temperature of 95°C, which is on the higher end but within the thermal limit for short-duration stress tests.
- AIDA64 CPU Test: Recorded a temperature of 77.5°C, which is a decent result for CPU-centric stress testing.
- 3DMARK Fire Strike Ultra: Showed a temperature of 54.5°C, indicative of good performance under GPU stress conditions.
- Cyberpunk 2077 Benchmark: Yielded a temperature of 71.2°C, a solid performance in a real-world gaming scenario.
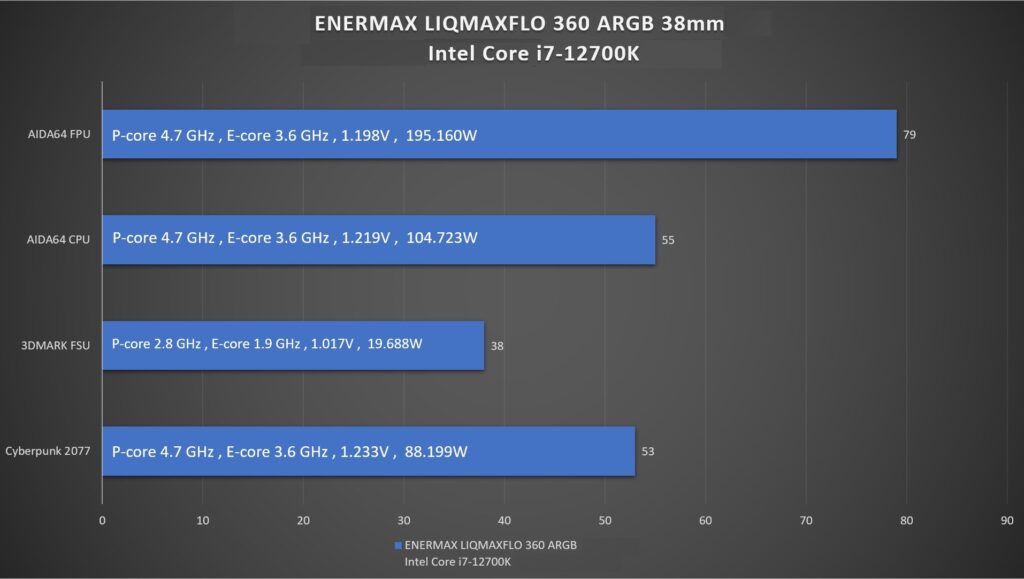
Intel Platform Test Results:
- AIDA64 FPU Test: Achieved 79°C, which is a strong performance, especially compared to the AMD results.
- AIDA64 CPU Test: Recorded a significantly lower temperature of 55°C, showcasing the cooler’s efficient handling under CPU load.
- 3DMARK Fire Strike Ultra: Reached 38°C, suggesting excellent thermal management during graphic-intensive tasks.
- Cyberpunk 2077 Benchmark: At 53°C, the system maintained a cool operation during gaming.
Analysis:
The Intel i7-12700K system consistently maintained lower temperatures across all tests compared to the Ryzen 9 7950X. The difference in temperatures can be attributed to various factors such as thermal design power (TDP), workload handling between the two architectures, and possibly the efficiency of the liquid cooling system in relation to the different CPU structures.
It’s notable that the AIDA64 FPU test on the AMD platform pushed temperatures close to the CPU’s thermal threshold, which might be expected given the extreme load this test puts on the CPU’s Floating Point Unit. However, the overall cooler performance across different types of loads—from synthetic benchmarks to actual gaming—appears to be satisfactory for both platforms, keeping temperatures within safe operational ranges.
Given the test environment’s open platform and room temperature of 24°C, these results should be considered with the understanding that they might differ in a closed-case scenario due to different airflow dynamics.
For optimizing system performance, it might be worth exploring additional cooling strategies, such as case fans and airflow optimization, especially for the AMD platform under high thermal loads. It’s also essential to ensure that the thermal paste application and the cooler’s mounting pressure are optimal for the best heat transfer efficiency.
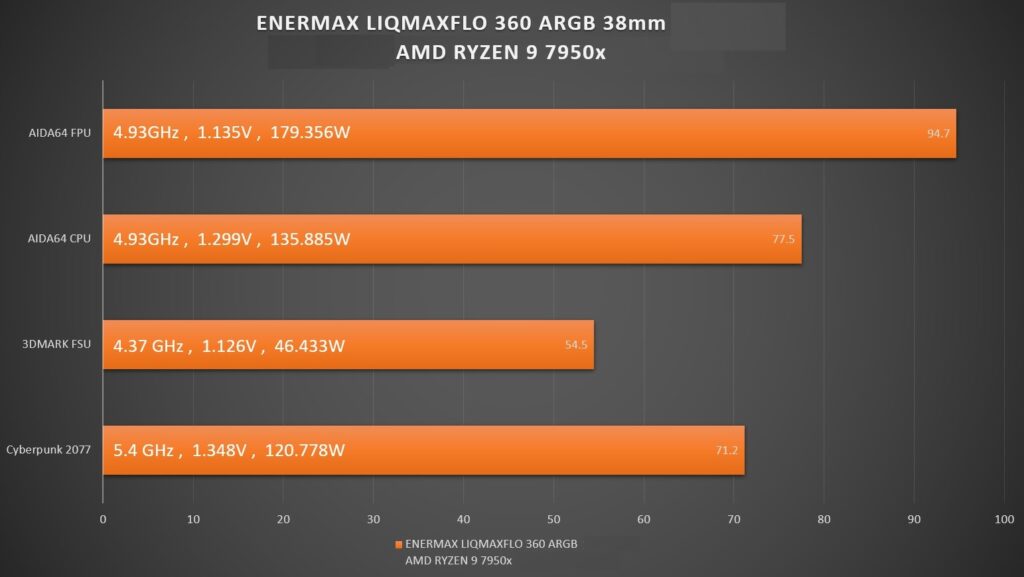
The chart illustrates the cooling performance data for a Ryzen 9 7950x processor using the ENERMAX LIQMAXFLO 360 ARGB 38mm cooler over a period of ten minutes across various stress tests and applications. Here’s a breakdown of the results:
- AIDA64 FPU: Under this intense test, the CPU reached a clock speed of 4.93 GHz at 1.135V, with a power consumption of 179.356W, resulting in a high temperature of 94.7°C.
- AIDA64 CPU: This less rigorous CPU-specific test had the same clock speed and a slightly higher voltage of 1.299V but with lower power consumption of 135.885W, achieving a temperature of 77.5°C.
- 3DMARK Fire Strike (FSU): During this GPU-centric benchmark, the CPU’s clock speed was reduced to 4.37 GHz at 1.126V, with a significantly lower power draw of 46.433W, and maintained a temperature of 54.5°C.
- Cyberpunk 2077: In the gaming benchmark, the CPU was pushed to 5.4 GHz at a higher voltage of 1.348V, consuming 120.778W, and recorded a temperature of 71.2°C.
The data reflects that the ENERMAX cooler is capable of handling the Ryzen 9 7950x under various workloads, although it does reach near thermal limits under extreme CPU stress tests like AIDA64 FPU. This is not uncommon, as such tests are designed to generate maximum heat output that may not be representative of typical daily usage.
In real-world applications like gaming (Cyberpunk 2077), where the CPU is not constantly under maximum load, the temperatures are significantly lower, indicating that the cooler performs adequately in typical scenarios.
These results are valuable for users who want to understand how this cooling solution performs under different conditions. It is especially informative for those looking to push their systems with high-end CPUs like the Ryzen 9 7950x, as they can anticipate temperature ranges and adjust their system settings or cooling solutions accordingly.
Summary of experience
The Enermax LIQMAXFLO 360 ARGB appears to deliver commendable cooling performance, potentially owing to its 38mm thick radiator and the latest generation Enermax patented dual-chamber water block design. Precision-calibrated special specification fans also contribute to its silent yet efficient cooling capabilities. The VRM fan on the water block is a considerate feature for extra motherboard cooling, beneficial for other components in the vicinity.
The comprehensive manual and supplemental materials make the coolant replenishment process straightforward, and the product’s five-year warranty, supported by a purchase invoice, adds a significant value proposition.
A reminder for prospective buyers to check compatibility with their PC cases is pertinent, as not all cases may accommodate the size of this cooling system. And there’s an expression of interest for a white version of the LIQMAXFLO series, hinting at the aesthetic preferences some builders might have for their setups.
Overall, the LIQMAXFLO 360 ARGB by Enermax seems to be a solid choice for those seeking an effective cooling solution for high-performance CPUs, with additional features that show a well-rounded approach to system cooling.
If this article is helpful for you, please share this article with your friends on social media. Thank you!
This article is based on the personality of the reviews. You are responsible for fact-checking if the contents are not facts or accurate.
Title: ENERMAX LIQMAXFLO 360 ARGB Review: Unveiling the Thick 38mm Radiator & Innovative VRM Fan for Optimal Cooling